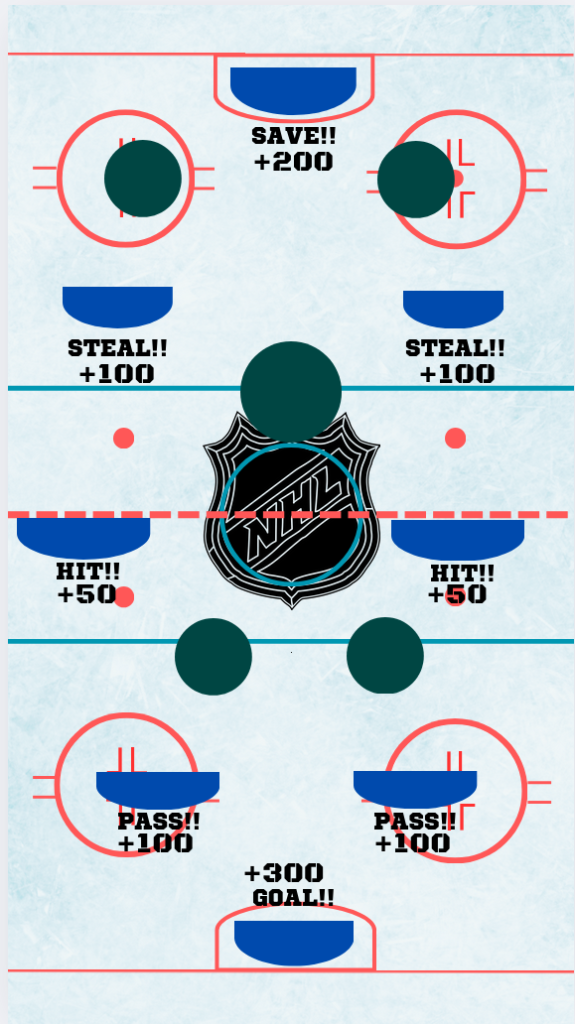
When beginning to ideate on what I would seek to build, I was trying to start with by asking myself: what an under-represented theme for tables would be, or what hasn’t been done much or recently. I knew I wanted to try something I was familiar with, and I chose to focus on sports. I feel it doesn’t get a ton of attention with tables, especially with pop culture licensed tables making the majority of the money and sales.
My designs were mainly revolving around how to innovate with the “buckets” that I could create to catch the ball shots. I originally wanted to do large holes in the main board, but I found it to be much more reiterable and reusuable to just create objects on top of the play board to collect the score zones.
(Original Sketches and inspo)
I moved on to my actual physical construction. I reused cardboard from the kit in an order to reduce the waste of it and to make do with what I had available. I created all of the playfield in Canva and created the concepts for what it would look like in the final version.
I created a first version of the field in Canva that told me where to put the goals and obstacles (which is the exact one I used on the final version) but made a copy to make a rough “pin” draft.
(First Ver)
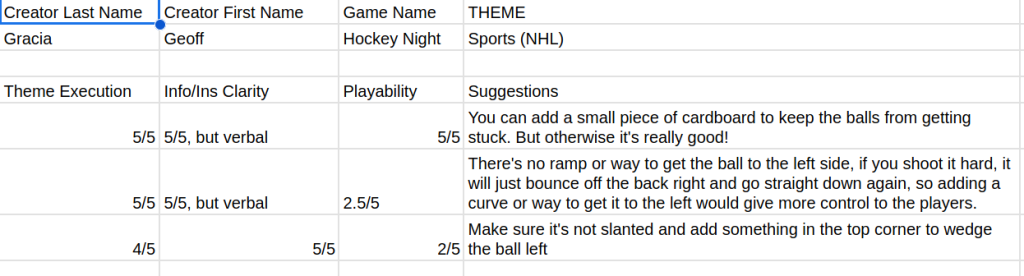
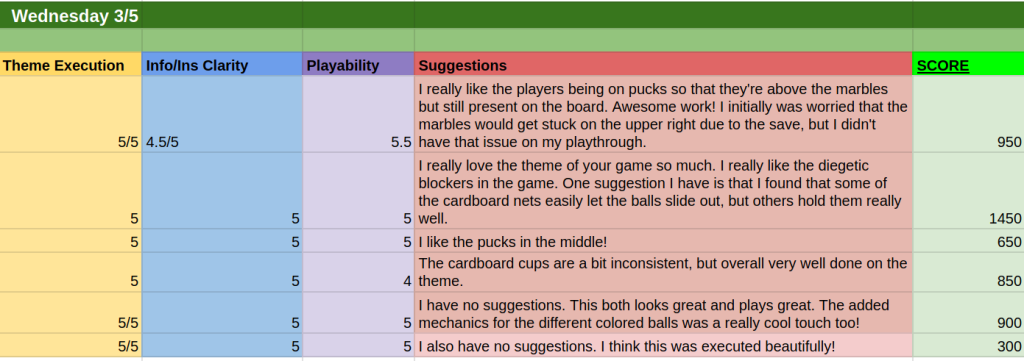
I got this feedback on the first version’s demo day:
I took a lot of that feedback and did what I could during that day to improve the experience
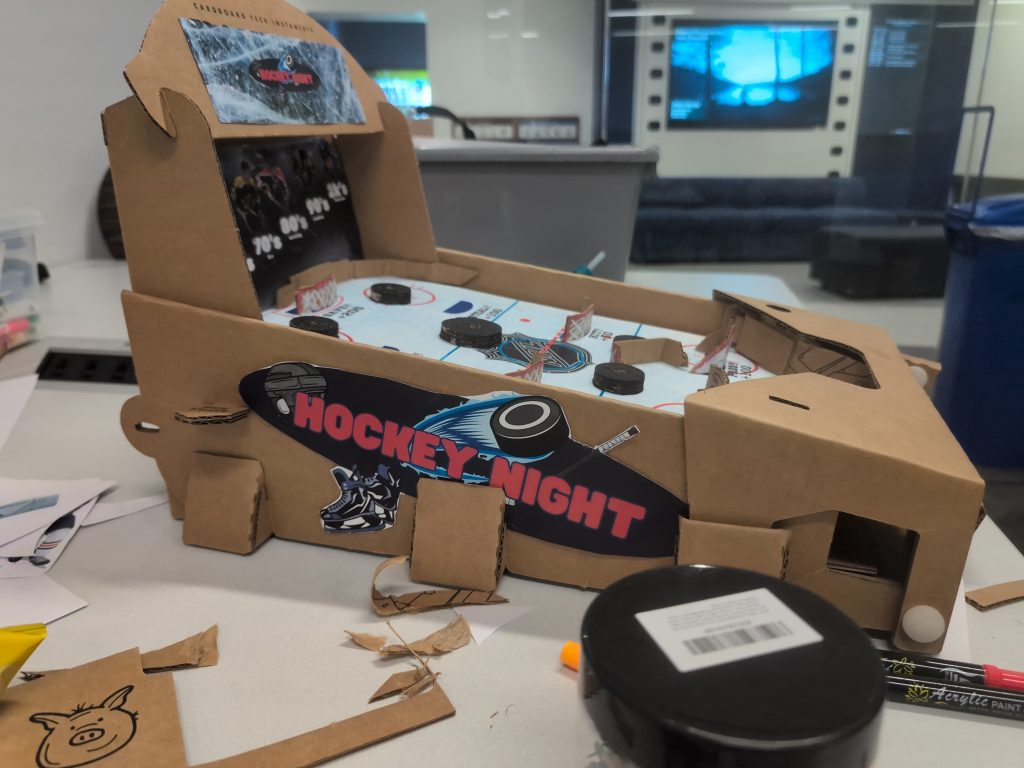
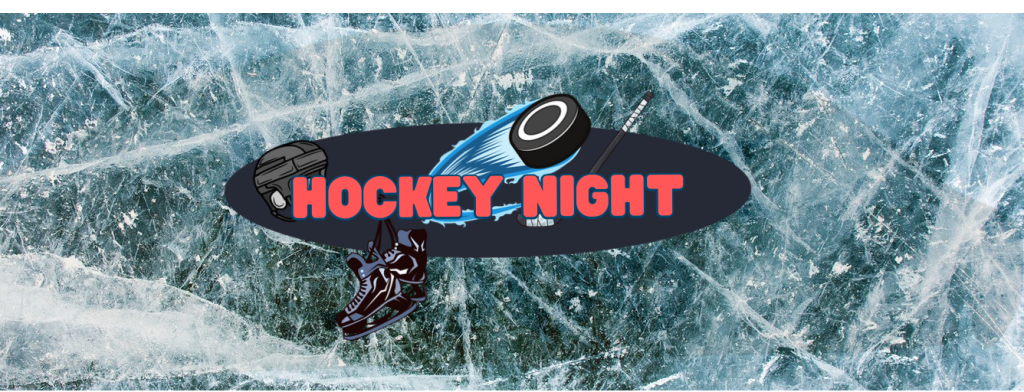
I created and attached a consistent logo and branding, an interesting backglass that I had imagined prior, machined wooden pucks to fit in their spaces on the field as the obstacles, made and painted the small cardboard “net” buckets, and cut out and created “toys” that would go on the puck obstacles. I added a “rules” play card to the side on demo day (it appears in the video at the bottom launcher section).
There was a small amount of time where I tried to 3-D print the nets and pucks but they were so small that it didn’t work correctly.
It was safe to say that I corrected almost all of the issues in the gameplay, and really committed to the visual style I had in mind in a way that was well recieved and executed well enough.
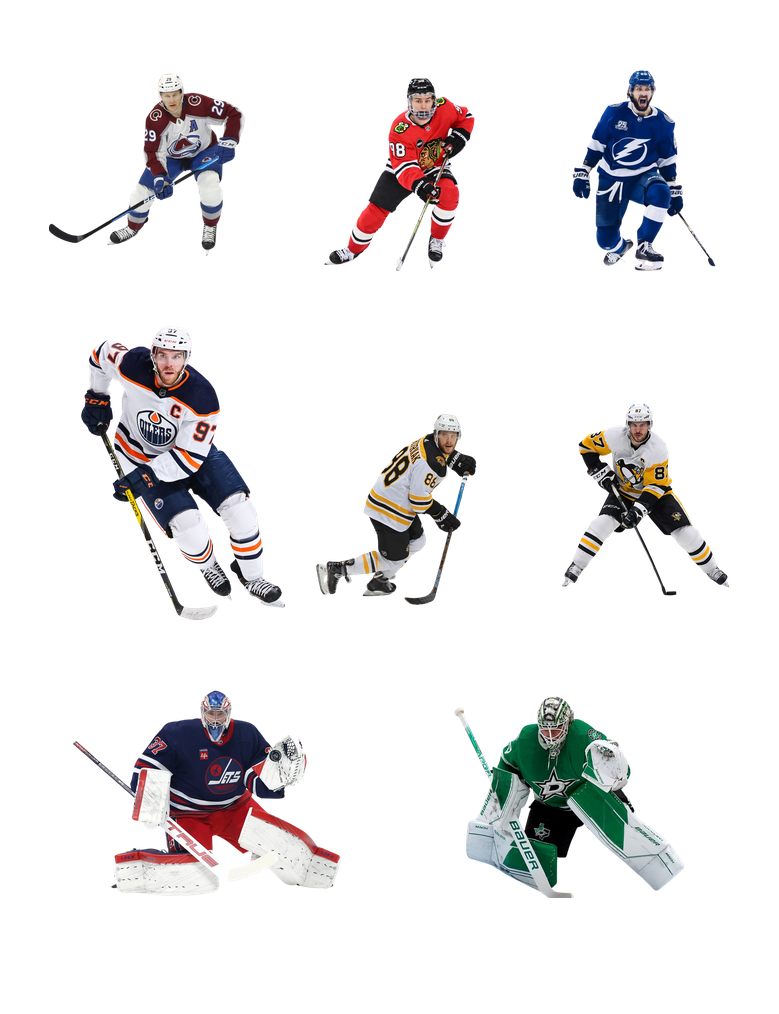
I wanted to also include the assets I made for visual reference (The hockey players were professional photographs that I “subject removed”). See all below
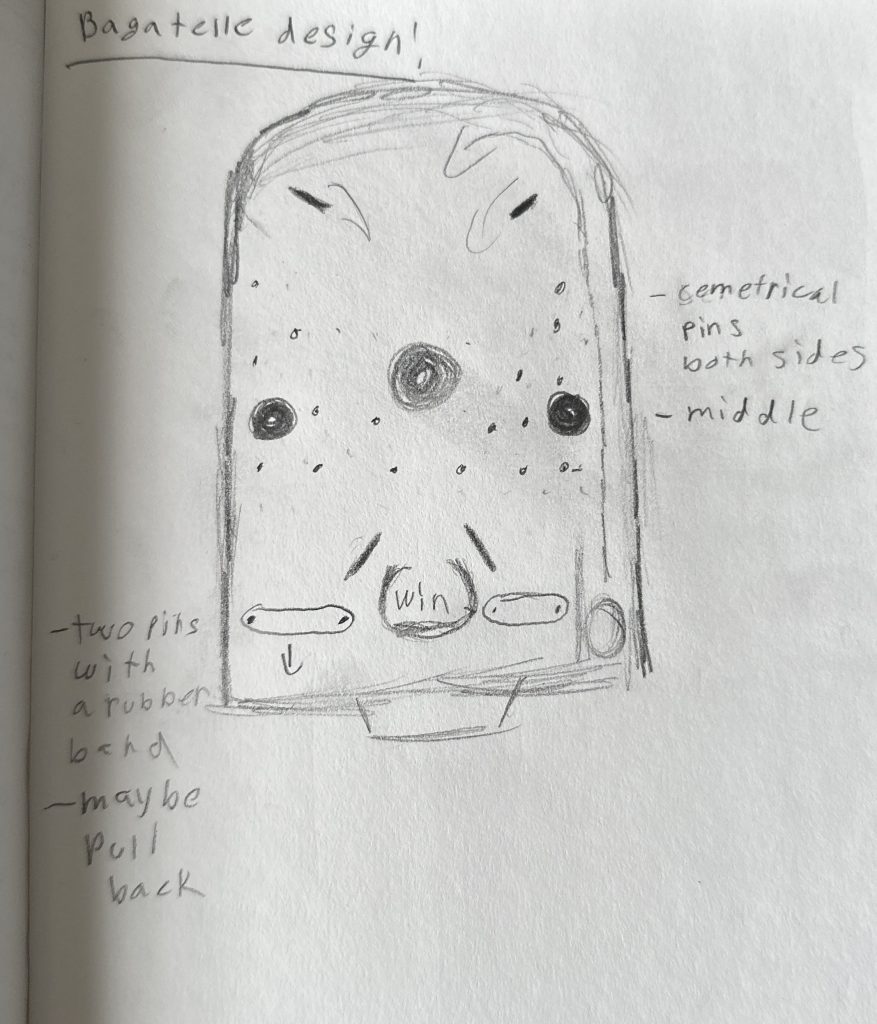
Coming up with an initial design for my Pinbox Bagatelle game was a challenge. I spent a lot of time looking at various bagatelle designs for inspiration, but I didn’t have a specific reference in mind. However, one element remained consistent throughout my iterations: I wanted a single win hole rather than multiple point-scoring holes.
The first draft of my design featured a symmetrical pin layout with three circular bumpers disrupting the ball’s path. Additionally, two flaps at the top were designed to redirect the ball toward the center. One of the most distinct features in this version was the use of rubber band bumpers at the bottom. At this stage, my idea was to have a game that continued until the player won. The rubber band bumpers made it almost impossible for the ball to exit the playfield, allowing players to keep bouncing it back up. However, as I refined my concept, I realized that this mechanic strayed from the traditional spirit of bagatelle.
Rough Physical Design
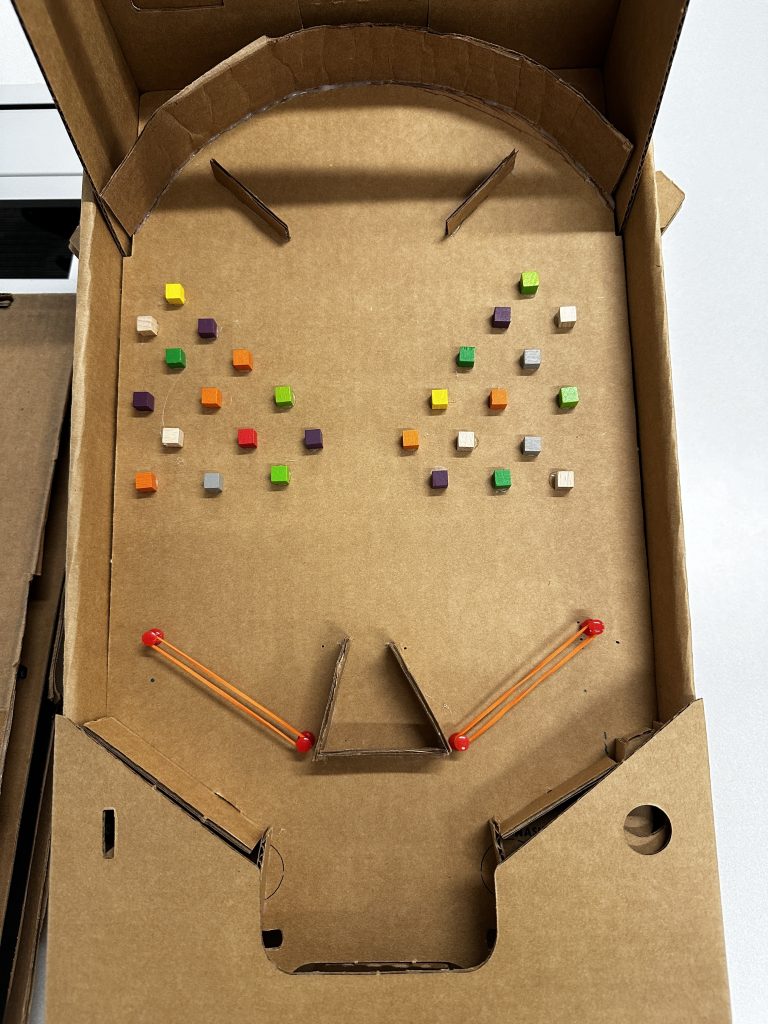
Once I built a rough prototype, I really started to explore the concept of control in gameplay. However, at this point, I still hadn’t figured out a concrete theme for my game. The rough physical design maintained the symmetrical pin layout from the initial sketch and included a curved top inspired by traditional bagatelle boards. The disruption flaps at the top also remained.
One significant change I made in this iteration was modifying the rubber band bumpers. Instead of using them to keep the ball in play indefinitely, I turned them into additional ball catchers alongside the win hole, introducing a losing condition. This opened up the bottom of the playfield, allowing the ball to exit. Another major alteration was the removal of the round bumpers. I initially made this change due to a lack of suitable materials, but it turned out to be a happy accident, one that would later help define my game’s theme.
Playtesting and Iteration
While I didn’t get the chance to have others playtest my game, I conducted extensive solo testing. As soon as I finished the rough prototype, I started experimenting with how the ball moved. One of the first issues I encountered was that the ball struggled to reach the top of the playfield, which led me to add a shooter lane.
However, after adding the shooter lane, I encountered another unexpected problem: the transition between the right wall and the curved top wasn’t smooth. The ball would hit a wedge and lose momentum rather than gliding smoothly across.
To address this, I extended the curved top further down along the right wall, creating a seamless surface that allowed the ball to flow as intended.
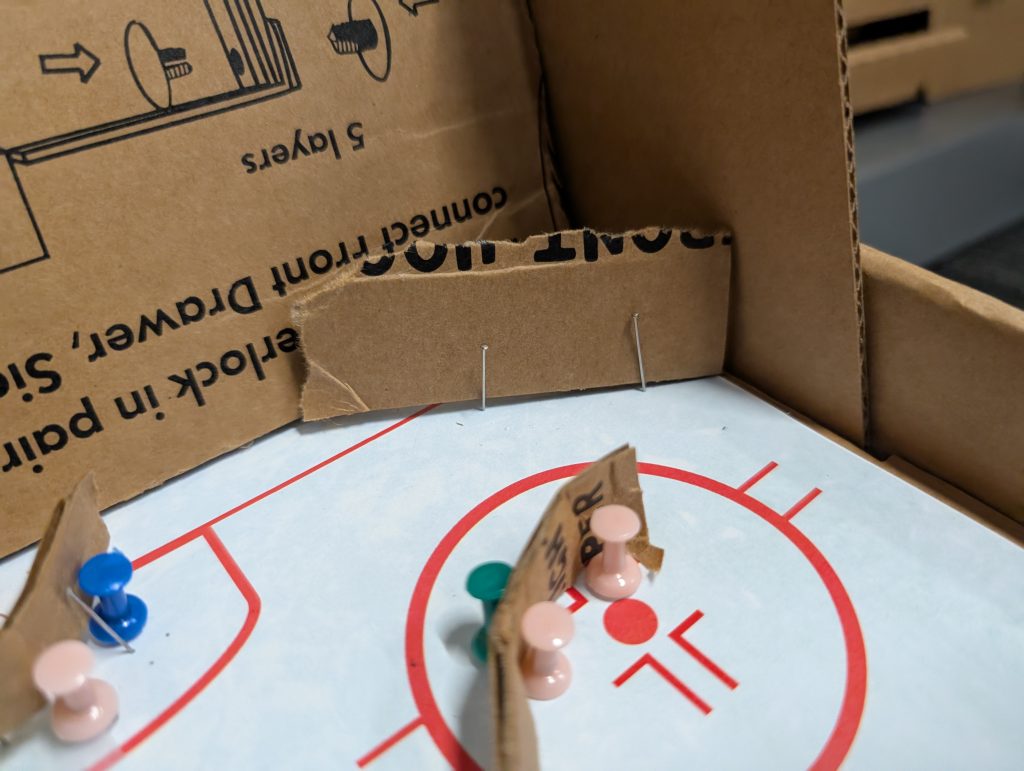
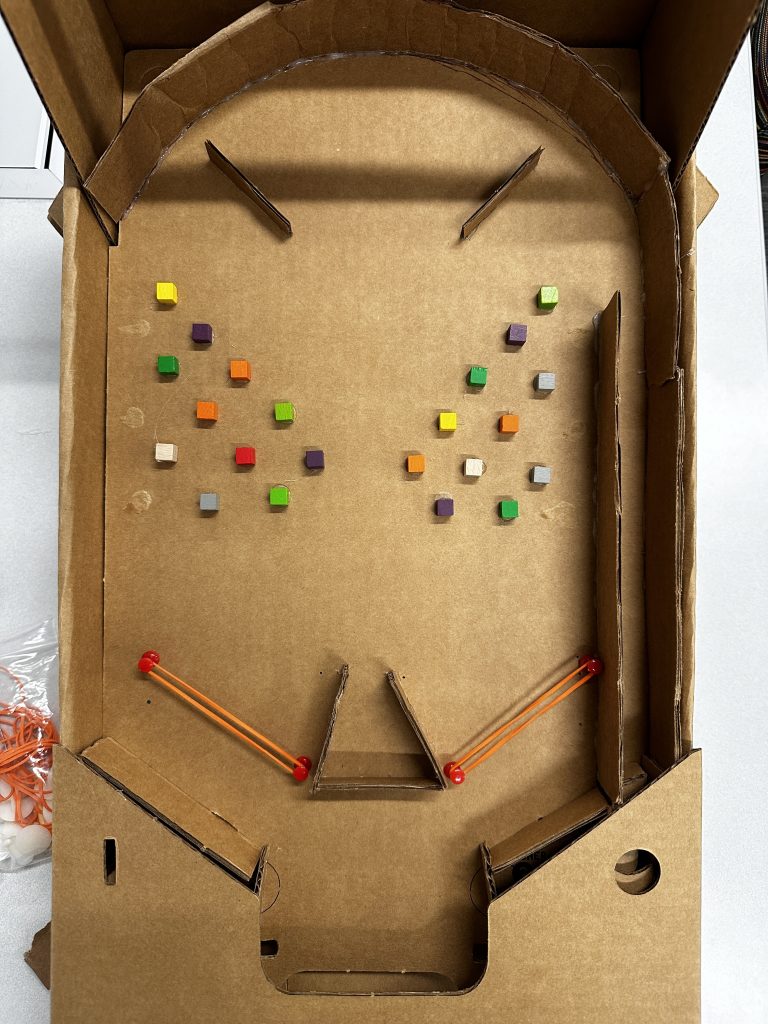
Another major discovery during playtesting was that my pins were too closely spaced, which caused the ball to get stuck in unwanted places. To fix this, I removed some of the pins, which led to a surprising realization. I had unintentionally created three distinct lanes:
A left lane for when too much force was used
A right lane for when too little force was applied
And a middle lane for when the player used just the right amount of strength
Then, during one particular playtest, I pulled the launcher back with just the right amount of force, and the ball landed perfectly in the win hole. That’s when it hit me, my game was all about control. The core challenge wasn’t just getting the ball into the win hole but mastering precision and finesse to find the perfect balance of force.
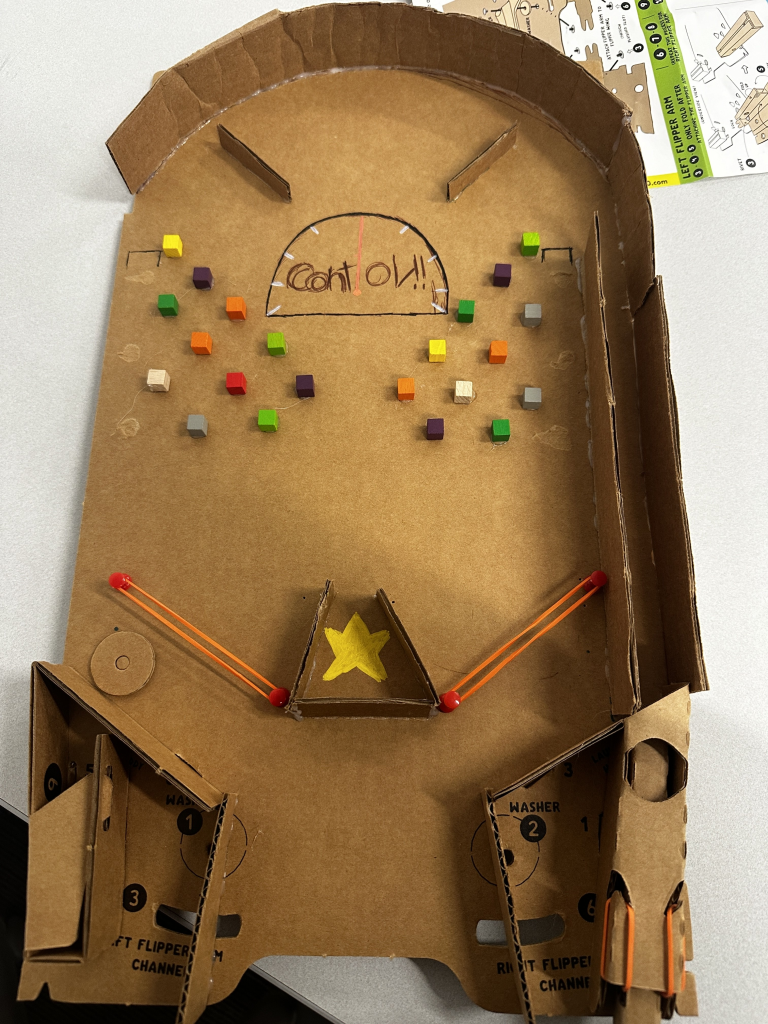
Final Design
This is the final design for my game, Control, a game all about self-control. To effectively communicate this theme, I implemented a speedometer-style visual design. A fully filled bar to the left represents pulling back too hard, while a barely filled bar to the right represents pulling too weakly. In the center, players see the game’s logo, featuring a speedometer pointing straight to the middle and the winning hole positioned below it, reinforcing the idea that the goal is to shoot with just the right amount of force.
Unfortunately, in the final physical version, I didn’t get the chance to fully realize my intended design. The playfield is missing the two power bars on each side, which would have further reinforced the theme. However, if I were to revisit this project, adding those elements would be an easy improvement to make my game feel more complete, along with finishing its logo.
I’m excited to move on to designing a pinball machine, incorporating the lessons I learned from making this bagatelle. While the plain brown cardboard look worked well for a bagatelle (since traditional bagatelles often had simple wooden designs) my pinball machine will need a much more eye-catching aesthetic to stand out among real machines.
My original idea for this revolved entirely around something which I had seen on some of the example bagatelle designs we were shown, where the ball went around the entire board when it was originally shot out, and looped around and back up into the actual play space. Eventually, this evolved into the idea to turn the bagatelle into a racing-themed one, but I wasn’t able to find enough time to illustrate that.
Changes Made
At first, I really only had the looping mechanic down for the first couple of play tests, which was a little unfortunate, as I didn’t really have a way to “score”. So from then on I focused on thinking about how to approach scoring, but I realized I had an issue, since I could do something with adding pins to the board to act as scoring zones, but because the ball looped around and shot out from the bottom, instead of shooting up to drop from the top, it would be very hard to put those scoring zones in places where they were both out of the way and also able to be scored in. So instead, I decided to cut holes in the board. It sort of worked, but it didn’t really end up working or looking super great. However, it did create a pretty satisfying feeling when you did manage to sink a ball into the holes.
User Reactions
When we did the first play tests, I definitely didn’t have enough to show for with only having the looping mechanic, so I won’t touch on that play test as much. But for the ones that followed, I had managed to get the holes in the board, and “scoring” was somewhat implemented. Overall, most people did enjoy the looping mechanic and being able to absolutely pelt the ball around the board. There was also some feedback about how satisfying sinking the ball into the scoring holes was, but there was also a lot of feedback about how the game lacked any sort of theming or art to it, which is totally fair, since I didn’t manage to get any art onto the board unfortunately. Overall though, minus not really getting any art incorporated, I think I did a pretty decent job at making something that I have very little experience with making.
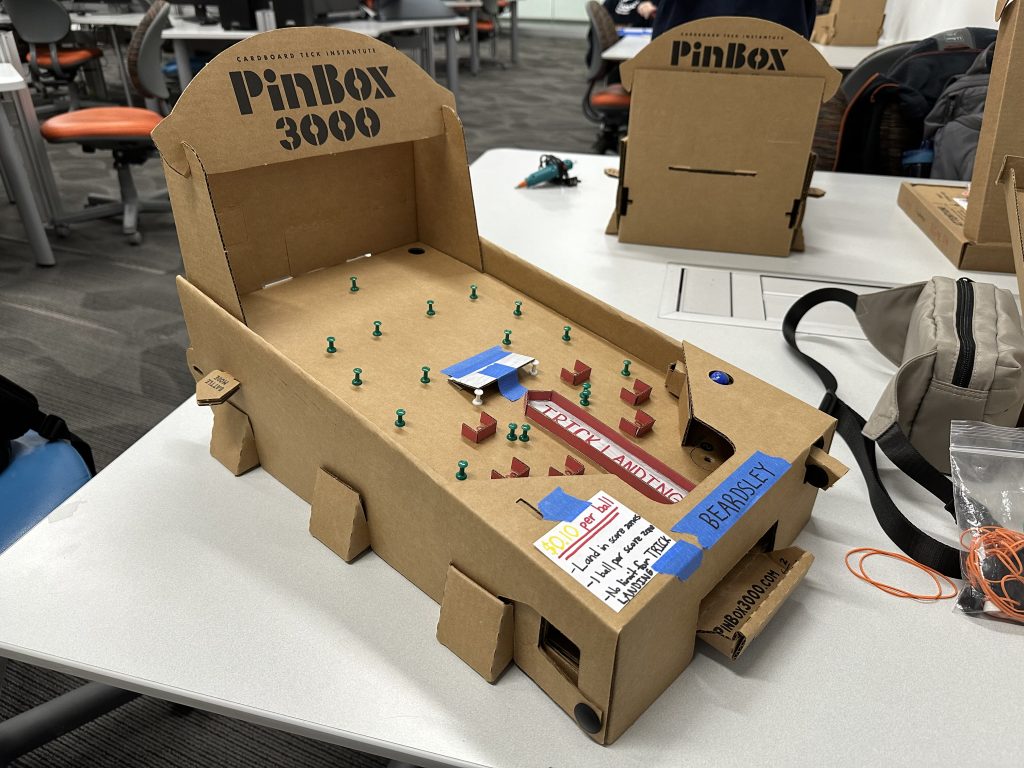
While brainstorming ideas for what I would make a bagatelle game about, I focused on the aspect of freely moving down a slope and came upon the idea of downhill skiing. Although I’m not a skier myself, I’ve always thought that it looks fun and I want to try it one day. I thought that downhill skiing would be a perfect theme for a bagatelle game since both skiers and the ball go from the top of a slope and head toward the bottom of it.
I wanted my bagatelle game to look just like a piste. In order to accomplish this, I centered the features of my game around what one might actually find at one. The main features that I planned are as follows:
The ball which represents the skier themself
Pins scattered throughout the board that represent trees
Pockets that represent runouts
A ramp
An area only accessible via the ramp that represents a landing zone
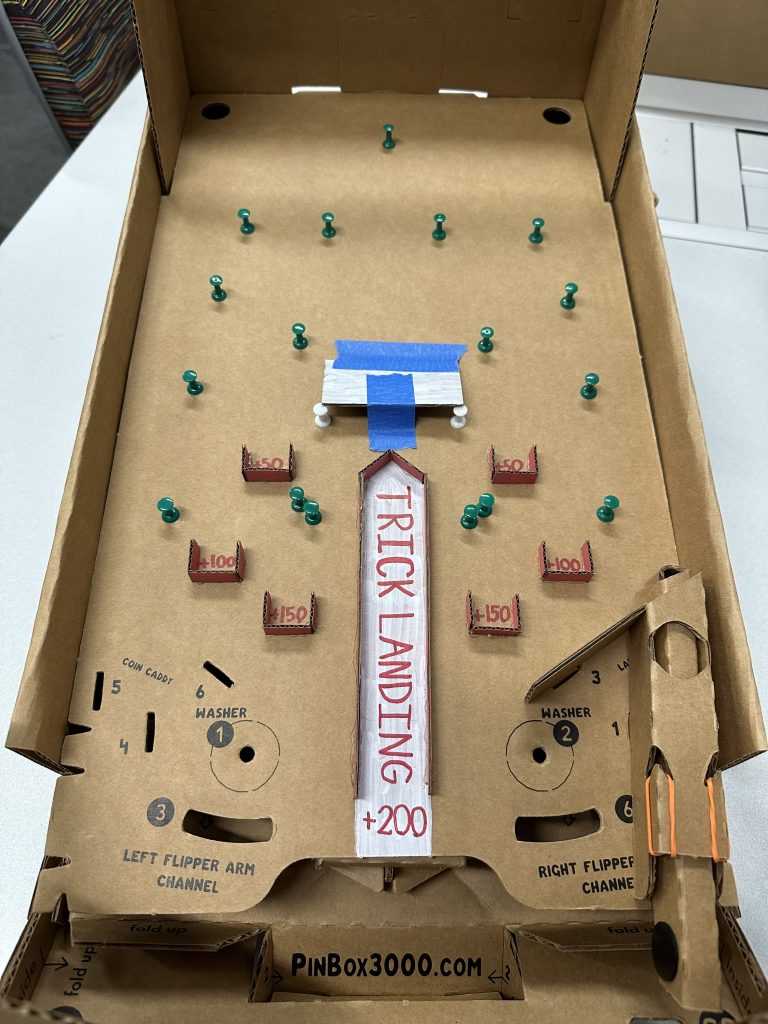
In the initial plan for my bagatelle game, the rules allowed for a player to shoot 8 balls, one at a time. The way to score points was to land the ball into any of the unoccupied pockets, which would yield its labelled point value. The most rewarding pocket was blocked off, so the only way to score from it was to get the ball to catch air over the ramp so that it could land inside of it. Each pocket could only have one ball in it at a time, and if they were all full before each ball was used by the player, then each unused ball would automatically be converted to an additional 200 points for the player. If the player were to completely miss all of the pockets with a ball, then it would yield no reward and did not grant an additional attempt.
Initial design sketch for Skitelle
Initial Design
As I actually started building Skitelle, I noticed that I was going to have to change a few aspects of it.
Prior to starting construction, I realized that the way that I had laid out the pins would end up making it incredibly hard to score. As a result, I decided to shift some around and remove others. I also decided to make the layout of the pins symmetrical for the sake of consistency.
Additionally, I made the choice to make the pockets out of cardboard walls instead of pins, since using the pins that represented trees for scoring zones made it look like the “skier” was being rewarded for crashing into a group of trees. I also realized that getting into the most valuable pocket with the ramp would be virtually impossible this way, so I decided to replace this pocket with a “TRICK LANDING” zone. This zone encompassed much more area than the original pocket, and now also utilized cardboard walls instead of pins. Still only accessible via the ramp, the new “TRICK LANDING” zone was designed to offer much more forgiveness for players who were aiming to make a “trick landing”.
Another change that I made was straightening out the base and top of the ramp and giving it a consistent width entirely. I made this choice because I did not have the skills or materials necessary to warp cardboard into such a precise shape.
Finally, I also chose to change up a few of the rules a bit. Instead of giving the player 8 balls, I decided that players would play in “sessions” instead, where they chose how many balls they got to shoot, at the price of 10 cents per ball. The other rule that I changed was that I removed the score zone exclusivity limit for the “TRICK LANDING” zone. By doing this, I ensured that Skitelle no longer had a limit to what the highest score possible was.
Various angles of the initial physical design of Skitelle
Playtest Results
After some playtesting on the behalf of others in my class, I learned that majority of the playtesters liked the theme that I’d picked out for the game, and that they also thought the rules were conveyed to them clearly.
I also learned, however, that there were quite a few flaws that I needed to work on. The general consensus about this version of Skitelle was that it was too hard, for a variety of reasons. Players had difficulty scoring because of the small size of the pockets, and the ramp was not at a feasible angle to make a “trick landing” possible. Players also noted that it was very difficult to aim the ball because there were no guide walls at the top of the machine or by the launcher.
Final Design
As a result of playtesting and trying Skitelle myself, I made even more changes to accommodate for the issues that were discovered.
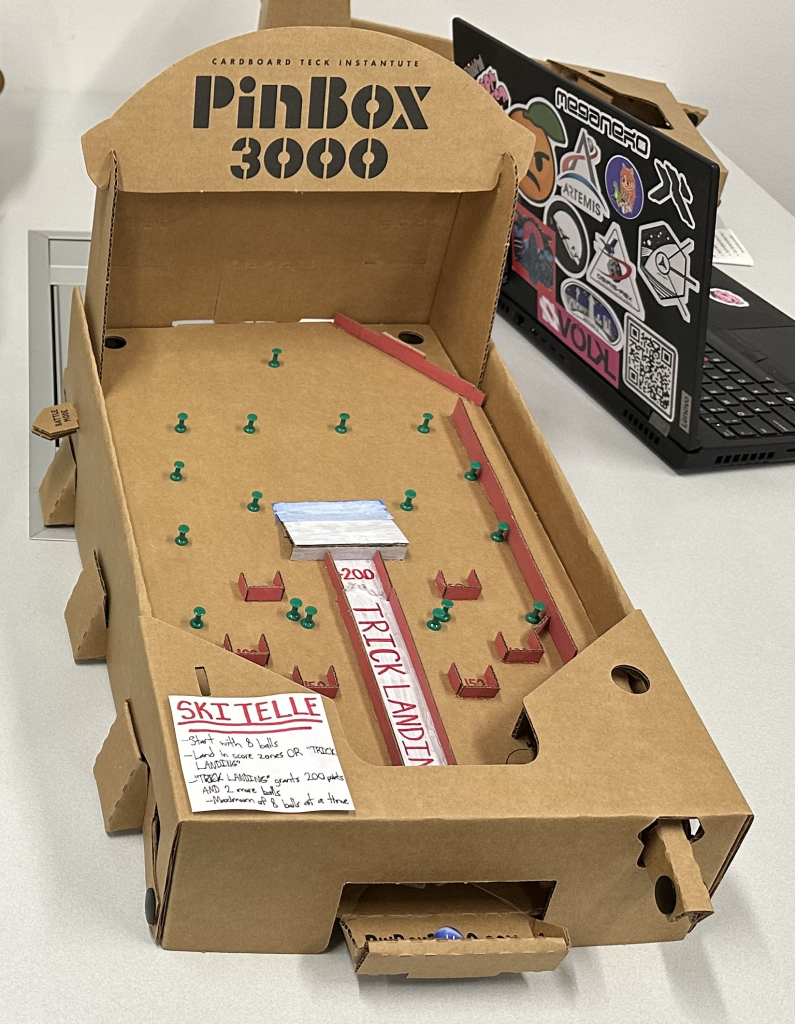
I firstly added a guide wall that ran parallel to the side walls of the machine so that balls would go straight after being launched. In addition to this wall, I added another one at a slant by the top right corner of the machine to direct launched balls to the left. I decided to add these walls to the machine to make the aiming experience much more consistent for players.
To tackle the “TRICK LANDING” issue, I made two modifications. The first change that I made was that I lowered the angle that the ramp stood at. I decided to do this because the harsh angle that it stood at before was part of the reason as to why making a “trick landing” was impossible. After lowering the intensity of the ramp’s angle, the ball was now able to actually roll over it, but it still could not catch air. Because it couldn’t catch air, I made the second change: extending the walls of the “TRICK LANDING” zone to the edge of the ramp. This change made it so that the ball only had to roll over the ramp, in the right spot, to make a “trick landing”. With this, there was no way for making a “trick landing” to be impossible anymore.
I also once again changed up the rules for the final version of Skitelle. I reverted the change to how to obtain balls and made the starting ball count 8 balls again. Additionally, I made it so that if a “trick landing” was made, the player would be granted an additional 2 balls on top of the points that they earned. I did this because I think that the monetization on the balls was too harsh in the previous ruleset, and it promoted paying to get high scores. Although playtesters did not have to pay to play, I could imagine that it would’ve been a frustrating system to deal with for them regardless. I also decided to make “trick landings” more rewarding because despite the changes I made to the ramp and zone, they were still difficult to perform. By granting an additional 2 balls for making a “trick landing”, I was able to maintain the lack of a highest score possible while also being able to reward players with an opportunity to play for longer.
Various angles of the final physical design of Skitelle
Final Thoughts
After doing some playtesting with the final version of Skitelle, I came to find that players generally appreciated the improvements. There were certainly still issues with the game, such as the small score pockets, but players were excited to be able to make trick landings, and, although it was still difficult, the game felt a lot more balanced than it did before.
My experience making my own bagatelle game has been quite the journey, and I learned a lot about it along the way. I had a great time designing and building Skitelle, and I’m glad to say that I am proud of what I created!
Gilded Age Initial SketchThe Gilded Age Initial Build.Gilded Age Final Build.
Initial Design Ideas:
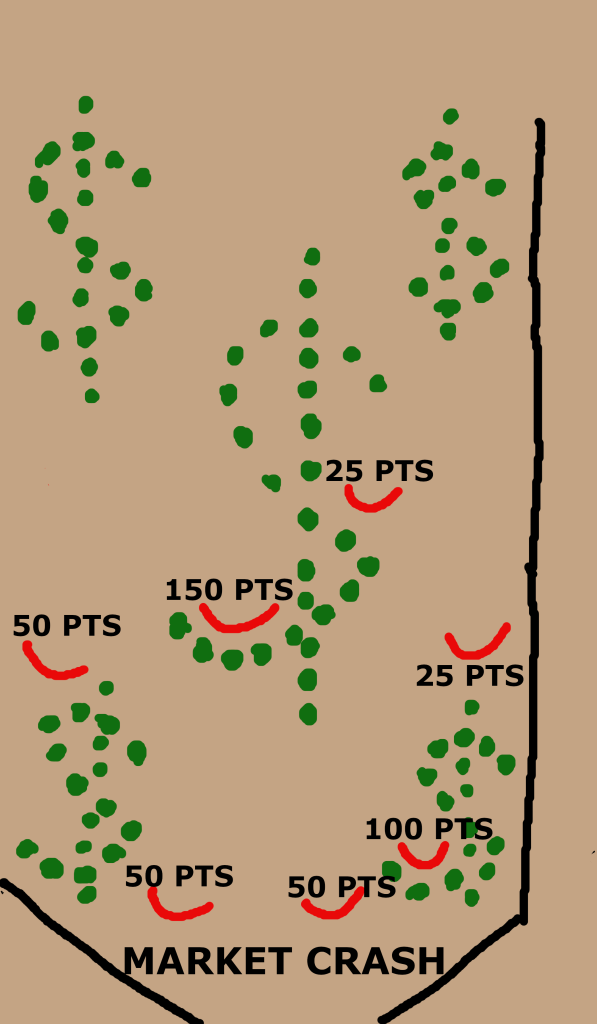
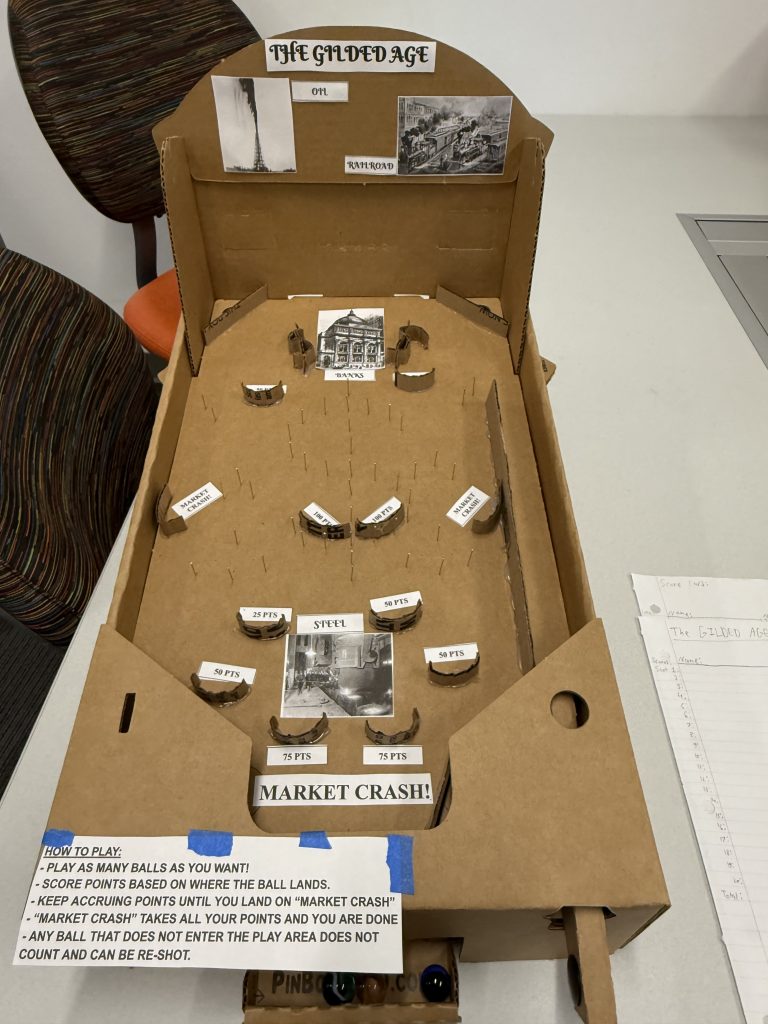
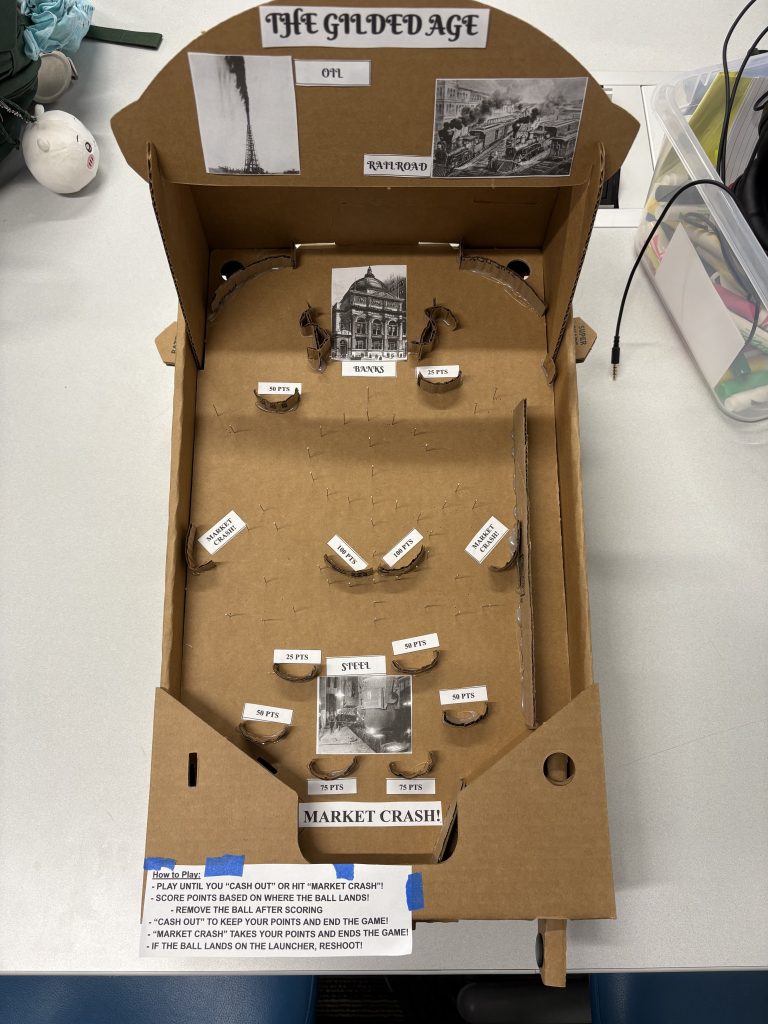
I designed a bagatelle inspired by the Gilded Age of the USA (around 1865-1902). It was a time period where a lot of wealth was consolidated in a few corporate monopolies in key industries such as oil, railroads, banking and steel. Due to these monopolies, leading to a few recessions and market crashes. From there, I designed a game where the player tries to accumulate as many points as they can without causing a market crash of their own. I felt that this theme and gameplay loop fit the gambling roots of bagatelle boards in America.
As for the playboard, I thought that a giant dollar sign made out of pins would be an effective and thematic centerpiece. My original idea was to have more dollar signs to redirect the ball, but they ended up taking up too much space. I placed the primary “Market Crash” section at the bottom of the machine, where the ball falls out of play. I added two more “Market Crash” catchers down the sides and angled them so the ball had a decent chance to roll out, helping to drive suspense and engagement. As for scoring sections, I placed six towards the bottom of the playfield, two up top, and two with the highest point values inside the main dollar sign. The highest point sections were quite literally “in the money”. For the scoring section on the top and bottom, I assigned points based on where the ball tended to land most often during my initial testing.
Changes and Iterations:
In the end, the general shape of the playboard stayed the same. Some of the pins were adjusted slightly to ensure that the balls could not get stuck anywhere that did not score points or cause a “Market Crash”. The walls in the back corner were changed from straight to curved to direct the ball more subtly. A small curved wall was added at the end of the ball launching track to help guide the ball towards the center of the playboard. The rules were updated slightly to tell players to remove balls once they landed in a scoring section. Otherwise the balls prevented other balls from being scored.
Playtest Feedback:
Overall, players seemed to like the game. They reported that the theme was well executed and most remarked that they liked the giant dollar sign in the center. There are still a few spots where the balls can get stuck, and I also noticed that the green marble is a little larger than the other two, so I may need to check each space with that one. A few players lamented that it was too easy to hit “Market Crash” and that they wanted to be able to play a bit more and get more points before losing. One player suggested adding more decoration, which I agree with. Despite all the critique, I think The Gilded Age bagatelle was a success, considering the materials and time I had to work with.
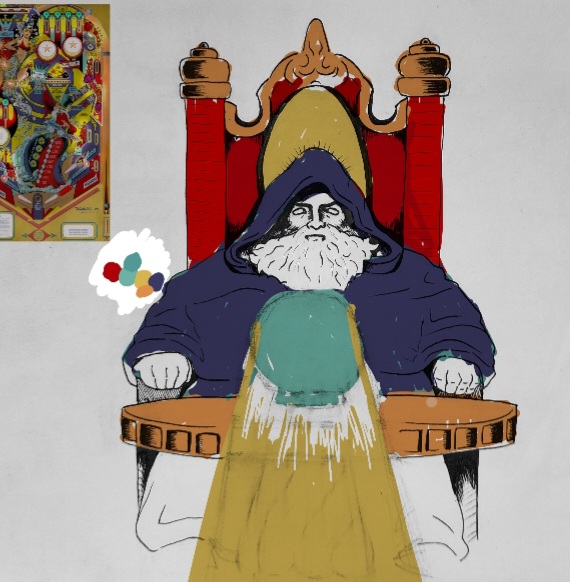
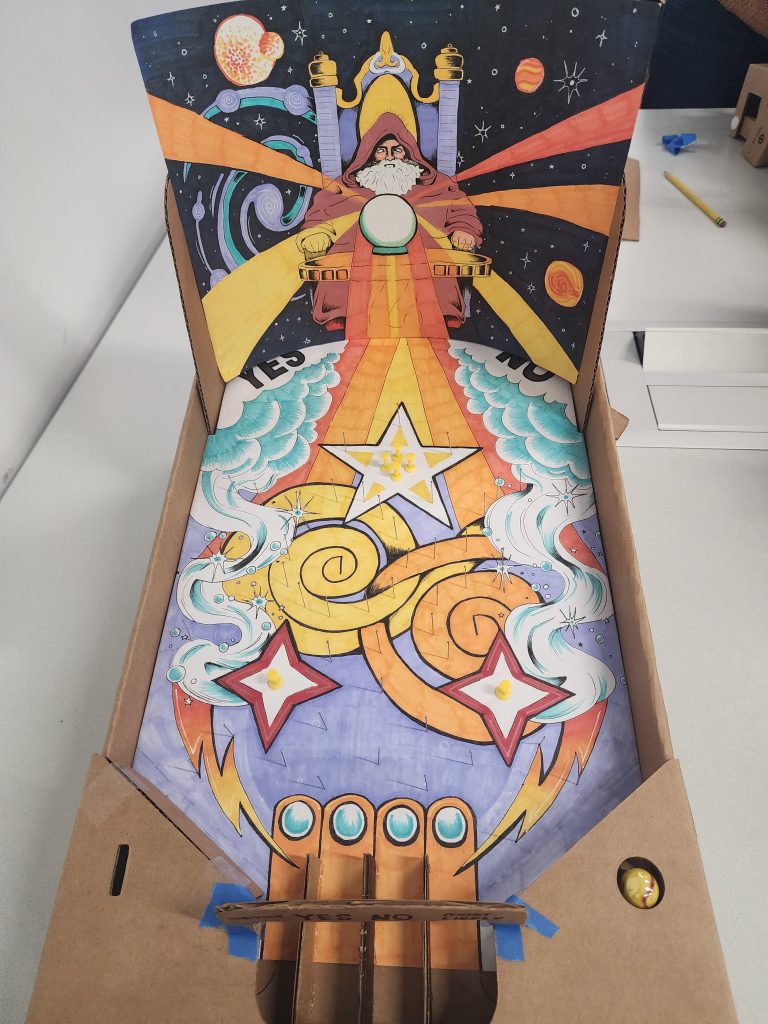
For my bagatelle game, I wanted to capture the spirit of old coin-based attractions like Zoltar and electro-mechanical pinball machines, both in style and substance.
Instead of trying to get a high score, you ask the bagatelle wizard a yes or no question, then you get it answered depending on where the ball lands.
Since it was technically simple (and similar to a plinko machine), I wanted to make sure it was visually engaging.
All of the artwork was made by me, and I tried to emulate the electro-mechanical style- bright colors, no shading, ink linework, etc.
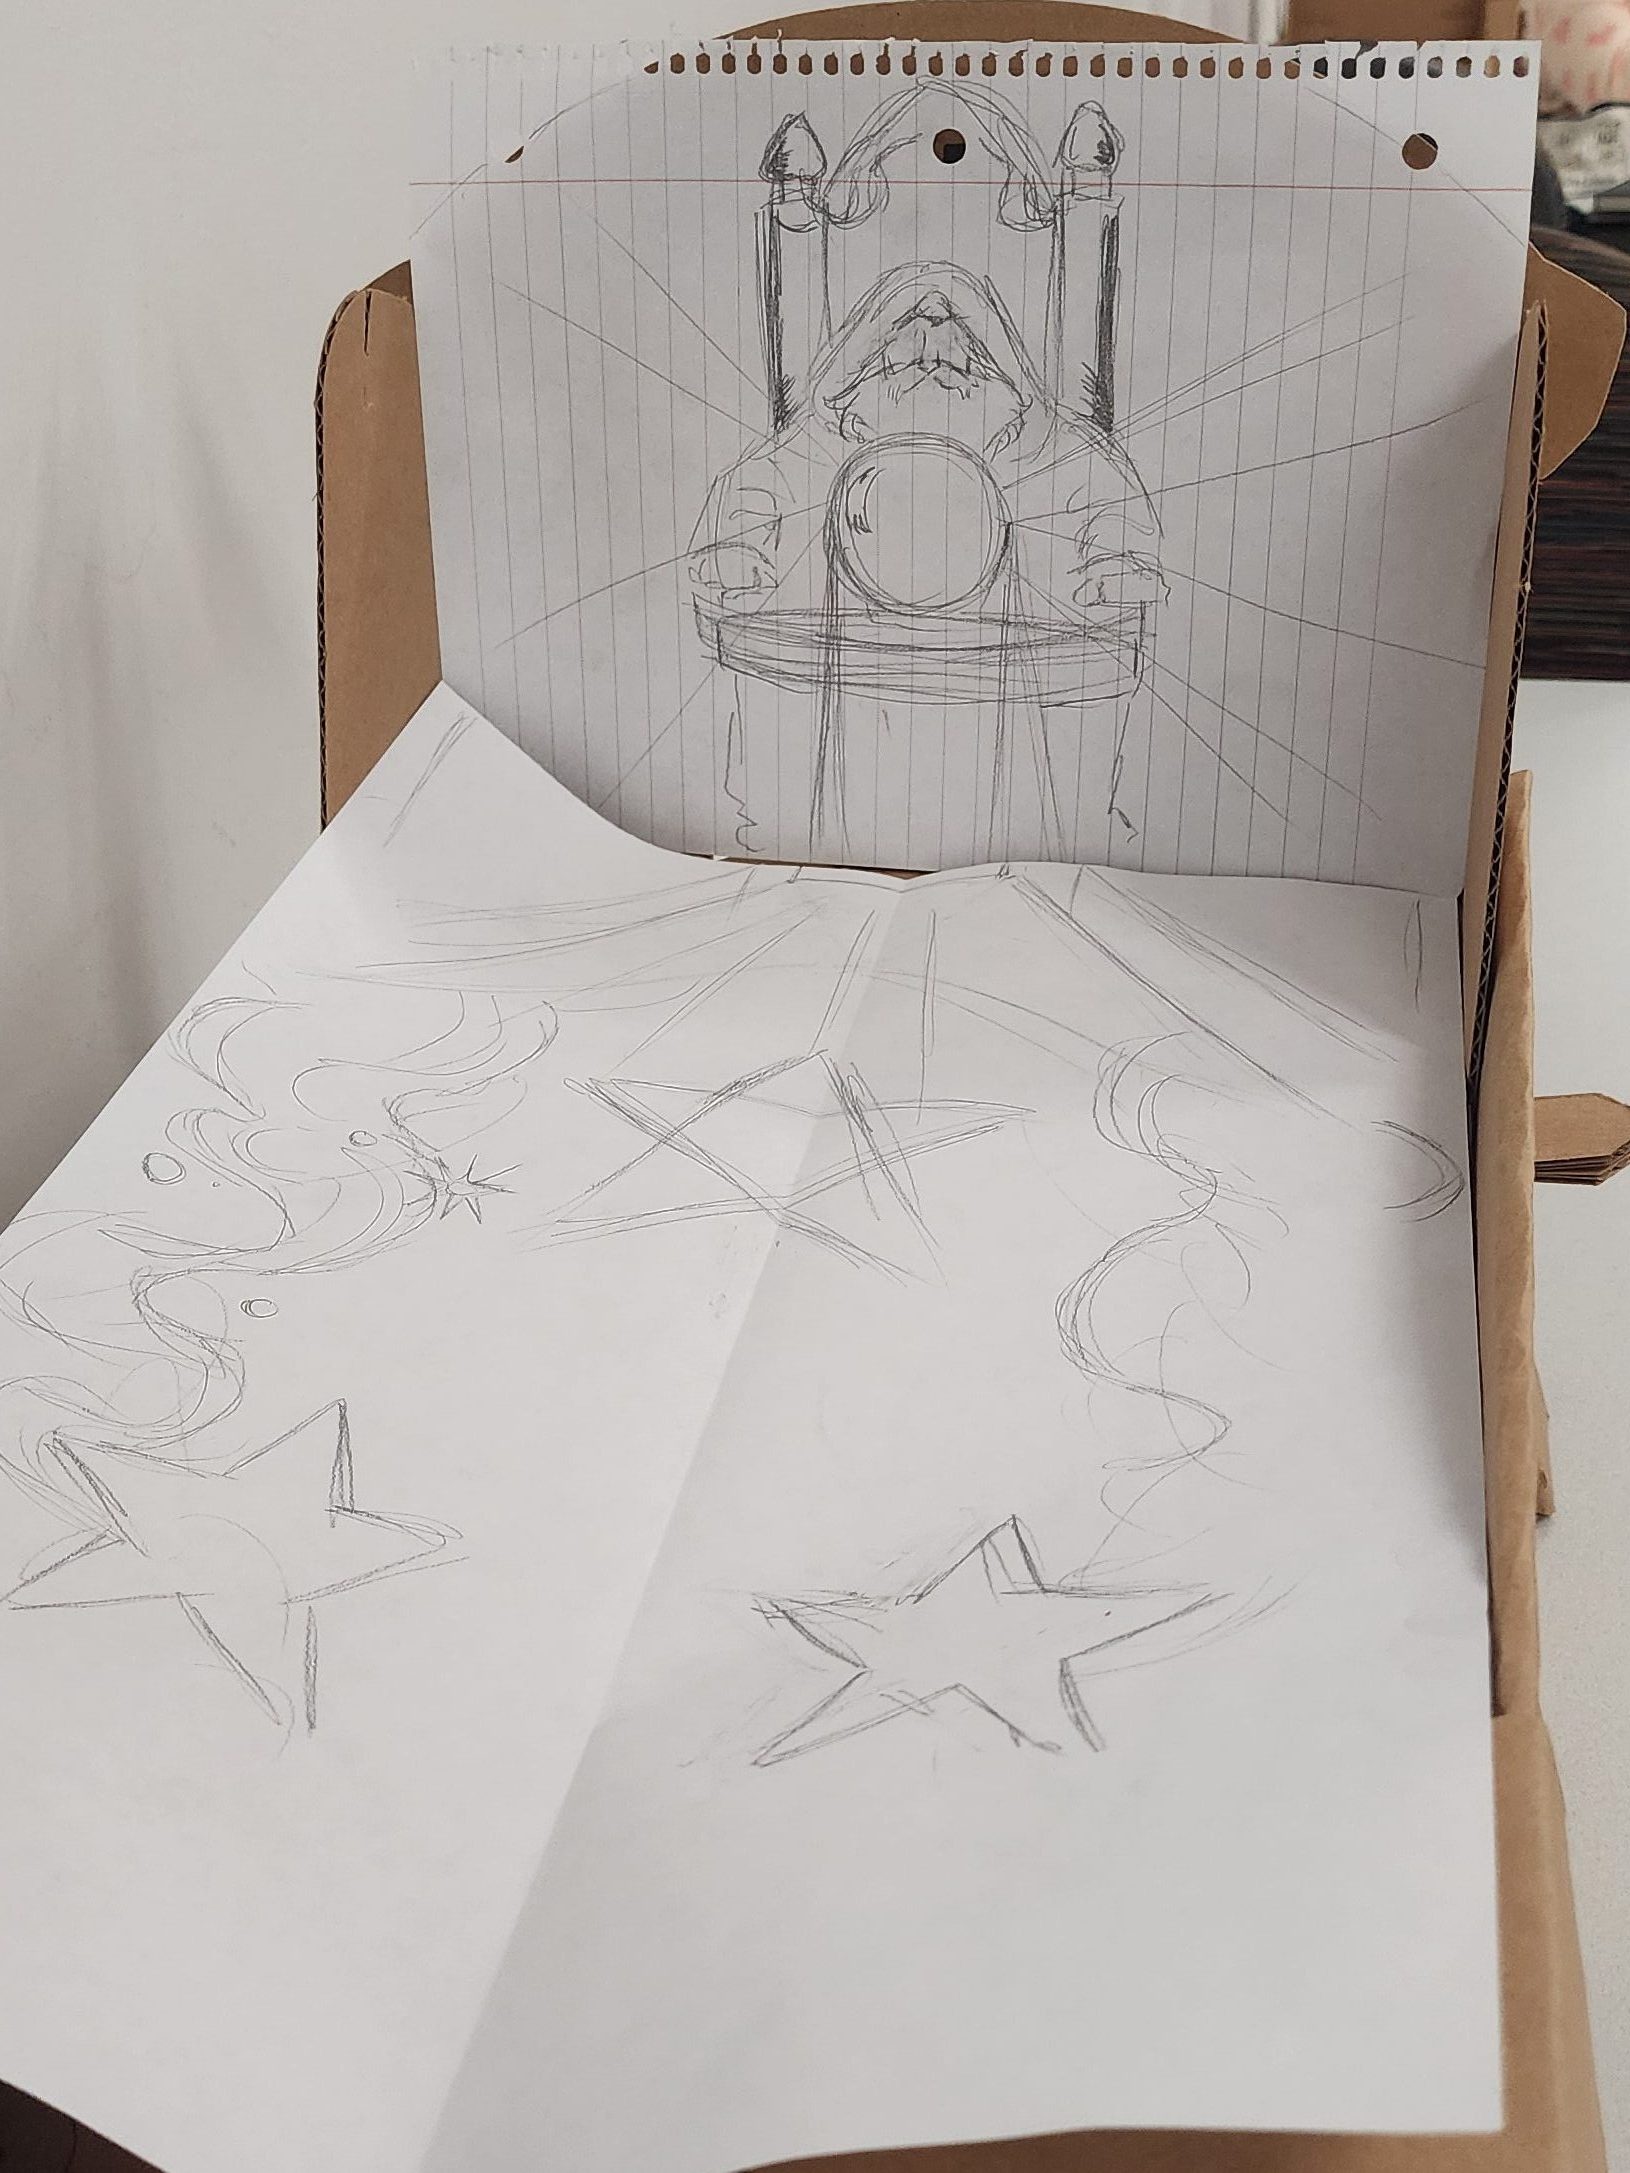
My design sketch featured three stars and four “slots” for the marble to land in. At the bottom, near the slots, there would be 3D “bump arches” that would tell the player their fortune.
Design Iteration
I started by sketching out what I wanted the playfield to look like and figure out how I was going to incorporate the fortune-telling aspect into the aesthetic.
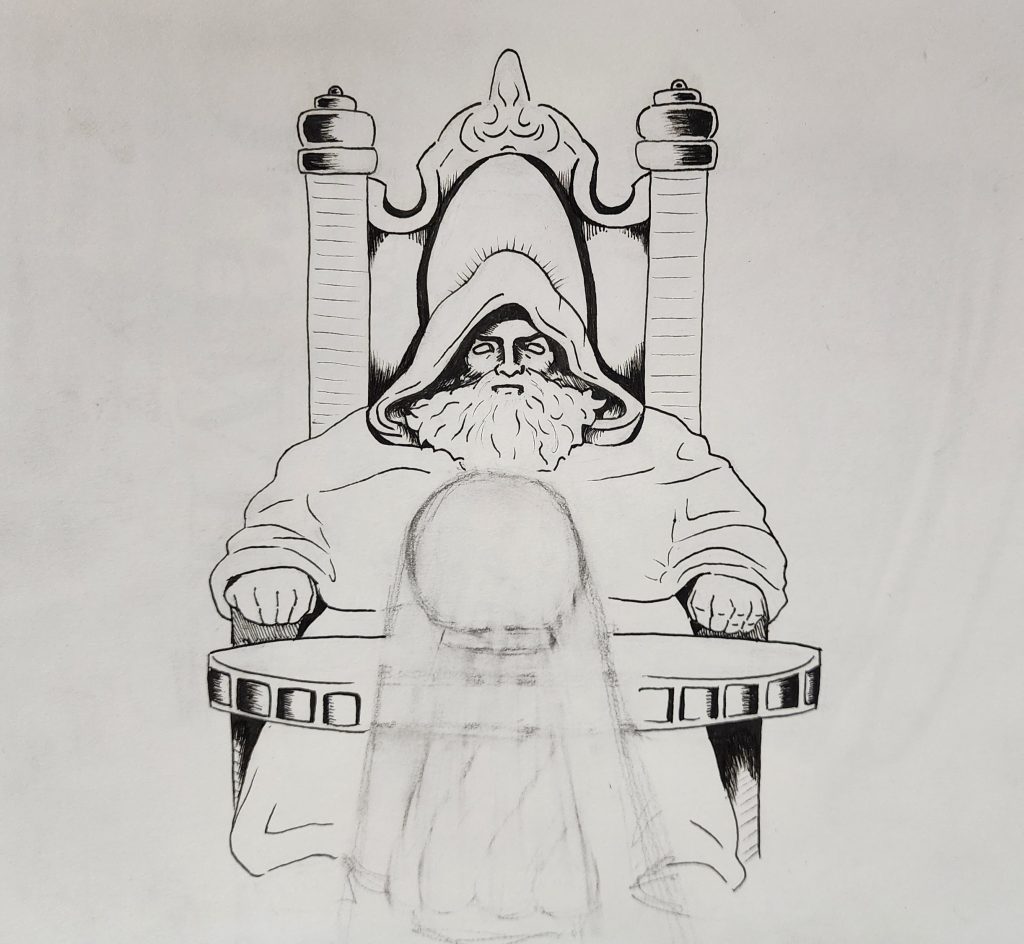
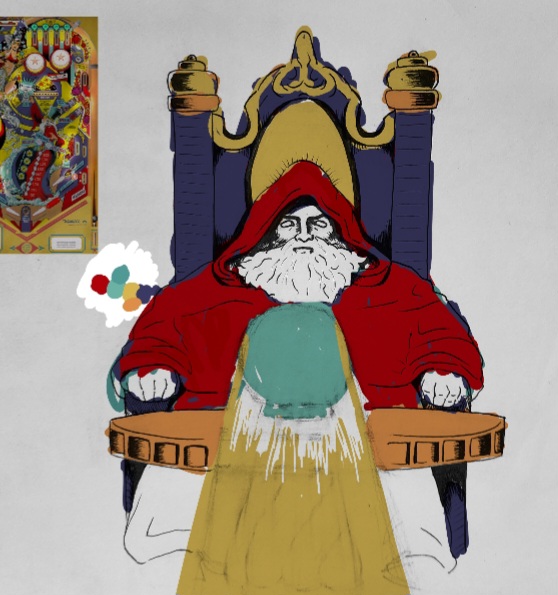
I knew that I wanted to include a wizard pondering a fortune-telling orb as part of the “backglass”. I sketched it first, then drew it on nicer paper and inked the design. I took a picture of the ink drawing and tested out different color palettes online before settling on a palette I liked.
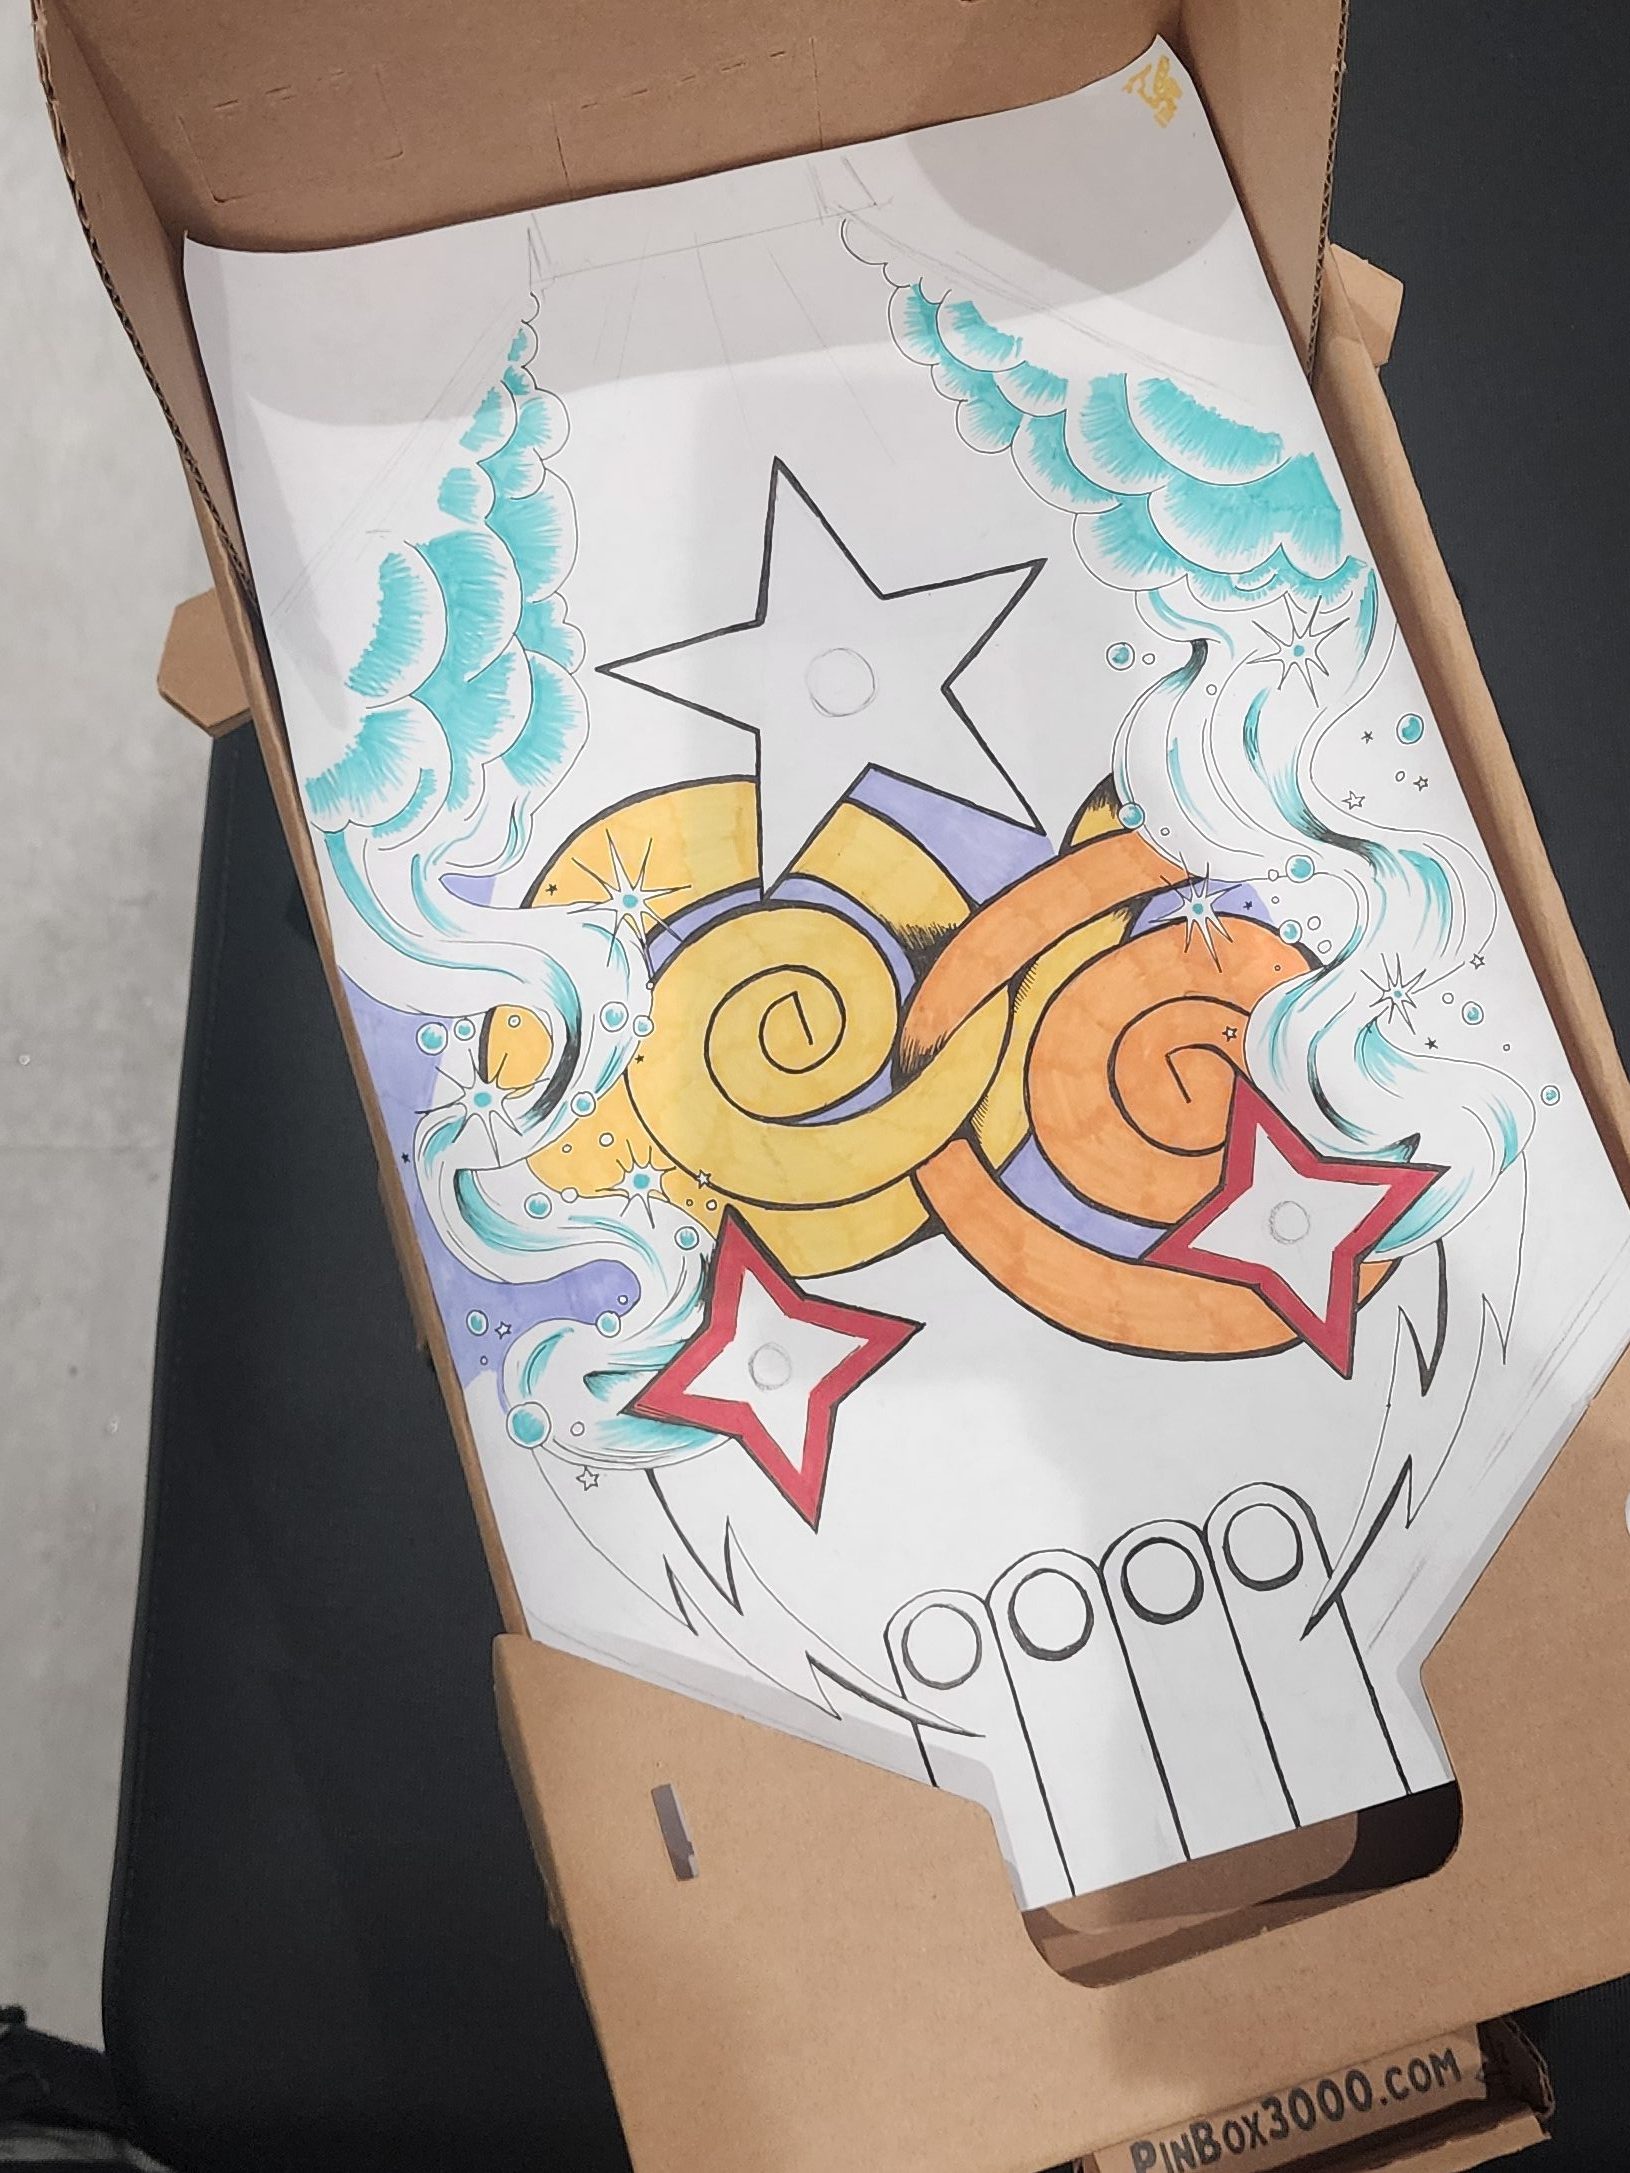
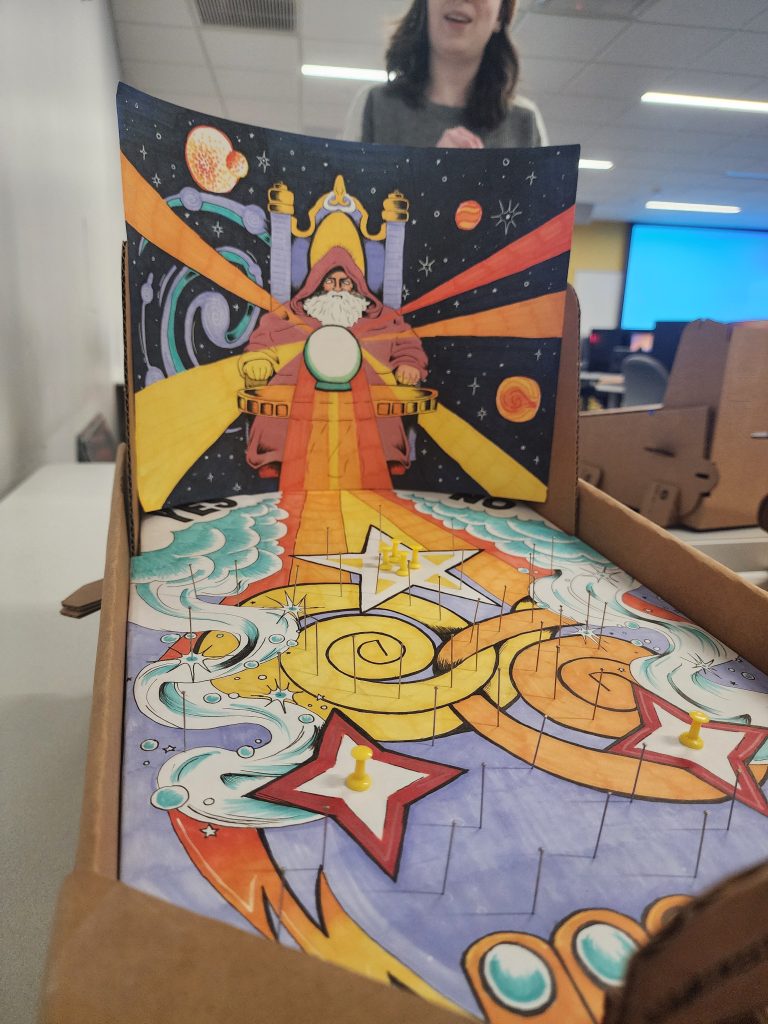
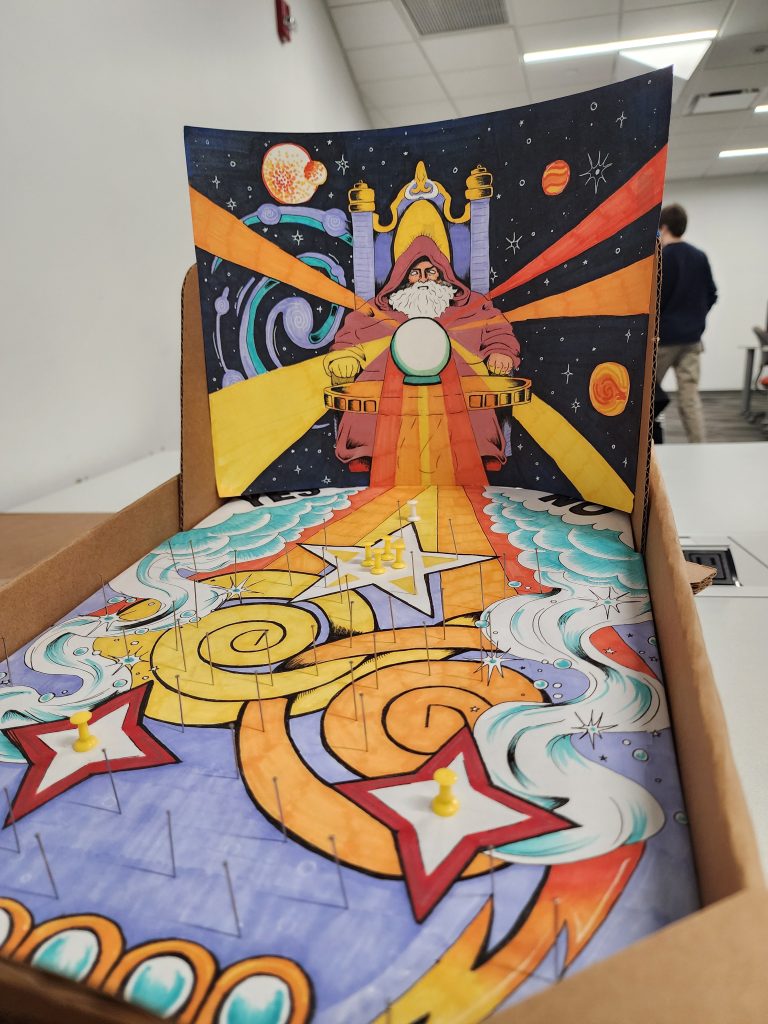
Next, I had to draw the playfield. Since I was only using straight pins to provide something for the ball to bounce off of, I could make a detailed background.
I incorporated three stars, but two stars are 4-point and one star is 5-point. I added lightning, clouds, and other smoke effects to depict the wizard’s powers.
This should cover your initial design ideas, what changed as you brought it together and iterated on it and why and what the user reactions were during your play tests.
Playtesting and Changes
I got a lot of helpful feedback from the initial playtest that helped me make the machine much better.
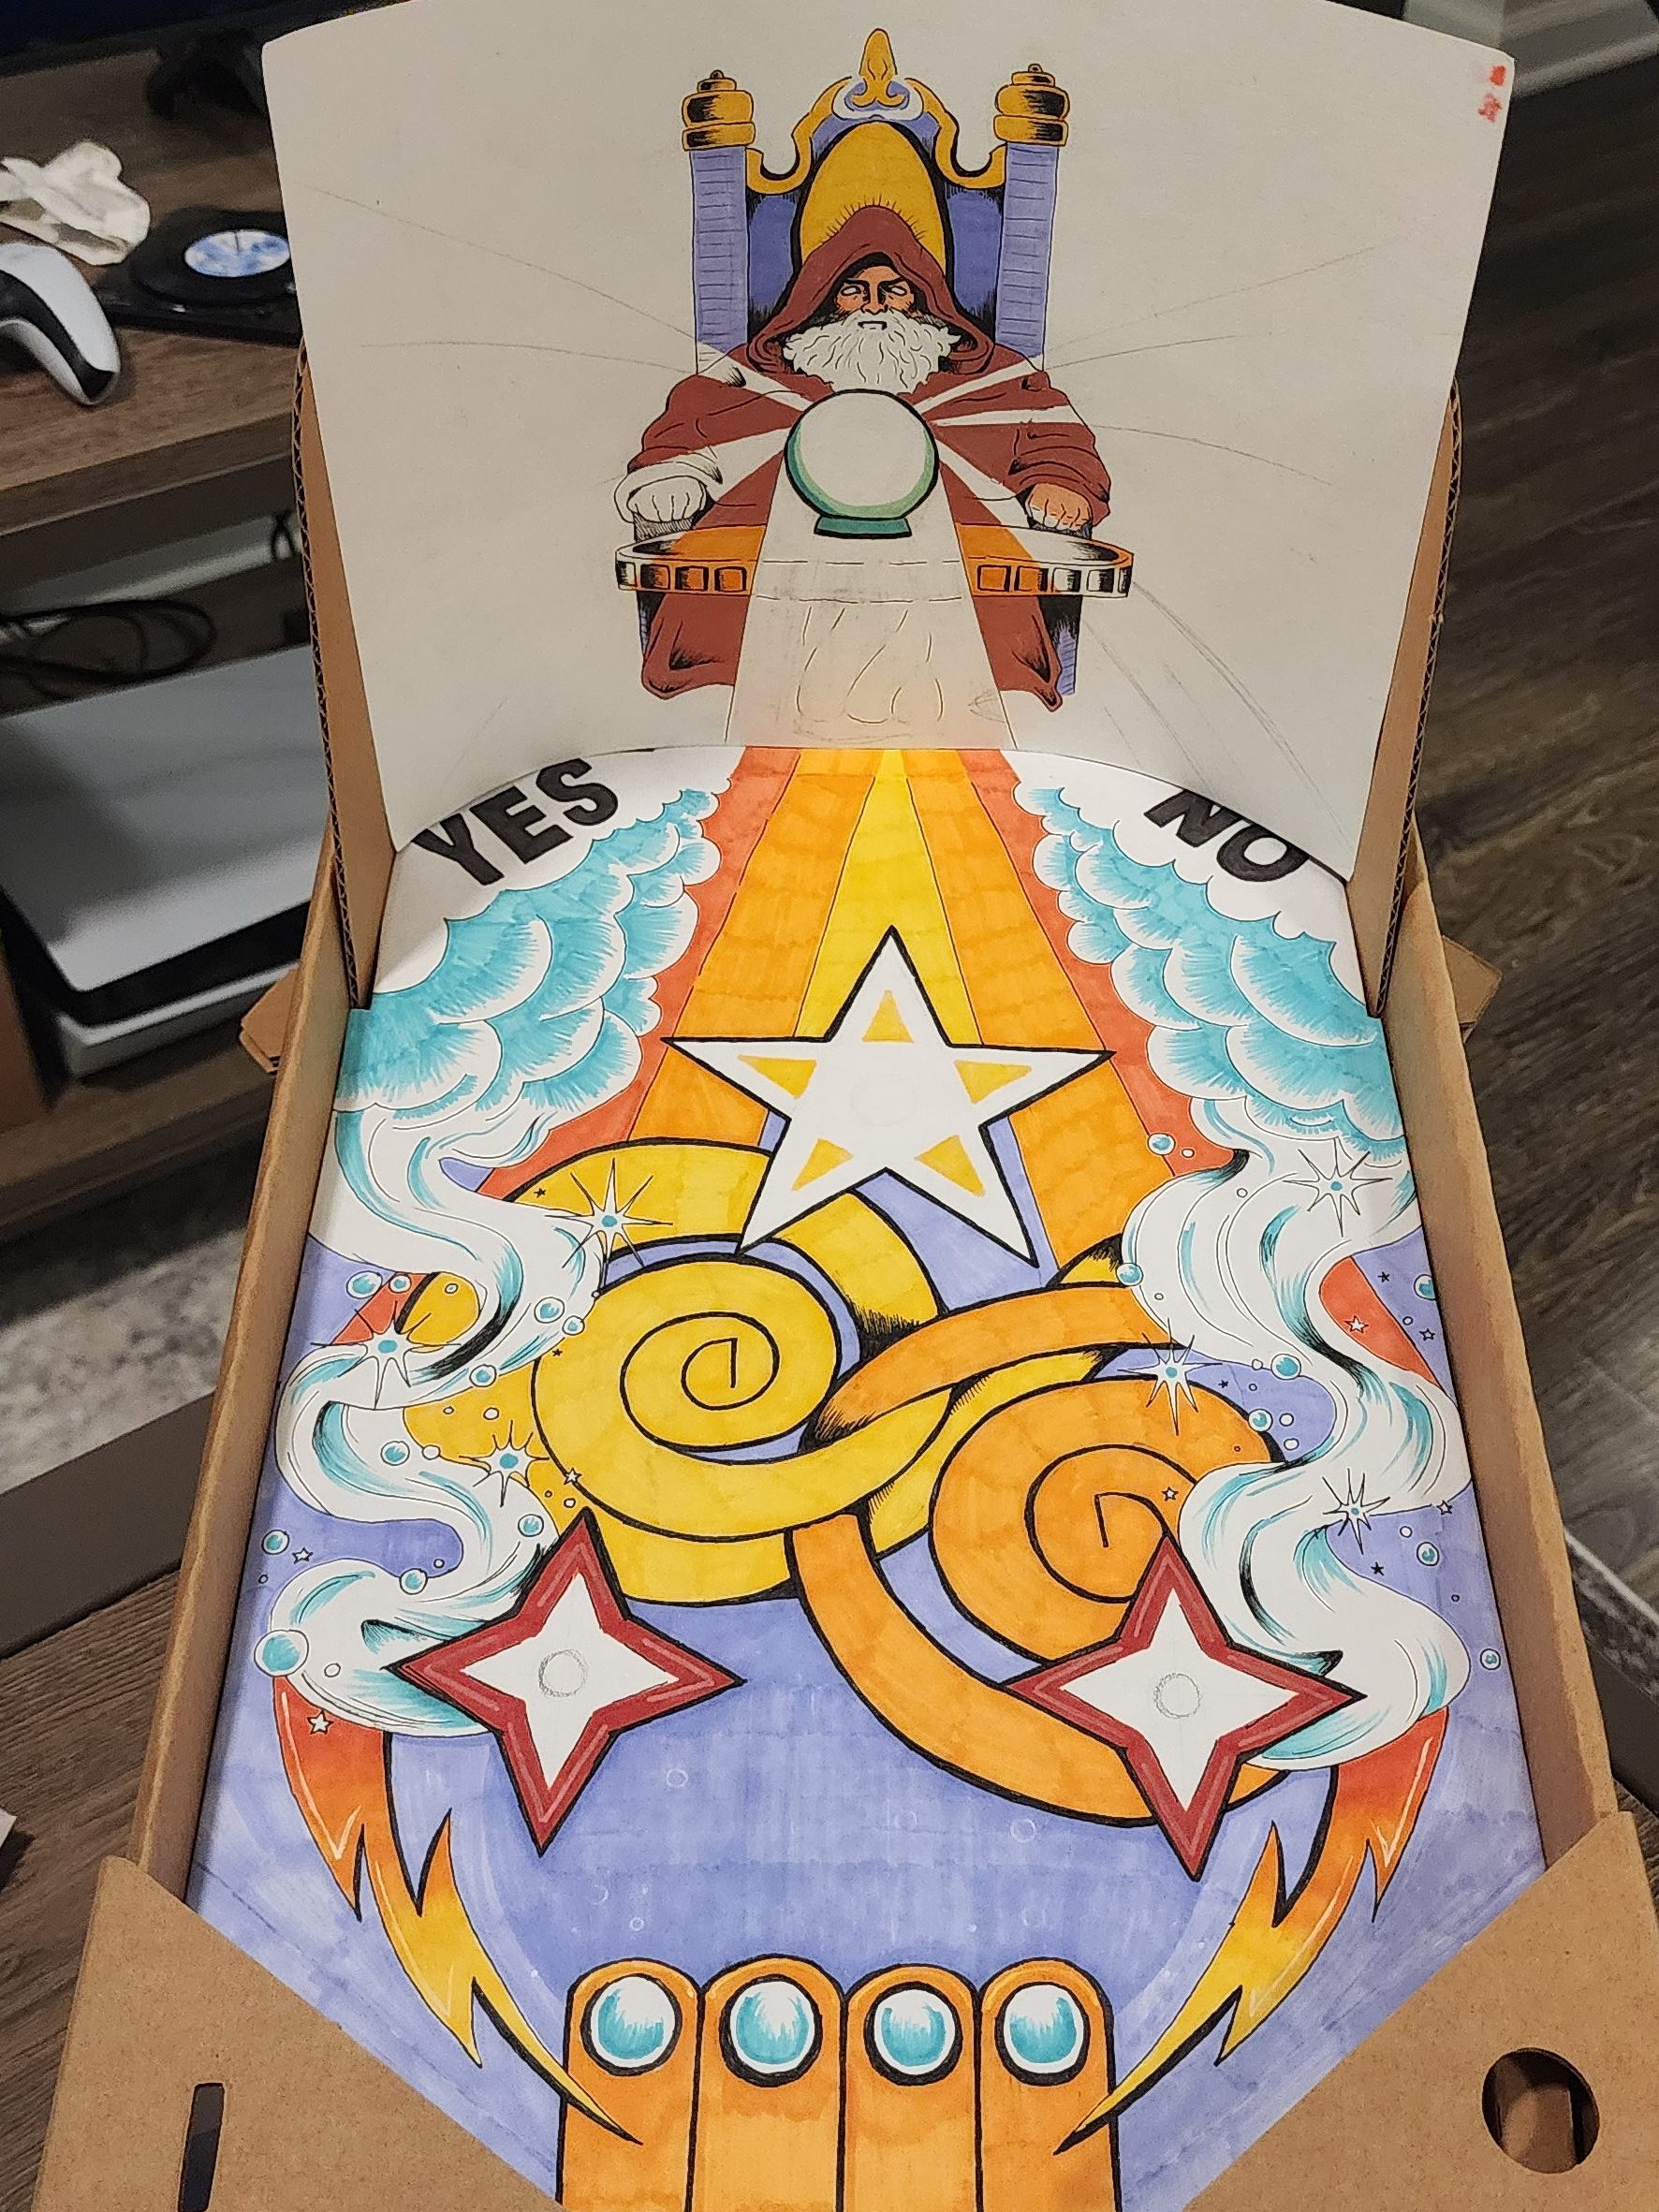
During the first playtest, playtesters wrote that the game looked great, but lacked randomness since the ball would often just roll down the left-hand side of the bagatelle into the far left gutter. I ended up adding more pins along the backside to add a curve so the ball wouldn’t roll down the left-hand side every time.
After I made these changes, the playtesters said that it felt more random and was more fun to play as they got more variety in their outcomes. (Someone also commented that the wizard told them they were “going to die alone :(“, but I don’t make the fortunes- he does.)
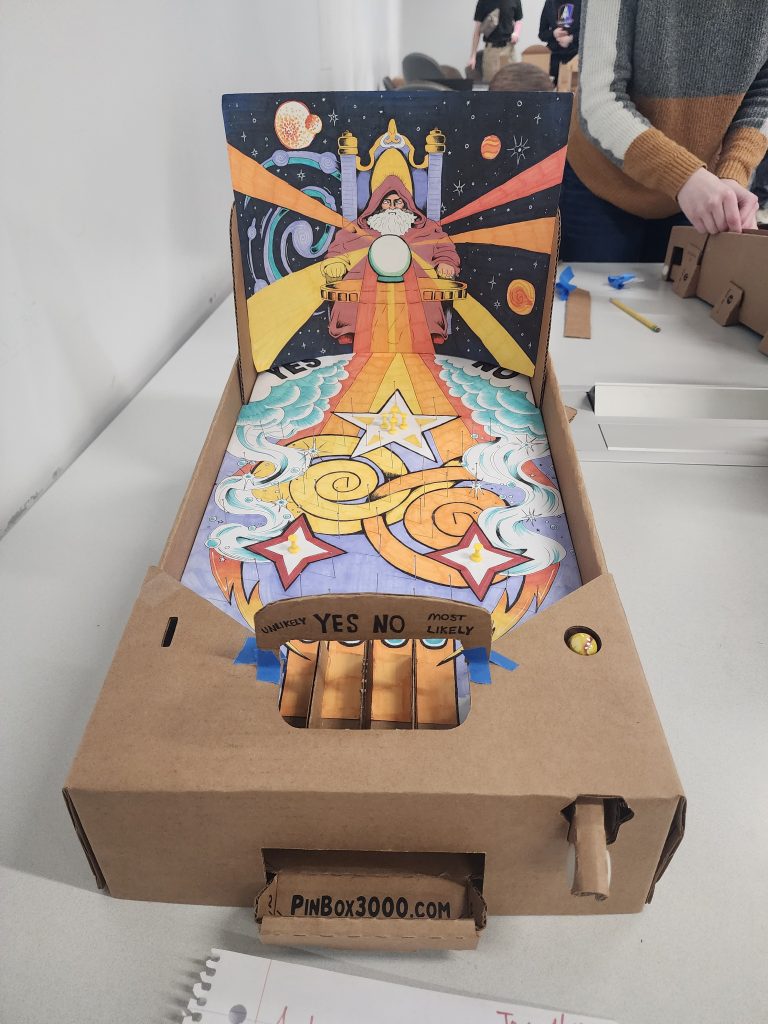
Finished Design
My finished design incoroporated more pins with strategeic placement to help ensure randomness.
I had a fabulous time making this game, and I feel really good about the final product. The pins even produce a small melody of “dings” at different pitches as the pinball bounces off of them, since they’re pressed into the cardboard at different heights.
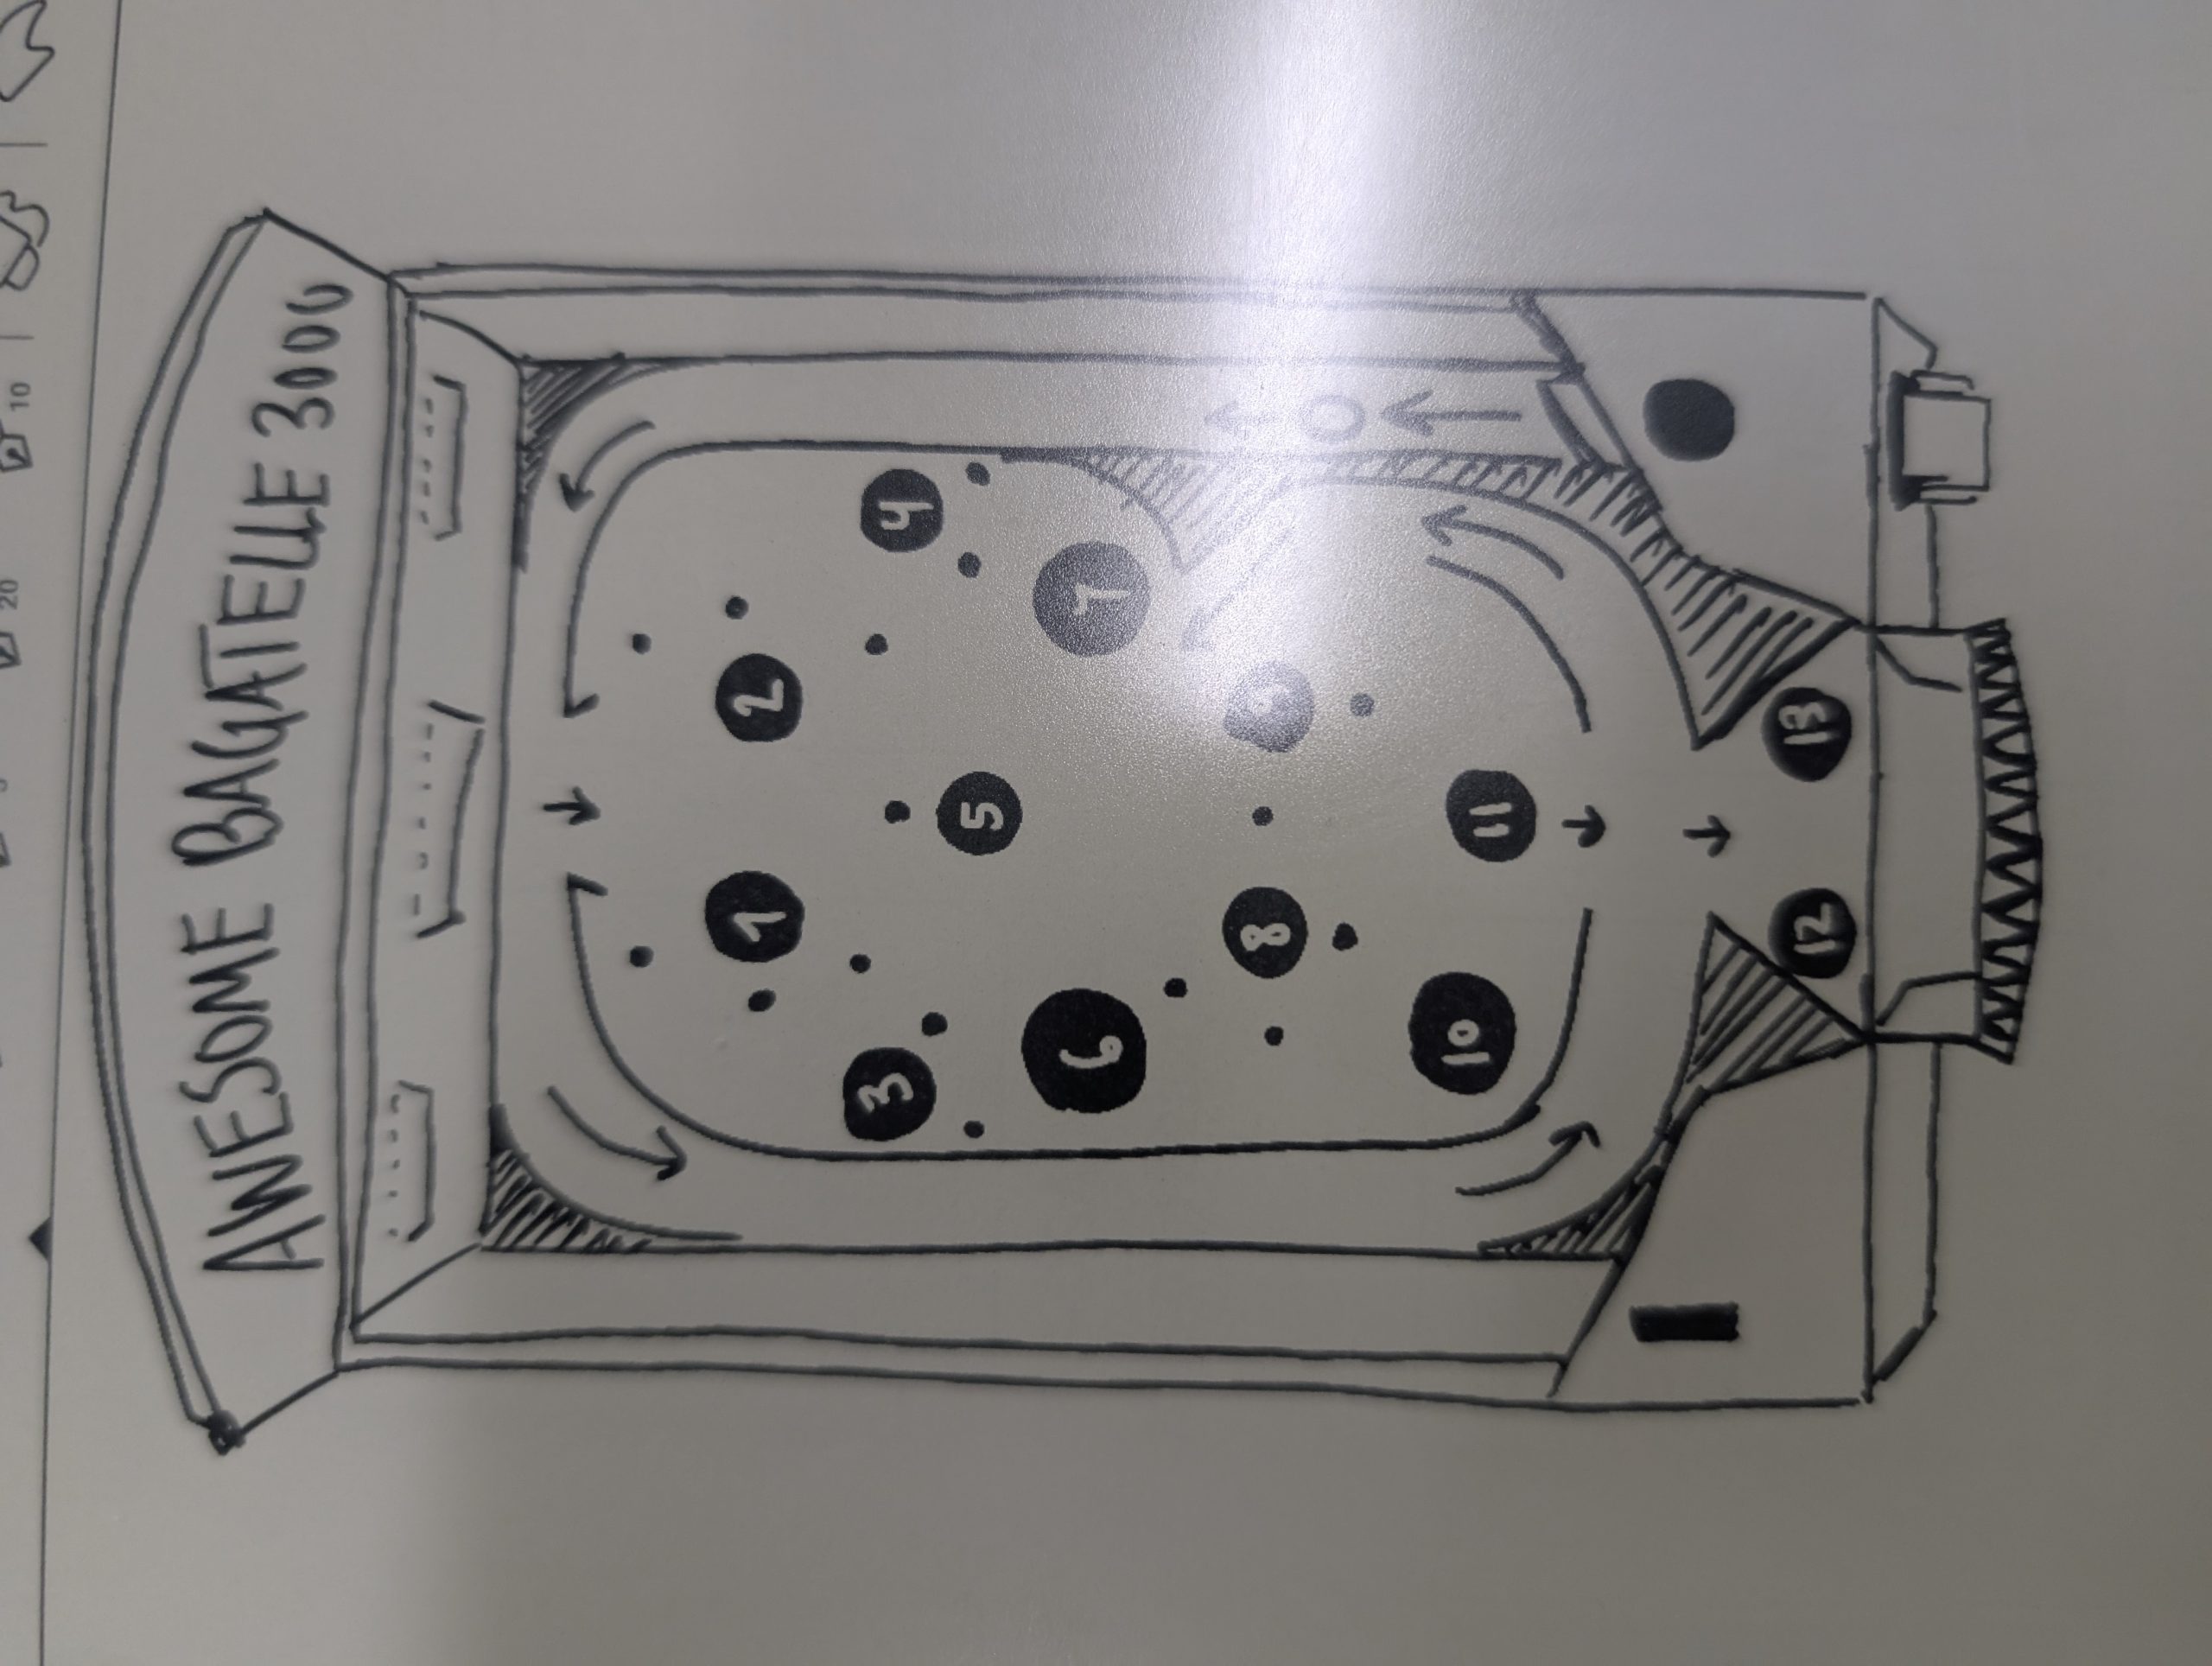
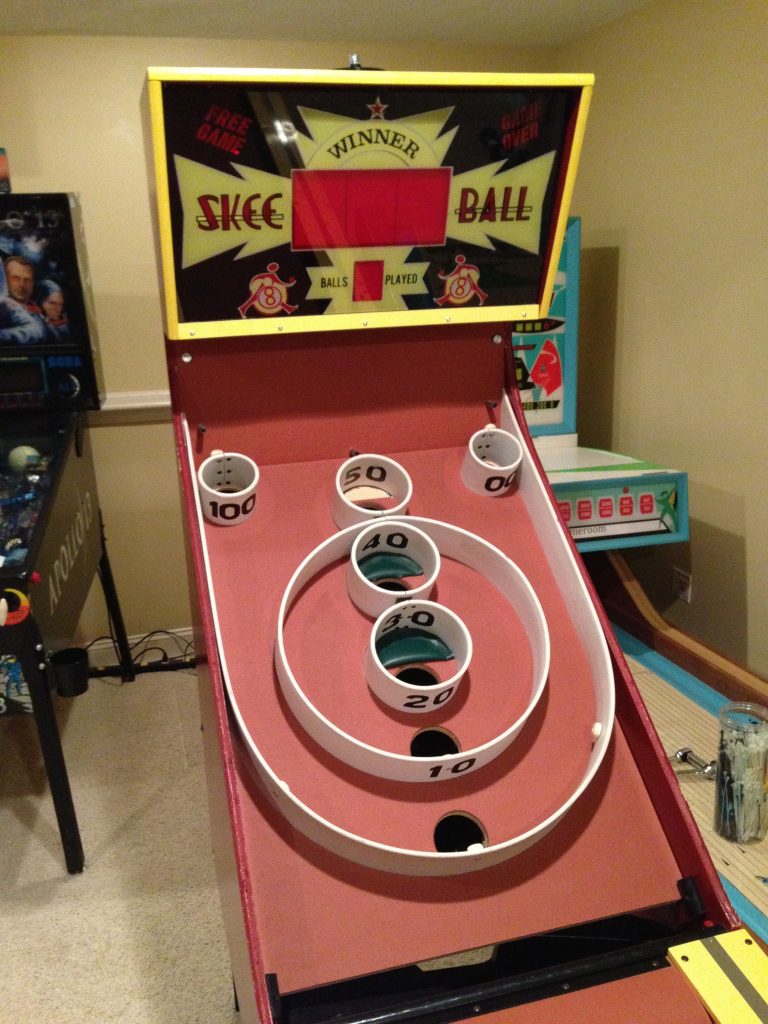
When the class was first covering the concept of bagatelle, I noted a lot of emphasis on luck and skill. That was the primary reason I decided to base my Pinbox bagatelle design on Skee-Ball; it’s a familiar test of consistency with a bit of luck involved.
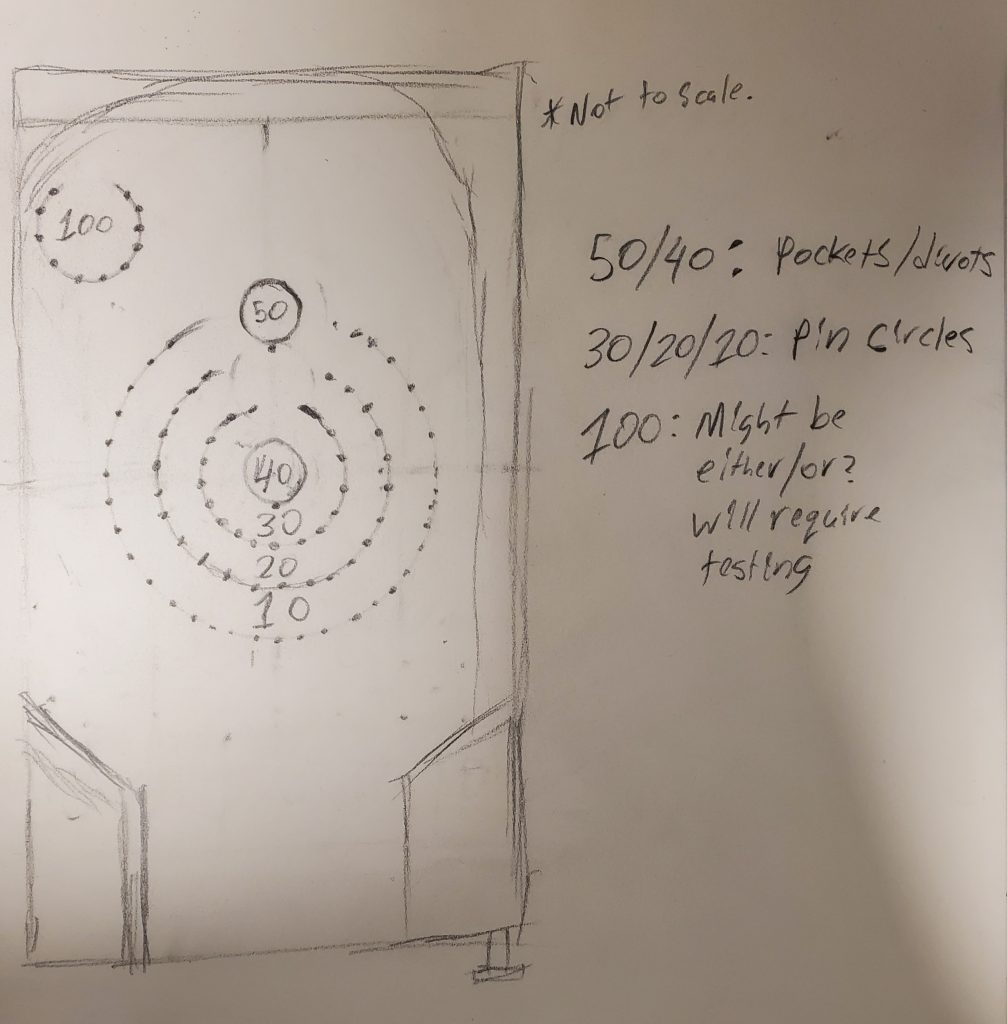
The initial design of the bagatelle board.
My initial idea was to essentially fully adapt a board to be like that of a Skee-Ball table; Have the same form of grouped scoring areas and have people shoot 9 balls, but adjust the scoring regions to follow how bagatelle balls are launched (i.e. up and around from the side rather than just straight below in your typical skee-ball machine).
A few problems arose as I tried to do this:
There would be no holes in which the balls would fall into and return to the player.
The smaller scoring regions (50, 100) would only fit one ball at most, given my initial size drafts.
Following a Skee-Ball layout 1:1 (i.e. having the 100 region off to the side) resulted in being able to score 100s into a trivial task of just launching with as much force as possible.
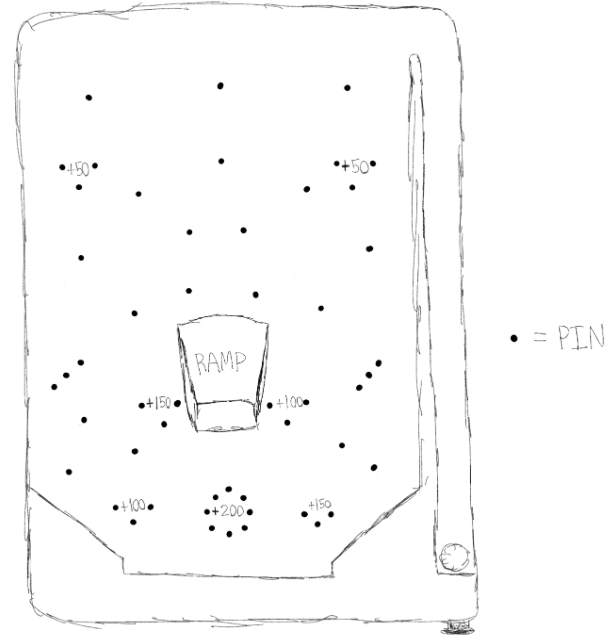
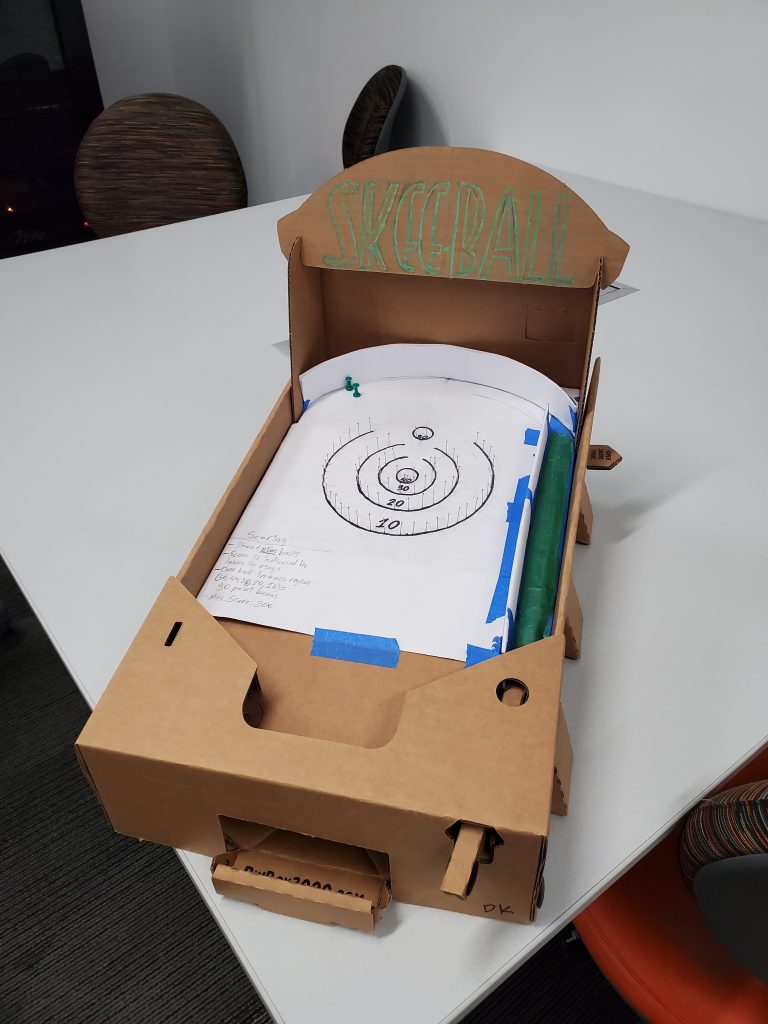
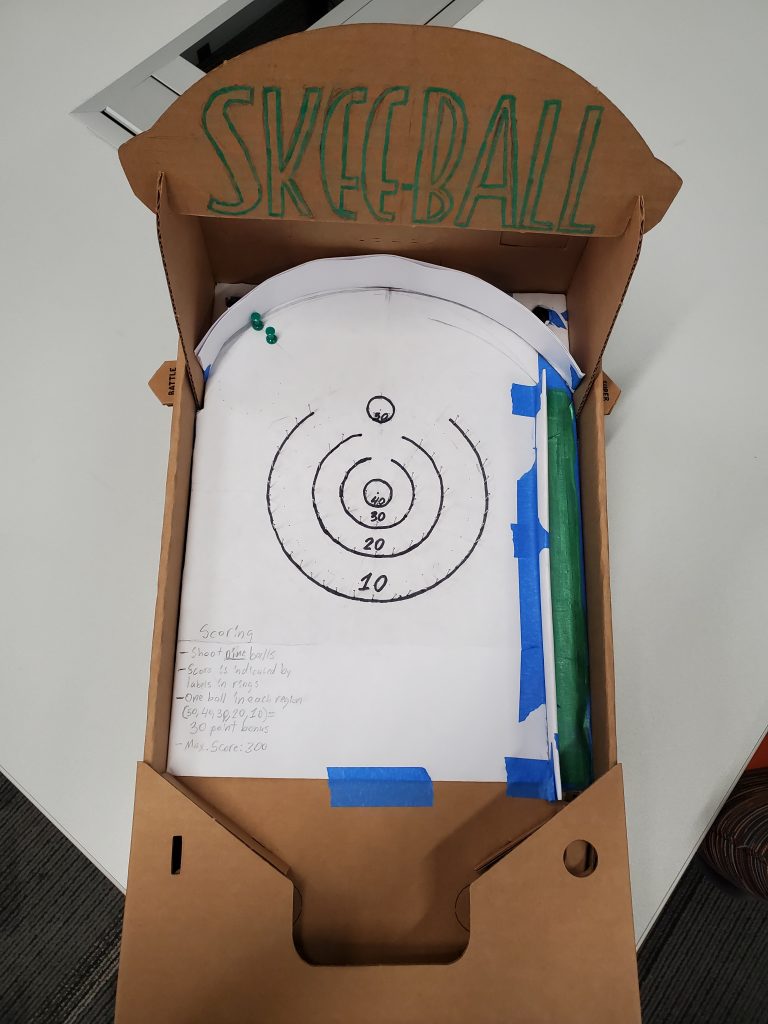
The revised design for the bagatelle board that would essentially become the final design.
Revisions
These were the things I did in order to fix my initial tests:
Remove the 100 scoring region entirely.
Since this resulted in a LOT of overshooting, I added some pins at the end of the launcher’s trajectory to allow scoring to be a bit more consistent.
Provide a point bonus to compensate for being unable to fill other regions. If you managed to get a ball in every scoring region, you would get an extra 30 points.
I did this so that if you get one ball in every region, then scored 30 for the rest, you would get a total of 300 points. This is the exact same as scoring one ball in the 50 and 40 regions and then scoring 30 in the rest.
It was designed to emphasize that test of luck, skill, or consistency.
If you want to be technical, this mechanic makes it more like Fascination, but since this mechanic is optional, I’m still insisting on calling it Skee-Ball.
Feedback and Postmortem
Playtesting feedback went about as well as I had anticipated; the main points of criticism came from how scoring was designed (more specifically, its wording) and its overall visual presentation (or lack thereof.)
Turns out the 30 point bonus I tried to implement was worded a bit too ambiguously; I should’ve stated that at least one ball in each region would’ve provided the bonus.
Additionally, the lack of eye-catching visuals was just entirely an issue on my part. I could’ve definitely refined how the game looked, but with how I drafted the initial project, I backed myself into a wall and couldn’t give the game the visual flourish it desperately needed.
One thing I should’ve anticipated was people having issues with having all 9 balls. Between play sessions, balls would get stuck in the return chute; this resulted in people not knowing that all 9 balls were actually there, and as a result I had a lot of feedback regarding that. It sucked, because I had thought I dealt with this problem while testing it on my own, but it seems it still persisted despite my best efforts.
Another piece of feedback was that it seemed a bit too easy; the balls bouncing off the pins at the end of the trajectory made things too consistent for some people. To an extent I understand this point, but I also choose to believe that the person who said this just managed to master the game better than I did, since I don’t think I could keep things that consistent throughout my numerous tests while prototyping.
If I went back and revised things, what I would focus on would be the following:
Visual polish, obviously. The game was very visually basic and on a paper white background.
I’d try to make the colors more akin to a real Skee-Ball machine, but I’d first need to find a consistent color scheme for it, because even the official machines seem to lack that.
I’d also like to make the marquee a bit better. I don’t think I did a bad job at emulating the Skee-Ball typeface when making the one I currently have, but it just lacked color.
Using holes for the scoring regions. This would eliminate the need for 9 balls and also make it so scoring in the same region multiple times was possible.
Trying to actually implement a 100 point scoring region. The game’s score is woefully small because of the limitations of the current board, and the game didn’t feel quite right without the high-risk, high-reward that the 100 hole provides. I’d have to spend a lot more time in prototyping to figure out where it would work best.
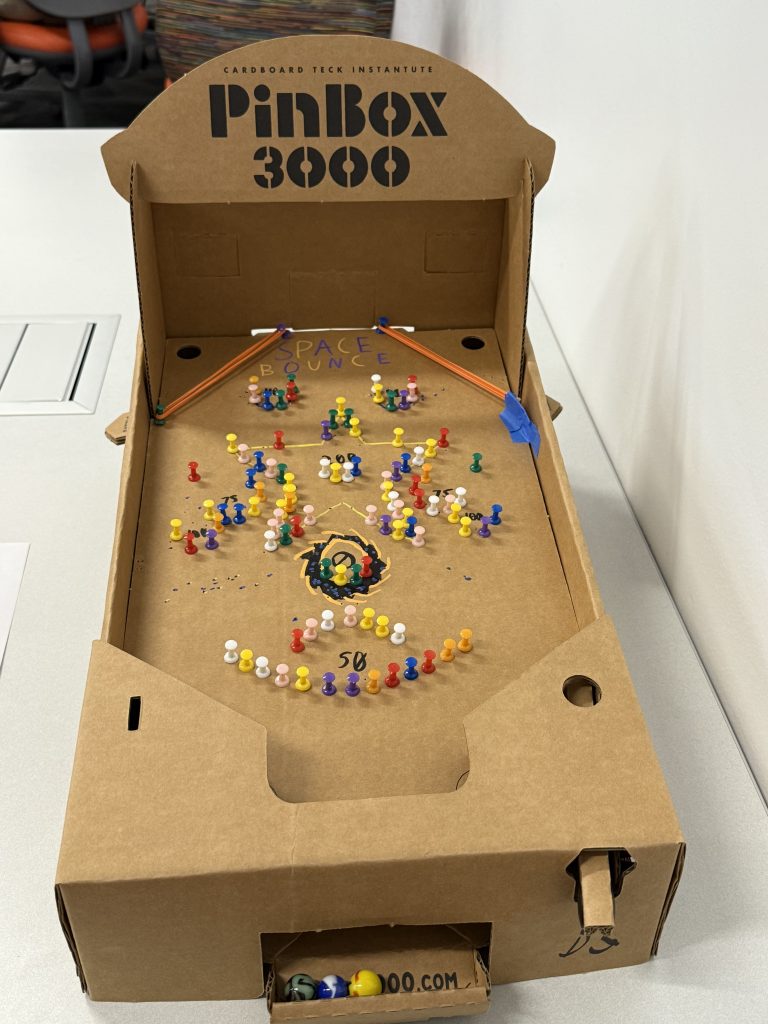
My initial design was immediately spawned from my love of Outer Space and the concept of having two rubber bands in the corners of the board to bounce off of instead a typical Bagatelle curve at the top to help aim the ball. Most of the elements were based off of space-related iconography, such as a large star for the centerpiece, ringer planets, a black hole, and a UFO.
Through personal testing, many modifications had to be made, as was expected. The tips of the Star could no longer act as points pockets, point distribution as a whole changed across the board, and I had to ditch the two swiggly “nebula” things between the UFO and Black Hole due to space constraints. I also added a curved piece of tape to help redirect the ball away from one of the pegs holding the rightmost band in place. The first round of testing went well, but airballs where the ball would go all the way left and miss any pocket was a common critique. A lack of detail was also a frequent talking point.
After that playtest, I went all out in refining the art detail to make it more eye catching. I also added a third rubber band straddling the left wall to help with the airball issue. The ring planets morphed into these abstract curves that reminded me of horoscope symbols in a way. I decided to do this mainly because it was easier to draw. The biggest complaint from the final playtest was the lack of walls behind the bands preventing the ball from potentially hopping over. Otherwise, it was praised for its eye-catching design and for the bouncing mechanic as opposed to a typical curve.
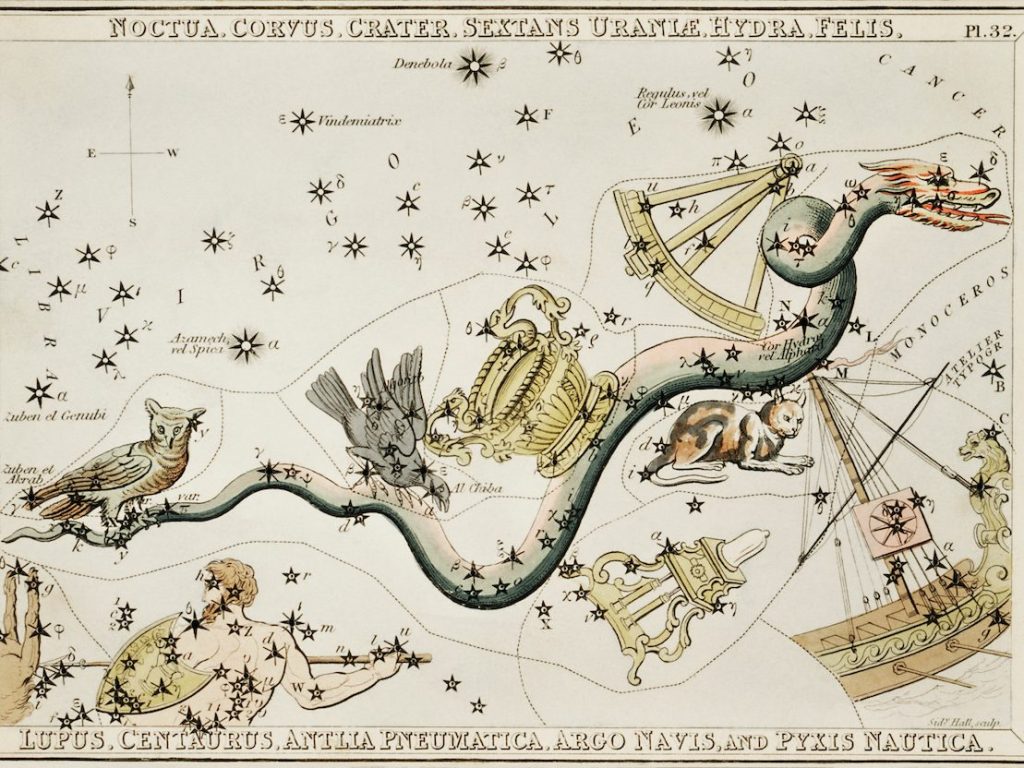
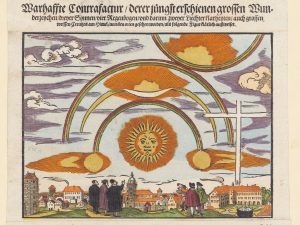
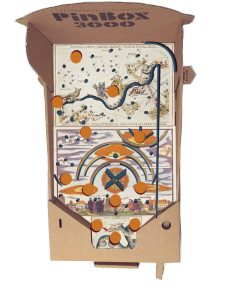
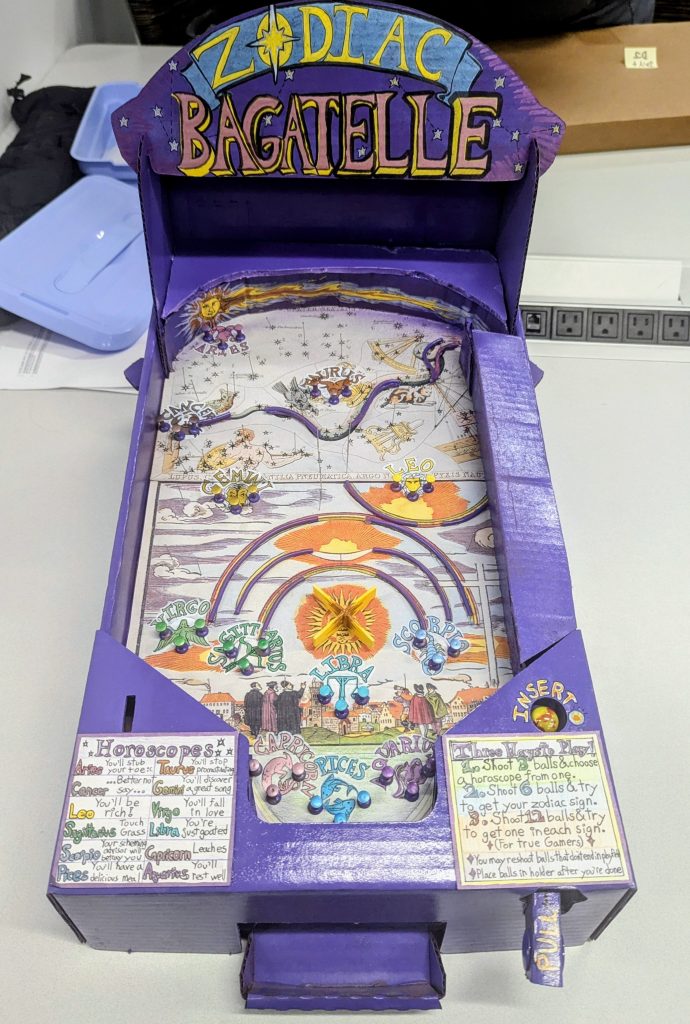
For this assignment, I took the approach of letting the aesthetics and theme lead the playfield layout design and gameplay. Specifically, I really liked the look of 1500s Astronomical star charts & woodcut prints, as well as Horoscopes, which give you a prediction for the future based on your zodiac sign. All of the reference art and the two images used for the final playfield are available in the public domain, and were found using pdimagearchive.org.
For the mechanics of the game, I knew I wanted to include these elements:
12 holes with corresponding zodiac signs. The sign you get will correspond to a horoscope
Rails and pins to follow the contours of the playfield art (ex: pins where stars are, and rails where rainbows are)
A spinning ‘water wheel’ in the center
For my initial design sketch, I displayed orange circles are holes, and blue dots & lines are rails and pins.
Design Iterations
This Bagatelle machine when through a series of iterations and improvements to get to the final design. Here are the main ones I documented:
Assembly of the PinBox 3000 Frame.
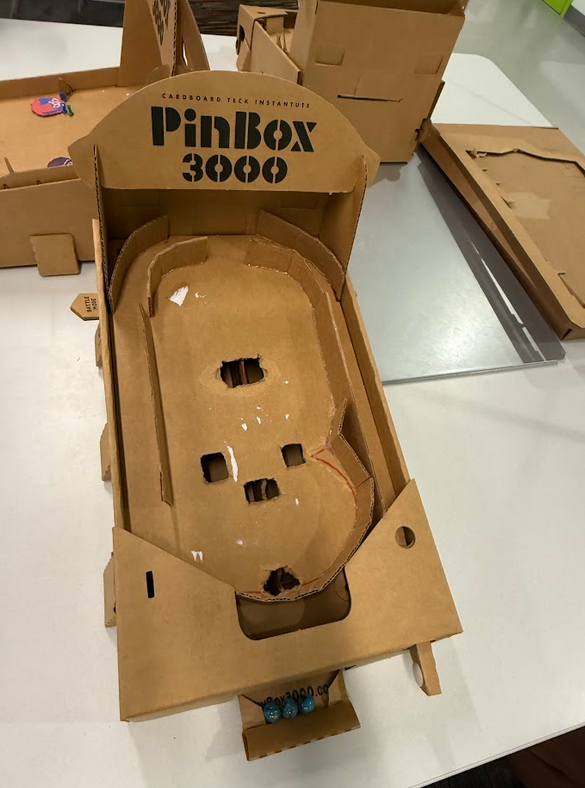
Initial playfield layout constriction (pins, discarded electrical wire rails, a curved backboard and chute. I decided against cutting actual holes in the playfield, as the marble would sometimes get stuck underneath it.
Also initial playtesting by the Sophie, my roommate’s cat. 🙂
“Oops all purple”, decided the frame looked too plain and ugly, so spraypainted it purple. Unfortunately this warped the paper playfield, so I had to rip it out and start again from scratch.
Also the initial spinner test was completed with a folder piece of paper.
Playfield update and additional graphics for the zodiac signs drawn. This was the most fun part for me as I was creating new art for the game, but it was also a challenge coming up with 12 unique colors and symbols that matched with the existing graphics. I also added a small sun on the backsplash to match with the one on the playfield.
The spinner was also replaced with some more durable foam that I had lying around, and I patched up some of the gaps on the backboard and over the chute.
For the final design, the biggest change was adding a game instructions card, which now lays out three different was to play, as well as actual horoscopes for the signs.
I also added some more backsplash art with the name “Zodiac Bagatelle”, and directions for where to insert the marble and pull the plunger.
Final Design & Player Feedback
Players seemed to like the art for the game, as well as the overall gameplay. The most common feedback was the tendency for the ball to get stuck on the wire, likely due to the paper underneath it being warped. The instructions were also a bit messy and hard to read. If I were to make changes, I would:
Print the playfield on cardstock, or some other more study material
Type out the instructions & horoscopes on larger paper, with a more readable font