Dungeon Delver Pinball Demo Days

Some Guests at Imagine RIT Playing Pinball

Imagine RIT

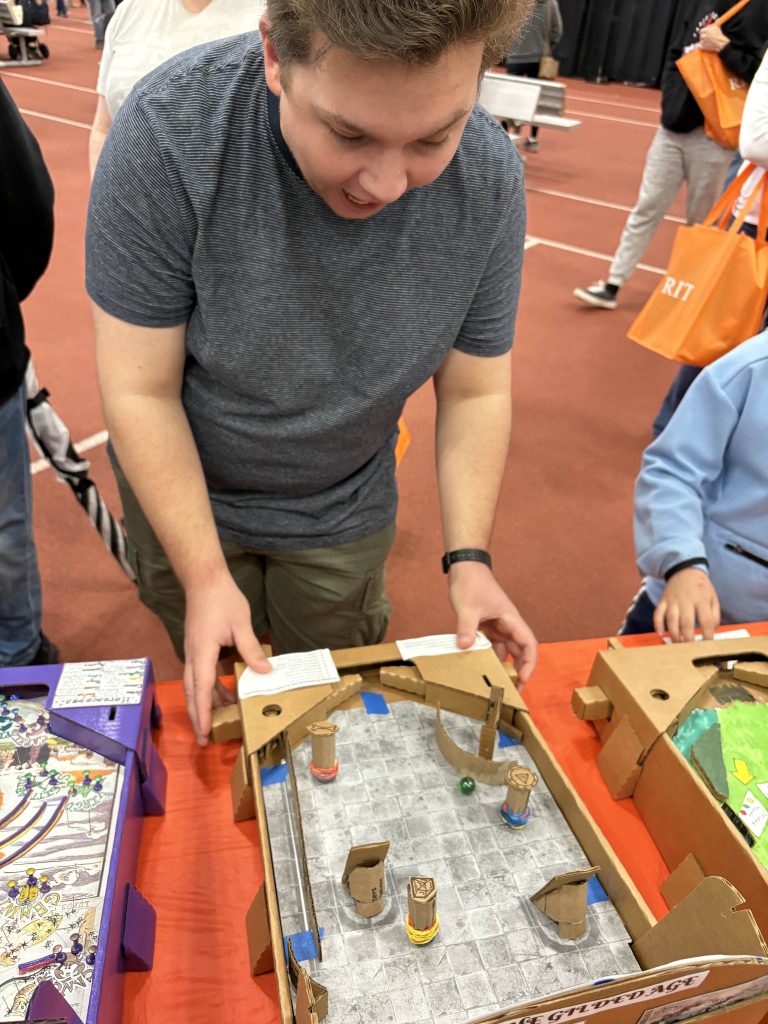
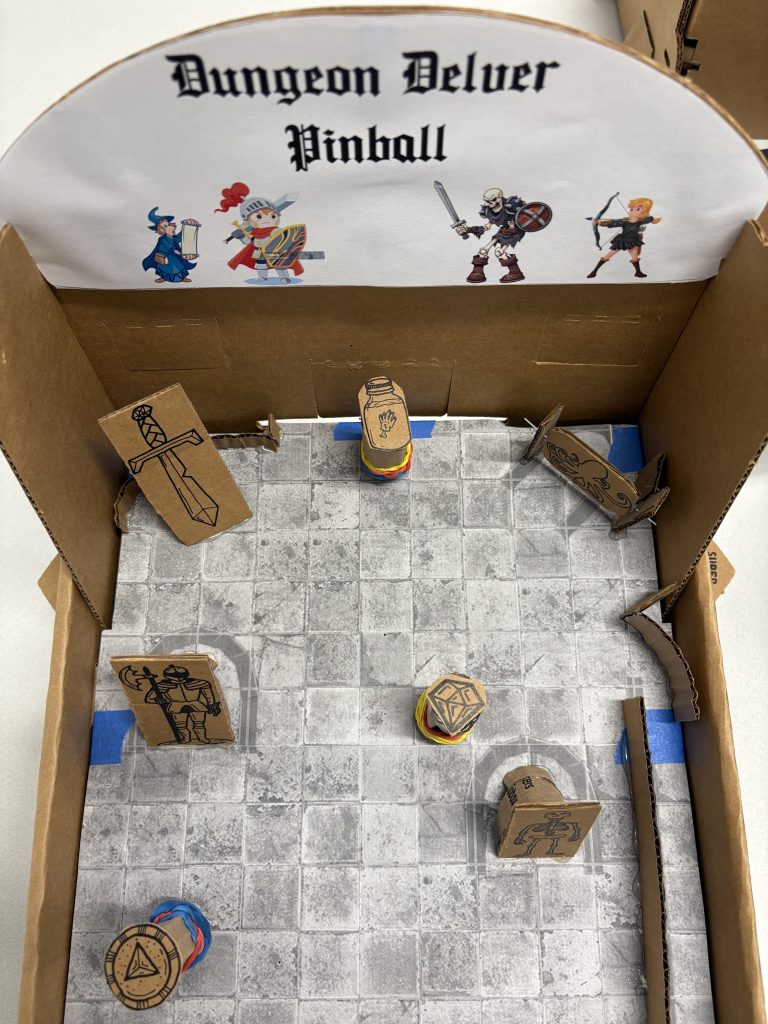
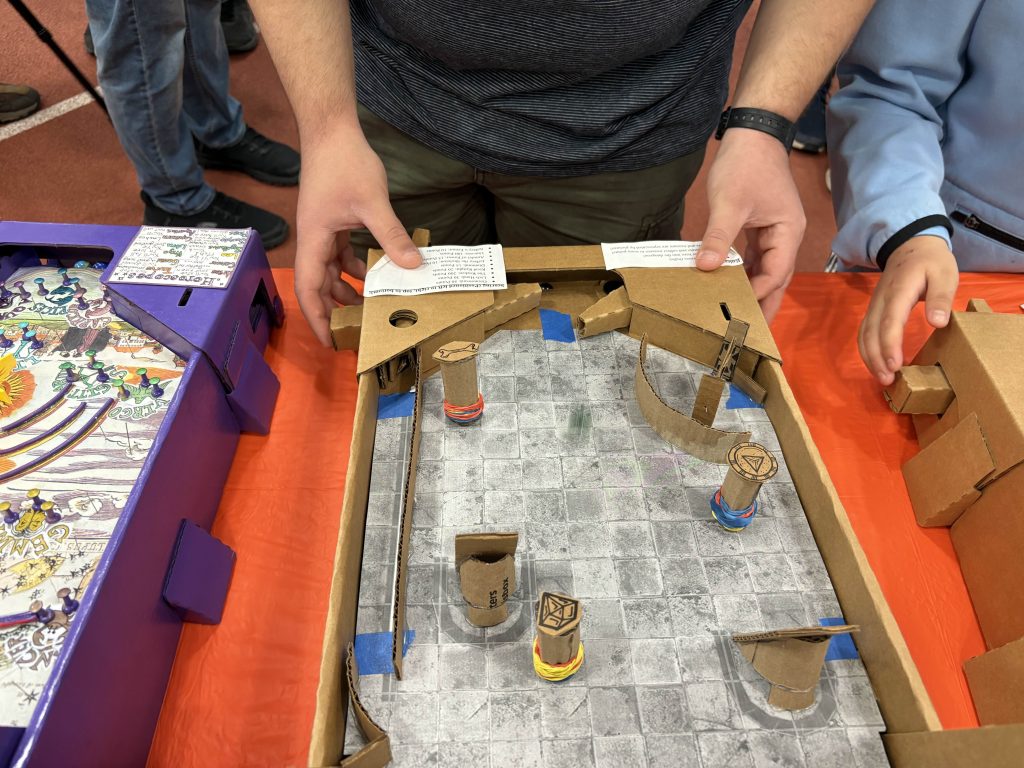
I spent two hours at Imagine RIT showing off my Pinbox build, Dungeon Delver Pinball. The goal of the event was to show off our projects and advertise for the Strong Museum of Play’s pinball events the following Saturday. My shift did not feel like two hours while I did it. However, I did feel the drain soon after leaving the table. I am an introvert and am not built for events like this. My main jobs at the table were supervising guests playing the pinball machines, answering any questions, and handing out fliers for the Strong Museum’s pinball day. The people most interested in the fliers were parents who brought their kids, with some even signing up for the Pinbox 3000 workshop before they even left the table.

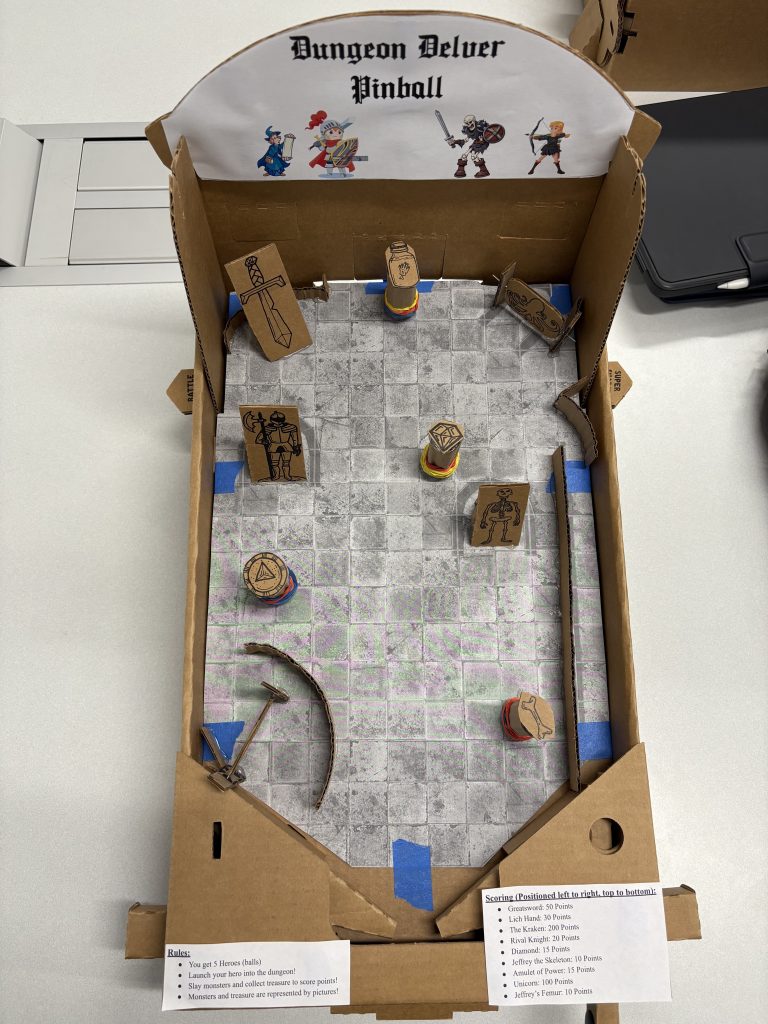
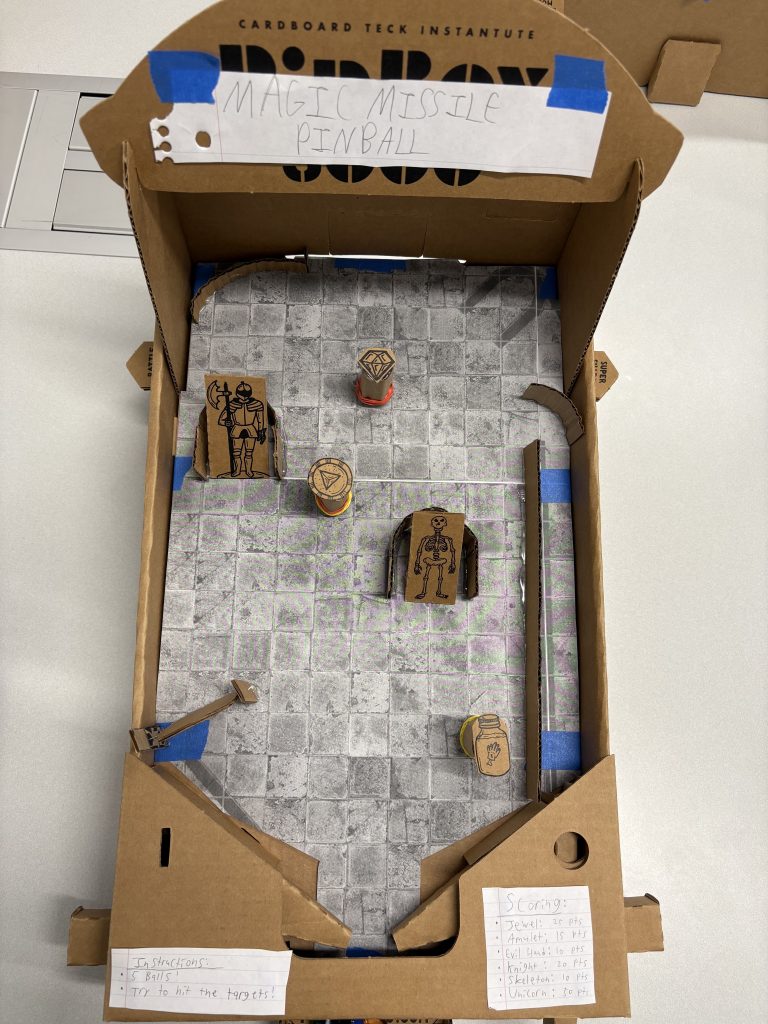
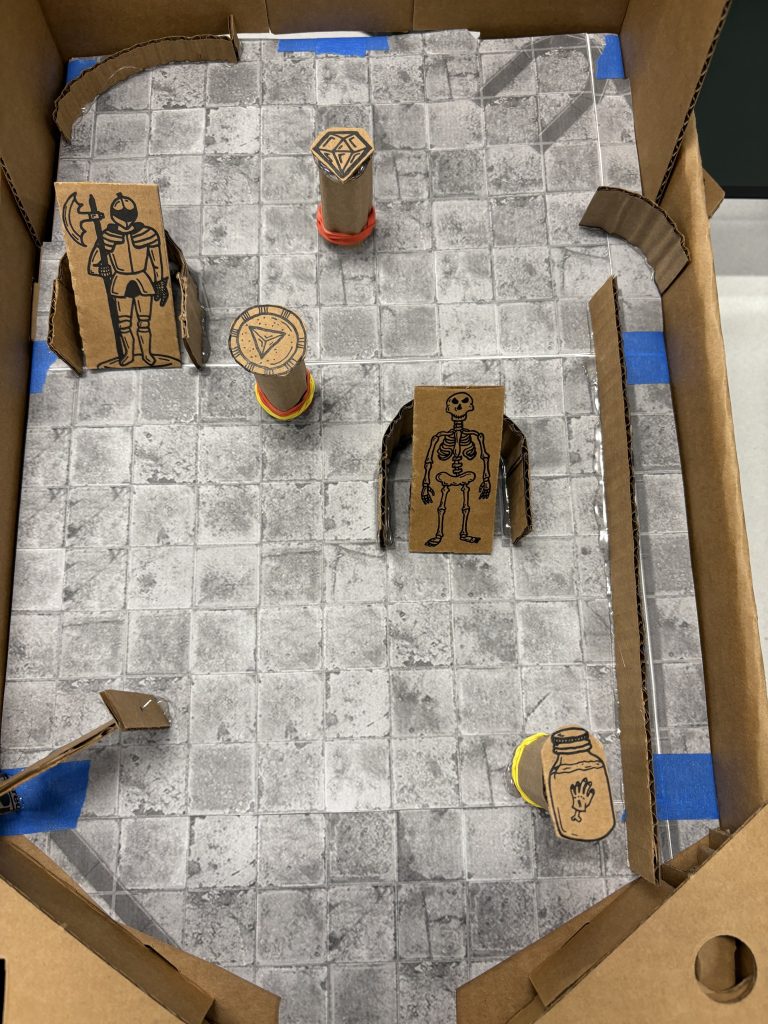
The cardboard machines were very popular with kids, but most of the adults did not interact with them much. Some of the kids could be rather rough, pounding on the flippers and pulling the plungers too far back. I had to swap out all the rubber bands afterwards so they would hold up at the Strong Museum. But as long as the kids had fun, it was all worth it.

I also spent a lot of time explaining the Zodiac Bagatelle game to guests. It is not my machine, but the professor chose to leave it out for the entirety of Imagine because it was the best of the bunch. A lot of the kids were a little upset at the lack of flippers and had little interest in my little history lesson on bagatelle. Maybe it is for the best that I decided to major in game design instead of teaching. Once I explained that it was a fortune telling machine, the kids had some fun with it. Unfortunately, most of their fortunes read “leeches”.

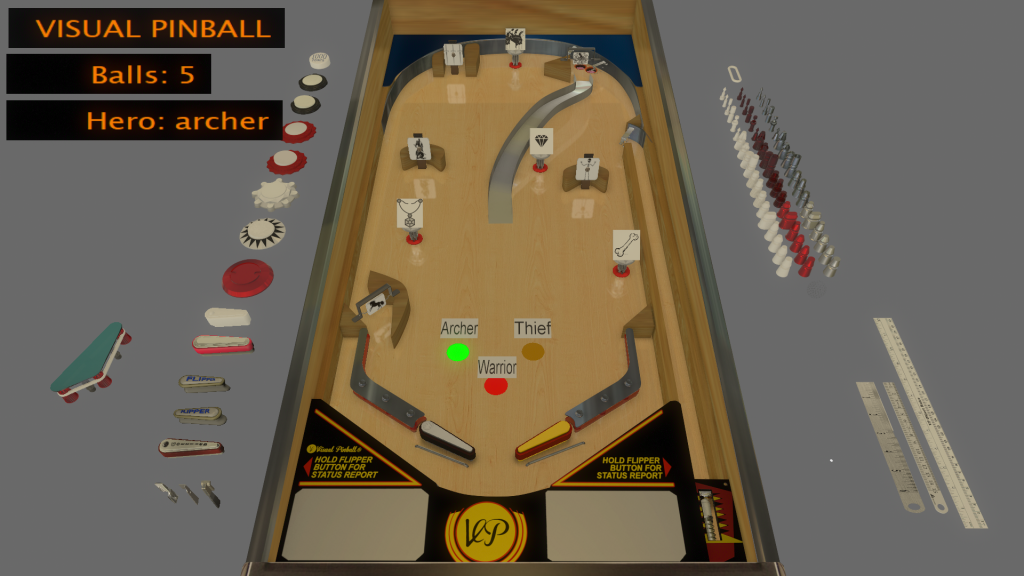
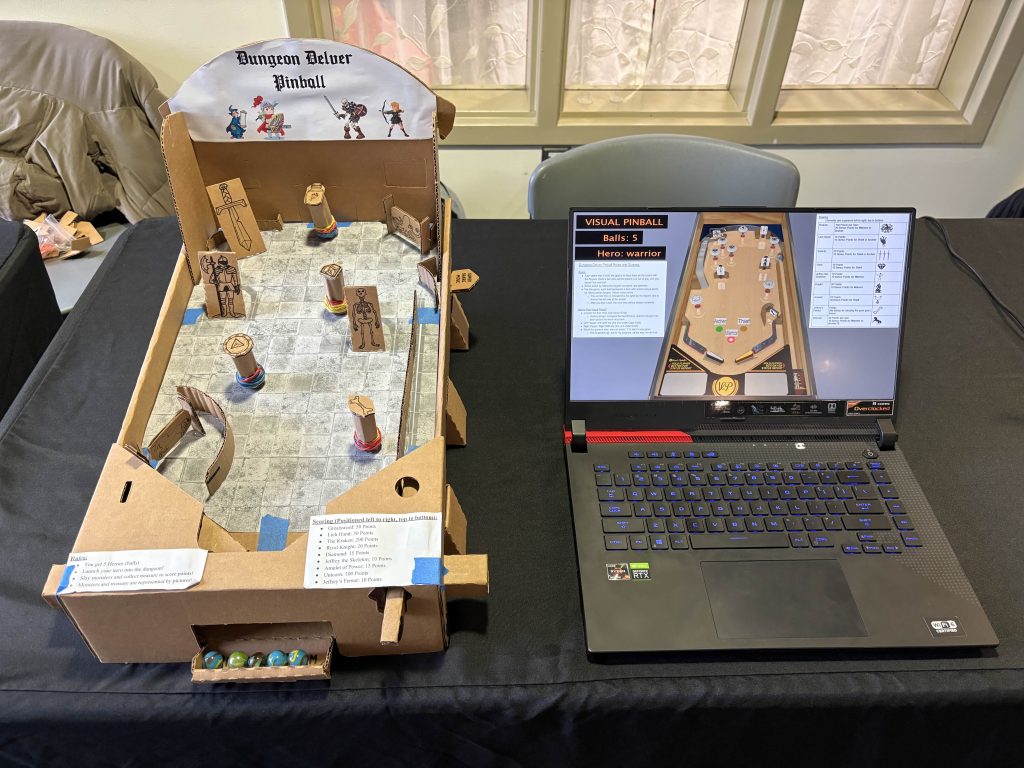
The other person at both of my shifts opted to present their Visual Pinball games on their own. Most of the guests did not interact with them unless the owner gave them the go ahead. I will remember this for when we present everything at the Strong Museum. I assume that most people did not want to be touching expensive laptops without permission, which makes sense. I’ll be sure to let people know they can play my Visual Pinball at the Strong Museum. There wasn’t space at the table for me to present both my Pinbox and Visual Pinball machines, so I was unable to get any playtest results on it, and as such had no changes to make.

Overall, it seemed that the kids just wanted to play and the adults wanted to know the details about the machines and the course. Most of them were surprised to find out that we were presenting class projects, they had assumed we were part of a club. There were even a couple RIT students that wanted to take the course, but unfortunately the future of the course is not set in stone.

Strong Museum Pinball Day:

Both the Pinbox 3000 (Left) and Visual Pinball (Right) Versions of Dungeon Delver Pinball

The showcase at the Strong Museum of Play was not what I expected. The original plan is that us students would take shifts helping representatives from the Cardboard Technology Institute run their Pinbox 3000 building workshop and showcasing our own Pinbox and Virtual Pinball builds. In the end, they did not need much help from us, so our whole time was devoted to showcasing our projects.

The representatives from the Cardboard Technology Institute came and looked at my game. One of them even played it. He said that he liked my bumpers with the rubber bands wrapped around them, they created a satisfying sound when hit. He also liked that I used the included graphics from the kit for my pieces. Though I was a little disappointed that none of the representatives offered any criticism, I cannot grow as much as a designer without knowing where I can improve. I wish I had a better analytical eye to draw from the machines the representatives brought. They managed to use the space much better than I had, but it was also a little too crowded to spend much time analysing.

Less people approached our table than at Imagine RIT. Our Imagine table had almost constant visitors who all wanted to chat and/or play some pinball. Most of the people I saw at the Strong Museum were parents with toddlers, for which marbles are a pretty significant choking hazard. Most of the people who would have been the most interested in our showcase were preoccupied with the Pinbox workshop down the hall. It is also possible that some museum guests did not know that our machines were open for play. At least one parent told their kids not to touch as they walked by, and several people were hesitant to touch anything until we told them it was ok. Even then, most guests opted to play the cardboard machines over the Visual Pinball machines. 

I think the difference in guest behavior is mostly due to the difference in venue. Imagine RIT is a full-on showcase space where it is expected for guests to go up to tables to talk to presenters. The Strong Museum is more of a looking venue, most museums do not allow for much touching. Also, at Imagine, we had a big sign behind our booth that explained what our display was for, which we did not have at the Strong Museum. All guests could see at first glance was that we had pinball machines and laptops, but there was no indication of who we were outside of the odd RIT jacket. 

Most of the people who did approach our table were parents with kids ranging from four to twelve years old. There were not very many college students besides us presenters. The kids had the most interest in playing, with their parents mostly helping them to learn how to play or use the plunger. Like at Imagine, most of the younger kids just slammed on the flipper mechanism repeatedly, trying to keep the ball alive. The few adults that played used a lot more finesse, trying to hit specific shots. While the kids played, parents would ask some questions about how we build the cardboard machines. They were very interested to hear that they came from the Pinbox 3000 kit, probably because it is something they could make with their kids. 

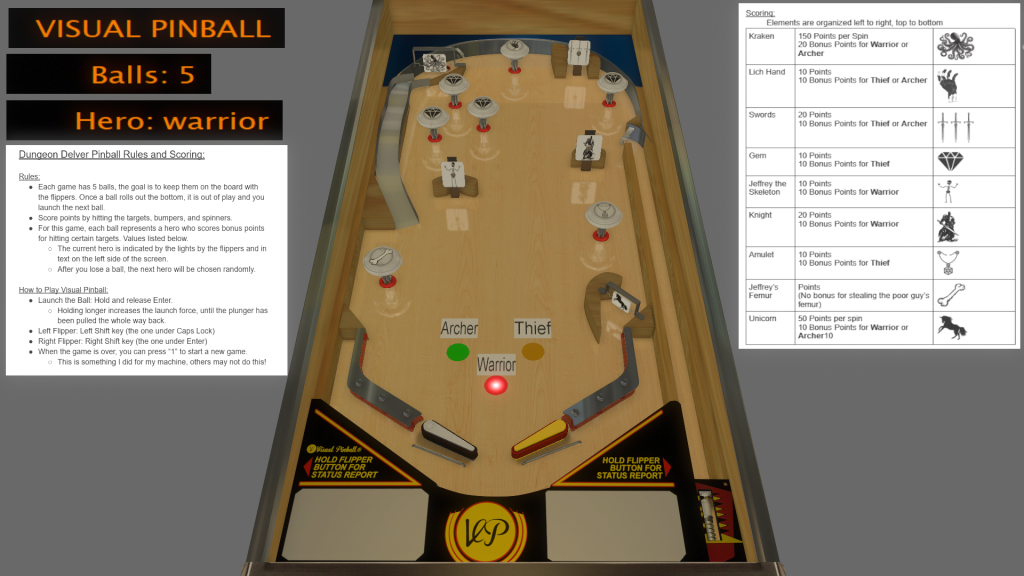
Some of the kids preferred the Visual PInball version of Dungeon Delver Pinball because it was easier for them to time the flippers. Most of them just spammed the shift keys like they did with the flippers on the physical machines, but they still had fun. I just wish they would listen when I told them hitting the key harder did not make the flipper flip faster or plunger launch faster. I also realized early on that I should have programmed a reset function that could trigger at any point, not just when the game was over. Most of the kids played until they lost a ball, then gave up and walked to another machine.

In the end, I think the longer shift wore down on everyone. I know as an introvert, I had a hard time keeping up a peppy facade towards the end. Luckily, Jay was there to cover for the rest of the table. Since everyone was there at the same time, we were all getting slowly worn down over the course of the day. I think a lot of people also woke up much earlier than they normally would have on a Saturday, so the overall energy was a little low from the start.

Overall, the Strong Museum was a good experience. I just wish it could have been a little more constant like Imagine was. The longer periods of downtime were not good for morale and people started itching for things to do. Most guests did not go to each table to see all the machines, so we did not always have something to do. It was nice to watch the families have fun and to see the surprise on people’s faces when we told them we took a pinball class. I think if the kids had fun, it was worth half a Saturday in the end.

Takeaways From the Class:

I chose to enroll in the History and Design of Pinball because I needed advanced elective credit, it sounded unique compared to most of the other advanced electives, and I hoped that it would have a fairly low workload. I was initially worried when I had to wait a few weeks for a working schedule to be posted, since that meant less time to spend designing and building pinball machines. I managed to finish all three projects, so everything worked out.

I wish there was more time spent on pinball design theory. Almost all of it came from a presentation by George Gomez (Chief Creative Officer at Stern Pinball, and I am still in disbelief he had time to talk to our class over Zoom), who obviously knows a lot, but he only had 50 minutes to teach us as much as he could. When it came time to build my Pinbox machine, I was a little lost at first. It was also challenging to figure out what I could actually accomplish without the electronics and mechanisms that make pinball machines work and that communicate information back to the player. I think this course could benefit from having more lecture material to help guide the early design process so students have a stronger foundation when building their machines.

Overall, this course was very valuable. I got to learn a lot about a topic that is glossed over in game design and game history. Building bagatelles and pinball machines is fairly similar to level design, a career that I am heavily considering embarking on. Both have a lot of constraints with area and need to find a sweet spot between open and closed spaces. For both disciplines, placement of gameplay elements is key, as the player needs to be able to find everything they need to interact with. I am glad I had the opportunity to take a course that expanded my skill set differently than most of my peers. Plus, it was a lot of fun!

Pinball Machine Image Sources:

Cardboard Version:

Knight: https://www.istockphoto.com/vector/cute-style-fairy-tales-fantasy-knight-character-cartoon-illustration-gm1474528483-504347407 

Wizard: https://creazilla.com/media/clipart/3169829/wizard 

Archer: https://www.freepik.com/free-vector/archer-woman-ready-shoot_358686133.htm#fromView=search&page=1&position=42&uuid=dde1dce4-7d96-465b-93f2-22cfd242d507&query=%40brgfx+archer 

Skeleton: https://www.123rf.com/photo_30590734_skeleton-warrior-vector-clip-art-illustration-with-simple-gradients-all-in-a-single-layer.html 

Playboard pieces: Provided in Pinbox 3000 Kit https://pinbox3000.com/products/pinbox-3000 

Playboard cover: Created by me in Dungeon Painter Studio http://pyromancers.com/dungeon-painter-online/ 

Digital Version:

Sword: From Tuye Project on Vecteezy.com https://www.vecteezy.com/vector-art/11641963-sword-drawing-illustration?autodl_token=9a63caadb550585a5653a54e9eace9e398d05ddf3e9f642f712920a51468c182b822280b26b776506f890f58d636beaf23e98b9a8156293c92f5f0625ec1e1f9 

Lich Hand: From Rizky Okta Dwiputra on Vecteezy.com https://www.vecteezy.com/vector-art/7356880-hand-drawn-zombie-hand-illustration 

Kraken: From Rashel on Vecteezy.com https://www.vecteezy.com/vector-art/44264408-octopus-silhouette-isolated-on-white-background 

Knight: From Adam Kiss on Vecteezy.com https://www.vecteezy.com/vector-art/55278662-medieval-knight-silhouette-with-sword-for-tattoo-or-coloring-book-designs 

Jewel: From Muhamad Chabib Alwi on Vecteezy.com https://www.vecteezy.com/vector-art/6693742-diamond-vector-icon-template-black-color-editable-diamond-vector-icon-symbol-flat-vector-illustration-for-graphic-and-web-design 

Skeleton: From Taras Dubov on Vecteezy.com https://www.vecteezy.com/vector-art/5362190-skeleton-black-terrible-silhouette-human-body-skull-and-bones 

Amulet: From Muhammad Usman on Vecteezy.com https://www.vecteezy.com/vector-art/16622049-necklace-vector-icon-design 

Unicorn: From Ingrid Jimenez on Vecteezy.com https://www.vecteezy.com/vector-art/7539061-unicorn-black-silhouette-collection 

Bone: From Brian Goff on Vecteezy.com https://www.vecteezy.com/vector-art/553158-bone-vector-icon 

Dungeon Delver Pinball: Visual Pinball Edition

Cardboard to Digital:

My original plan was to keep the Visual Pinball machine as close as possible to the cardboard Pinbox 3000 version, with some improvements that can be made in the digital version. However, the Visual Pinball template has a much larger playfield than the Pinbox, the flipper can output much more force, and the ball seems to have less friction than the marble on cardboard. In short, there is a lot more space in Visual Pinball, and the ball can easily get there. 

Perhaps the most frustrating challenge of Visual Pinball was the scripting. I know a few programming languages fairly well, but Visual Basic was not one of them before starting this project. I knew logically how all of the code should work, but I did not know how Visual Basic handled things like random number generation, resulting in quite a bit of time spent in documentation learning the syntax. 

Dungeon Delver Pinball Initial Build in Visual Pinball

Initial Build:

The initial Visual Pinball build is almost identical to the cardboard version, but with functional targets and bumpers, as well as a gate to keep the ball from falling back into the plunger lane. However, this approach did not provide much of a challenge, given the increased playfield size and flipper strength, the Kraken spinner was no longer challenging to hit. To help correct this problem, I added a ramp in the center as the only path to the spinner, and added some kickers and gates to send the ball back into the rest of the playfield. Unfortunately, the centralized ramp did not give the ball enough space to move between elements, creating a boring game. Playtesters also reported a fair amount of deadspace in the upper portions of the playfield. They also noted that it was hard to see the images on the playboard elements to aim appropriately and maximize their points.

I did succeed in scripting the game. There is a hero system where each ball is randomly assigned to be a Warrior, Thief or Archer, and scores more points for hitting certain targets. The selected hero is indicated by text on the backglass and by lights just above the flippers. There is also score tracking on the backglass. The game is coded to give players five balls, and once the game ends, pressing the “1” key resets the game.

Dungeon Delver Pinball Final Build in Visual Pinball

Final Build:

For the final build, the first thing to fix was the board spacing. My first attempt was to move the ramp over to the right wall, but that caused problems with the launch gate. I decided to move it against the left wall, and flipped where all of the elements were. I had to put a short wall under the ramp to prevent the ball from getting stuck. Flipping the board seemed to help a little, but the unicorn spinner ended up being too difficult to hit. I had to shift the nearest bumper and target a little to the left and widened the gap leading to the spinner. Unfortunately, this version did not get much playtesting, so I am unsure if it needs further adjustment. I also made most of the playboard elements larger to make the graphics on them easier to see, but they can only get so big before the game becomes too easy. I also added more bumpers to fill the remaining dead space I noticed. In terms of scripting, I added a seed for the random number that determines what hero the ball represents to avoid the same patterns from repeating. I also added the rules to the backglass for ease of access.

Overall, my Visual Pinball machine is still fairly simple, but I am proud of how it turned out. I managed to add a fairly unique mechanic with the hero system that should help spice up the game. I also managed to make a playfield where every element is worth engaging with, if only just a little. My only issue is that I didn’t have time to add more complex heroes.

Image Sources:

Cardboard Version:

Knight: https://www.istockphoto.com/vector/cute-style-fairy-tales-fantasy-knight-character-cartoon-illustration-gm1474528483-504347407 

Wizard: https://creazilla.com/media/clipart/3169829/wizard 

Archer: https://www.freepik.com/free-vector/archer-woman-ready-shoot_358686133.htm#fromView=search&page=1&position=42&uuid=dde1dce4-7d96-465b-93f2-22cfd242d507&query=%40brgfx+archer 

Skeleton: https://www.123rf.com/photo_30590734_skeleton-warrior-vector-clip-art-illustration-with-simple-gradients-all-in-a-single-layer.html 

Playboard pieces: Provided in Pinbox 3000 Kit https://pinbox3000.com/products/pinbox-3000 

Playboard cover: Created by me in Dungeon Painter Studio http://pyromancers.com/dungeon-painter-online/ 

Digital Version:

Sword: From Tuye Project on Vecteezy.com https://www.vecteezy.com/vector-art/11641963-sword-drawing-illustration?autodl_token=9a63caadb550585a5653a54e9eace9e398d05ddf3e9f642f712920a51468c182b822280b26b776506f890f58d636beaf23e98b9a8156293c92f5f0625ec1e1f9 

Lich Hand: From Rizky Okta Dwiputra on Vecteezy.com https://www.vecteezy.com/vector-art/7356880-hand-drawn-zombie-hand-illustration 

Kraken: From Rashel on Vecteezy.com https://www.vecteezy.com/vector-art/44264408-octopus-silhouette-isolated-on-white-background 

Knight: From Adam Kiss on Vecteezy.com https://www.vecteezy.com/vector-art/55278662-medieval-knight-silhouette-with-sword-for-tattoo-or-coloring-book-designs 

Jewel: From Muhamad Chabib Alwi on Vecteezy.com https://www.vecteezy.com/vector-art/6693742-diamond-vector-icon-template-black-color-editable-diamond-vector-icon-symbol-flat-vector-illustration-for-graphic-and-web-design 

Skeleton: From Taras Dubov on Vecteezy.com https://www.vecteezy.com/vector-art/5362190-skeleton-black-terrible-silhouette-human-body-skull-and-bones 

Amulet: From Muhammad Usman on Vecteezy.com https://www.vecteezy.com/vector-art/16622049-necklace-vector-icon-design 

Unicorn: From Ingrid Jimenez on Vecteezy.com https://www.vecteezy.com/vector-art/7539061-unicorn-black-silhouette-collection 

Bone: From Brian Goff on Vecteezy.com https://www.vecteezy.com/vector-art/553158-bone-vector-icon 

Dungeon Delver Pinball

Initial Design Ideas:

While building the body of the Pinbox 3000, I saw all of the classic fantasy decorations on the side of the frames and knew I wanted to use them for my machine. My initial idea was to have the player take on the role of a wizard casting a spell to try and hit various targets, but that did not come across in the initial build. I struggled to think of what I could build out of just cardboard and in a limited amount of time, so I settled on some classic pinball elements: spinners, bumpers and targets. The pieces from the Pinbox 3000 kit proved to lend themselves well to these kinds of components. The knight and skeleton are tall pieces that make good targets, the unicorn and octopus are wide and shorter to make good spinners, and the other pieces are small enough to make good bumper tops. 

The general idea was to place the elements around the playboard so that the ball could ricochet between a few before rolling down to the bumpers. I originally planned to section off the unicorn spinner such that the ball would have to roll into it from above, but I mismeasured my playfield cover, which I used to position the other playfield elements. I decided to angle the knight and skeleton targets slightly so that the player could more easily see them. I added an angled stand to the underside of each to create this effect. The bumpers were made of cardboard tubes with an image glued on top and a couple of rubber bands wrapped around the bottom.

The rules are incredibly simple. The player gets five balls and tries to keep them alive while hitting targets to score points.

Iterations and Player Feedback:

The initial build had a lot of smaller problems that quickly added up. First and foremost, none of the players were able to pick up on the theme. I made the quickest fix possible by changing the theme from a wizard shooting spells to the player sending heroes into a dungeon. There were also issues with the scoring instruction formatting, namely the lack of rhyme or reason to the order of objects. I had ordered them by element type (bumper, spinner, target), but the players preferred having them organized from left to right, top to bottom. 

The players did like how each element felt very tactile and satisfying to hit, with the unicorn spinner being the overall favorite. The targets and bumpers both had their issues. The angle on the targets was too low, making them more like ramps. Several players launched the ball out of the playfield after hitting these targets. The teaching assistant suggested that I put a sheet of plexiglass over the playfield to prevent this. However, I cannot afford that and I only had two days to make improvements, so I used cardboard to boost the targets forwards a little. The bumpers were initially not very bouncy. They were not secured very well and did not have enough rubber bands. Now they are attached to the playboard with a thumbtack through the bottom and have between six and eight rubber bands apiece to increase the bounce potential.

Moving to the Virtual Version:

The main thing I want to add in the virtual version of this machine is more complexity. Right now, it is the most basic a pinball machine could be: it has flippers and things to hit. I would like to have a machine that has other features that players expect, like a multiball or some kind of score multiplier. I think some kind of combo of hitting pieces could trigger the multiball.

I would also like to find a way to make the knight and skeleton targets more interesting. Currently, they are the most static pieces in the prototype. I would like to add some sort of movement, either horizontal or a pop-up, that makes them more engaging.

I would also like to add some sort of ramp or rail. I find them to be very satisfying elements of pinball games, but I was not brave enough to make one out of cardboard or try to figure out the physics to get one working on a physical board. I also want to add a kicker, possibly behind the octopus spinner, to add a bit more variety to the game. 

I am excited about a few physical quality of life features offered by Virtual Pinball, such as score tracking and the gate on the ball release. I could also add a gate to the unicorn spinner corral to keep the ball out unless it enters from above. Also, having true bumpers will be very helpful in making the game feel more like pinball.

Lastly, as a challenge, I want to try and add more for my theme. In my instructions, I say that the balls are all heroes. I think it would be interesting if each ball had something unique about it that would change the game slightly as it progressed. For example, the final ball might be a “healer” who can restore one other ball if the player completes a challenge, or a “thief” that scores extra points from “treasure” elements. However, this is a stretch goal that will depend on other projects that I also need to work on.

Image Citations:

Knight: https://www.istockphoto.com/vector/cute-style-fairy-tales-fantasy-knight-character-cartoon-illustration-gm1474528483-504347407 

Wizard: https://creazilla.com/media/clipart/3169829/wizard 

Archer: https://www.freepik.com/free-vector/archer-woman-ready-shoot_358686133.htm#fromView=search&page=1&position=42&uuid=dde1dce4-7d96-465b-93f2-22cfd242d507&query=%40brgfx+archer 

Skeleton: https://www.123rf.com/photo_30590734_skeleton-warrior-vector-clip-art-illustration-with-simple-gradients-all-in-a-single-layer.html 

Playboard pieces: Provided in Pinbox 3000 Kit https://pinbox3000.com/products/pinbox-3000 

Playboard cover: Created by me in Dungeon Painter Studio http://pyromancers.com/dungeon-painter-online/ 

The Gilded Age Bagatelle

Evan Fankhauser

Initial Design Ideas:

I designed a bagatelle inspired by the Gilded Age of the USA (around 1865-1902). It was a time period where a lot of wealth was consolidated in a few corporate monopolies in key industries such as oil, railroads, banking and steel. Due to these monopolies, leading to a few recessions and market crashes. From there, I designed a game where the player tries to accumulate as many points as they can without causing a market crash of their own. I felt that this theme and gameplay loop fit the gambling roots of bagatelle boards in America.

As for the playboard, I thought that a giant dollar sign made out of pins would be an effective and thematic centerpiece. My original idea was to have more dollar signs to redirect the ball, but they ended up taking up too much space. I placed the primary “Market Crash” section at the bottom of the machine, where the ball falls out of play. I added two more “Market Crash” catchers down the sides and angled them so the ball had a decent chance to roll out, helping to drive suspense and engagement. As for scoring sections, I placed six towards the bottom of the playfield, two up top, and two with the highest point values inside the main dollar sign. The highest point sections were quite literally “in the money”. For the scoring section on the top and bottom, I assigned points based on where the ball tended to land most often during my initial testing.

Changes and Iterations:

In the end, the general shape of the playboard stayed the same. Some of the pins were adjusted slightly to ensure that the balls could not get stuck anywhere that did not score points or cause a “Market Crash”. The walls in the back corner were changed from straight to curved to direct the ball more subtly. A small curved wall was added at the end of the ball launching track to help guide the ball towards the center of the playboard. The rules were updated slightly to tell players to remove balls once they landed in a scoring section. Otherwise the balls prevented other balls from being scored.

Playtest Feedback:

Overall, players seemed to like the game. They reported that the theme was well executed and most remarked that they liked the giant dollar sign in the center. There are still a few spots where the balls can get stuck, and I also noticed that the green marble is a little larger than the other two, so I may need to check each space with that one. A few players lamented that it was too easy to hit “Market Crash” and that they wanted to be able to play a bit more and get more points before losing. One player suggested adding more decoration, which I agree with. Despite all the critique, I think The Gilded Age bagatelle was a success, considering the materials and time I had to work with.