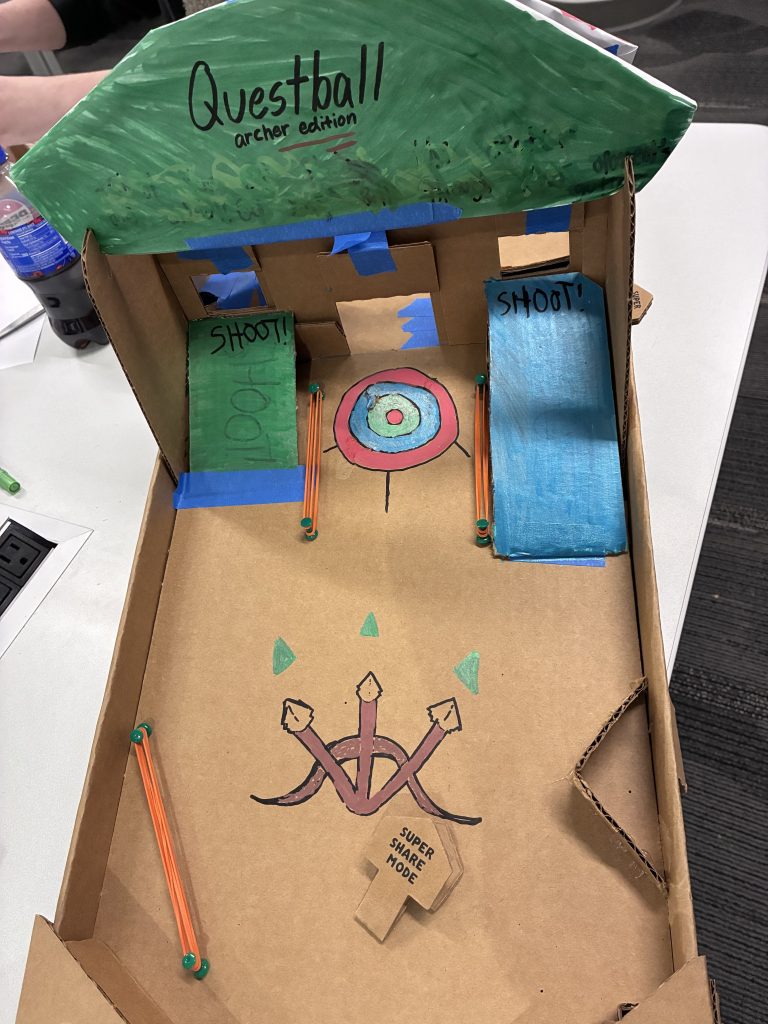
This time, I teamed up with Jacob and Raina to do something interesting: make a Fantasy Battle themed Pinball Pinbox. We decided that making each Pinbox a different Character Class like a traditional fantasy TTRPG. Mine was the Archer!
So I wanted to have a giant bullseye and ramps to simulate a sort of volley of arrows to attack the person on the other side of the box.
PRODUCTION
It was really fun working on this with Jacob and Raina. I had to make some changes to my board since I kinda realized clogging up the center of the field for a battle machine like this wasn’t optimal.
When we had finished, we had a really cool project! And it was super fun being one of the only groups who had a Battle machine like this, something that actually can’t be done with a digital medium, this is a Pinbox 3000 Exclusive Experience.
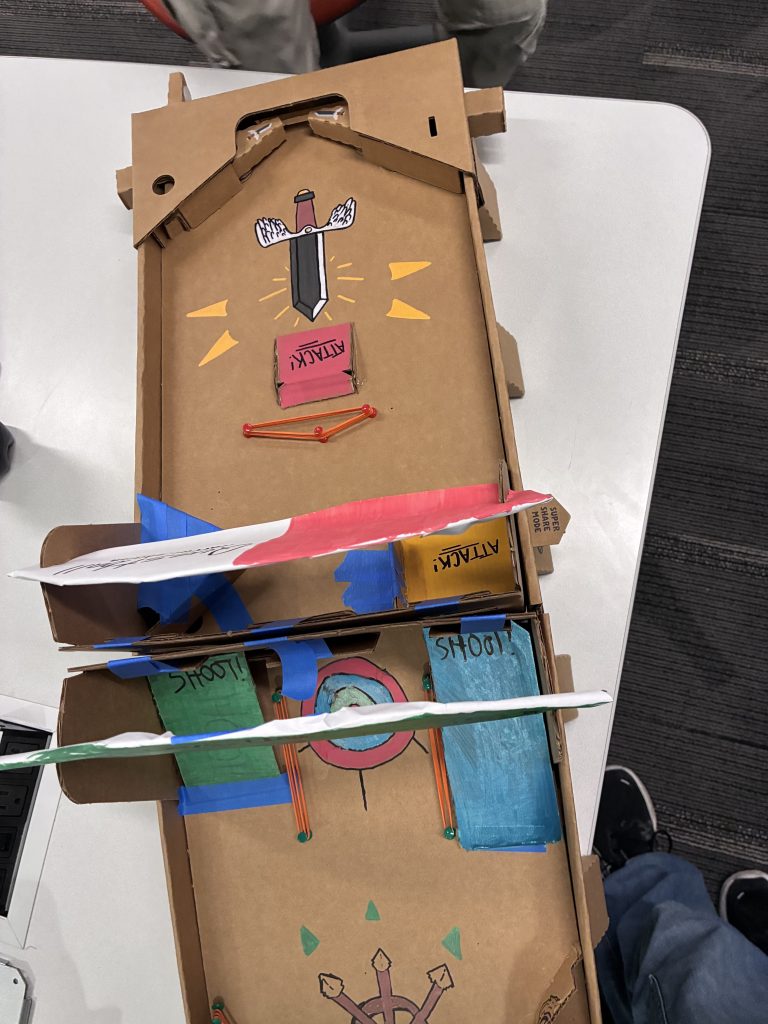
Questball is made up of a series of 3 different Pinbox machines representing different classic RPG classes, the Wizard, the Archer, and the Warrior. These different machines would be set across from each other in “battle mode” so that your balls could be sent to the other person’s board, like a 1-on-1 fight between two RPG heroes/villains. This edition of Questball is centered around the Warrior. The initial idea for the Warrior Edition of Questball was to have lots of “defensive” pieces all around your board, meaning that you’d have lots of ramps that doubled as walls for the opponent, lots of ways to redirect and slow down the ball to make it easier to calculate your hits and how you’ll get the ball over to your opponents board.
What Changed?
As I went along, creating and designing the first iteration of the board for the Warrior, I found that my original idea of “defensive” pieces on the board was going to be very hard to make work properly, because a lot of these pieces that could keep your opponents from scoring on you too quickly also often became a hindrance to you when trying to get your ball over to the opponent’s side.
Eventually, I managed to set up a ramp in the center of the board that would act as a way for you to get your ball easily to the other player’s side, and set up a rubber band bouncer so that your opponents would have a very hard time sinking their ball too quickly when sending their ball down the middle of the board. In addition to this, another ramp was added on the left-hand side of the board, and a block was added to the right hand side. The ramp allows you to have a second course of “attacking” rather than just the middle, though it is much harder to get the ball up the ramp. The block makes it harder for anyone who sends their ball on that side to get you right away with it too, while not really hindering you, since you don’t need/want your ball to go through that side of the board anyways.
User Reactions
Overall, most people found the “battle mode” gimmick a lot of fun, and “choosing your class” was a cool way to mix up the battles between players. I think a lot of people found that the Warrior Edition of Questball had a hard time “attacking” the other player a lot of the time, as it took a good amount of precision and power to get the ball through either of the holes the Warrior has easy access to. Generally though, I think most players had a great time stepping into the role of the Warrior and defeating their enemies!
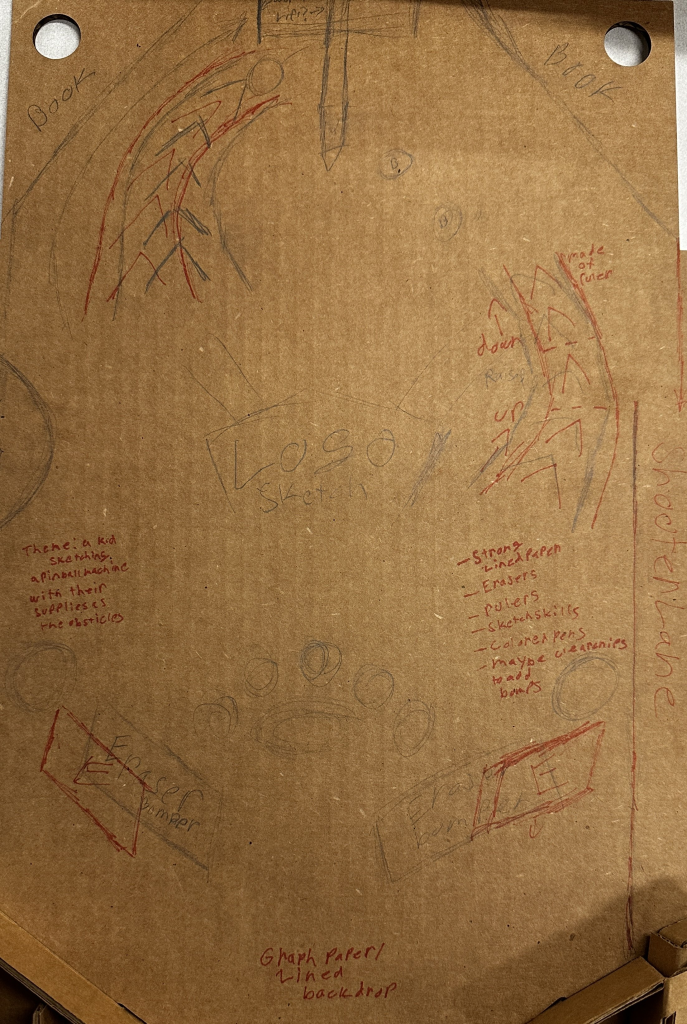
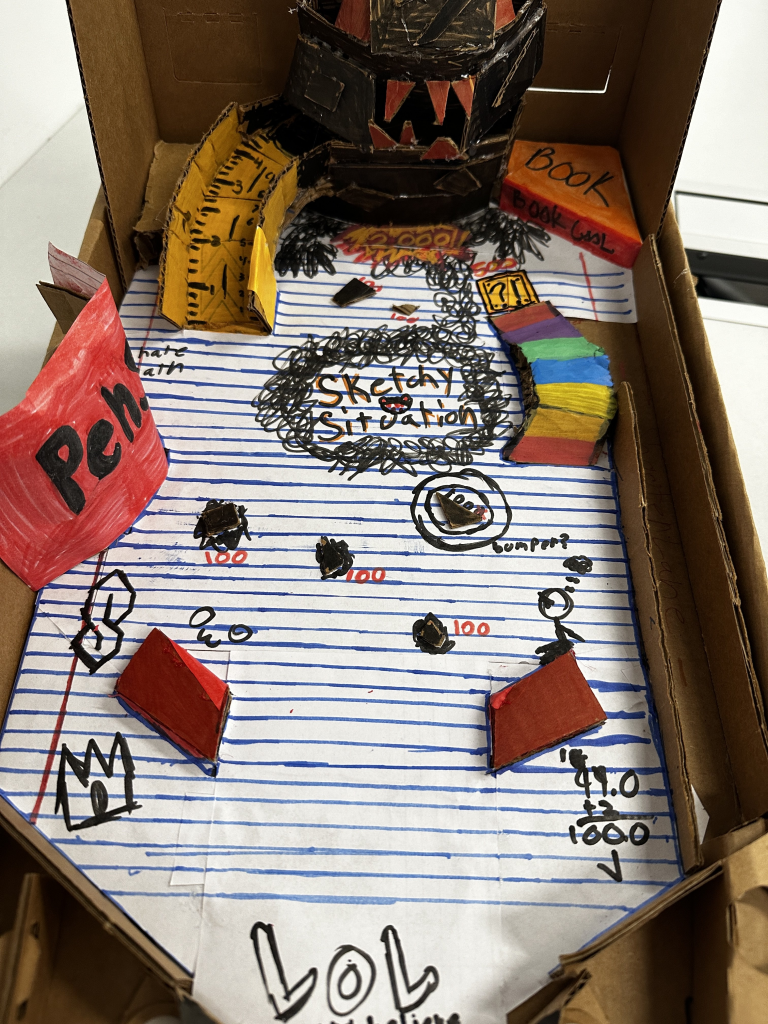
When I started brainstorming for my Pinbox 3000 pinball machine, I knew I wanted to build a sketch-inspired game. I set out to create a game that looked like it had been sketched by a kid during class. Every part of the game would lean into that vibe from the lined paper backdrop to the handmade cardboard elements designed to mimic school supplies like rulers, pens, and erasers.
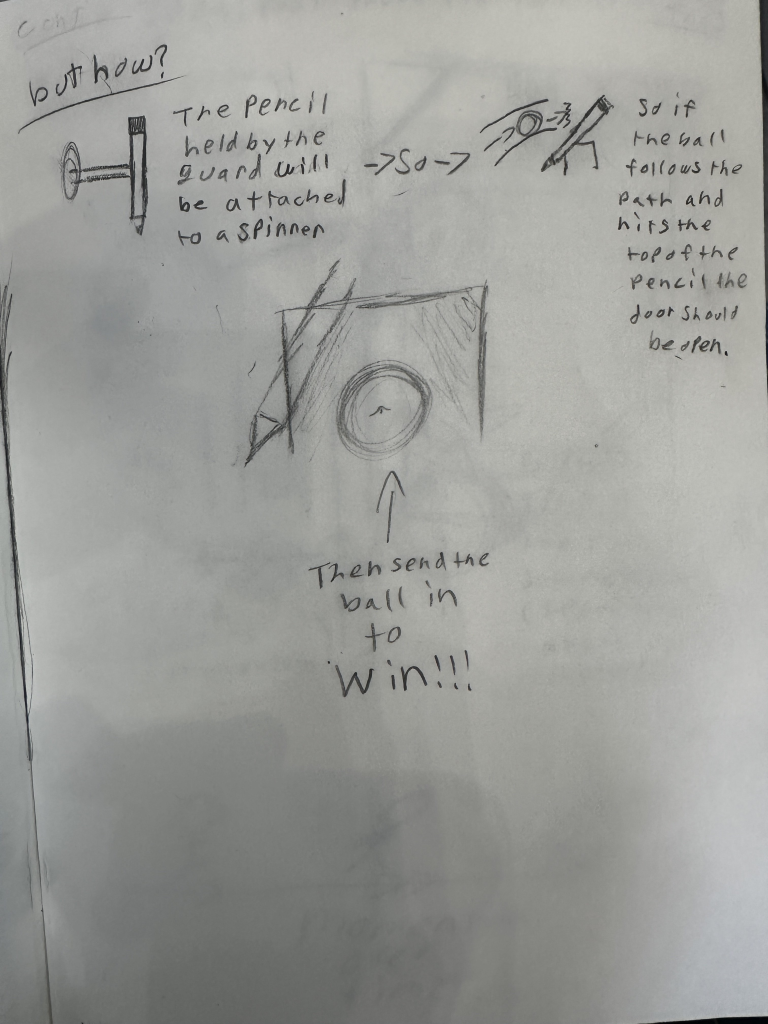
Originally, my win condition was going to be super specific: the player would guide the ball up a ramp to hit a “guard” holding a pencil sword. This pencil would be attached to a spinner, and if the ball hit the tip just right, the pencil would spin out of the way, revealing a hole beneath the guard’s legs. Sink the ball in the hole and you win.
That was the plan for weeks. I moved straight into sketching a rough outline on my cardboard playfield.
This design features 2 eraser themed bumpers at the bottom on the playfield, a ramp on the right side too simply add some more action, and finally the big ramp in the top left to hit that pencil and get you that victory. In Hindsight this design was very empty and didnt have much gameplay past the ramp. But I continued with it yet again and made a rough physcial design.
The phyiscal prototype pretty much matches the planned outline without many deviations. The main one was that the soon to be erasers were moved slightly. However as construction went on with this design, I realized I was falling behind. The guard mechanism was tricky and I couldn’t get the win condition to work the way I wanted. Everyone had compelted boxes and this was the state of mine.
So I pivoted.
Rough Physical Design & Major Pivot
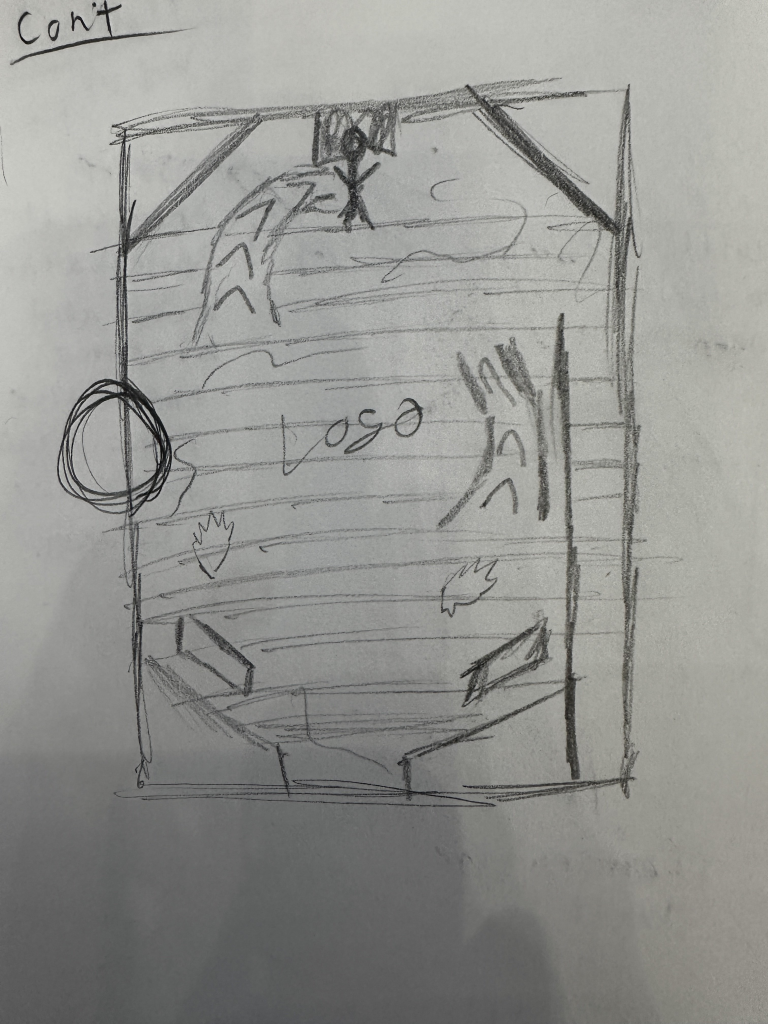
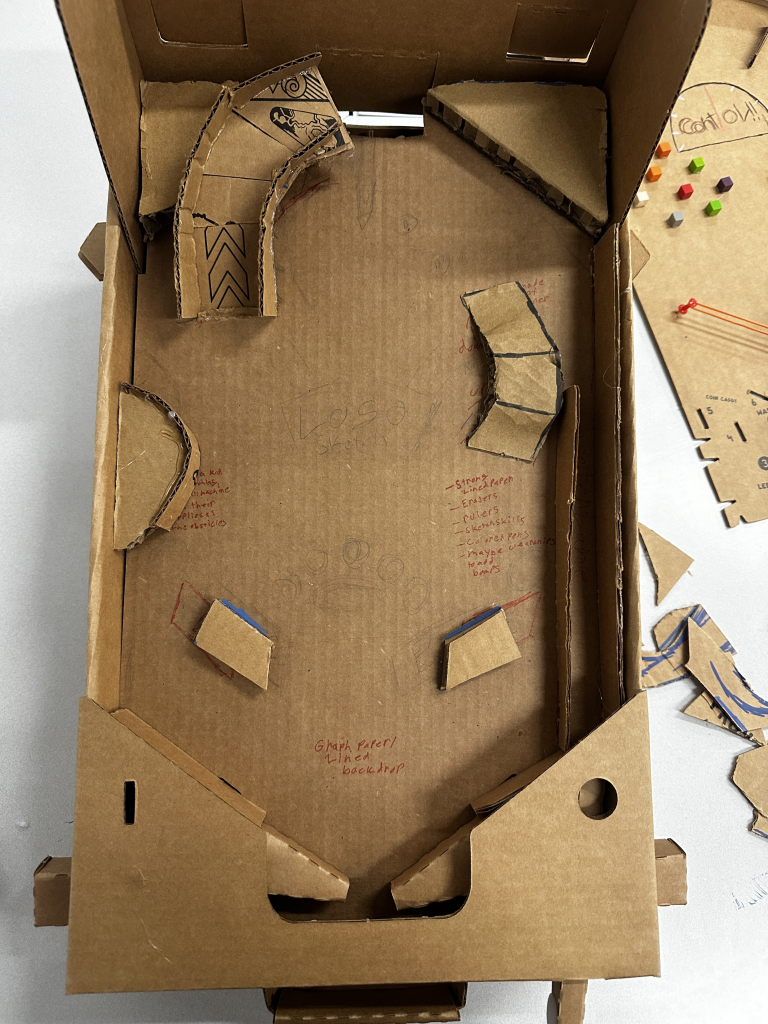
After days of struggle, I brought the pinbox home and redesigned the game in one night, 9:30 PM to 4 AM. I kept the notebook sketch theme, but ditched the knight guard. Instead, I designed a doodle monster that lurks at the top of the field. The goal now was to hit the ball up a ramp and into the monster’s open mouth, damaging it like a boss fight in a video game. It felt like a natural evolution, still cartoonish and creative, but way more fun and less finicky.
The board featured a hand-drawn lined paper background, a monster made of scribbles and cardboard, books actaing as the borders and a cup on pencils as an obsticle. My loose design rules were simple: everything on the board could be made out of supplies a kid might find in their pencil case or on their desk.
Iteration & Playtesting Feedback
While I was happy with the design, it still felt more like a novelty than a full pinball experience. That’s when I got some great advice during playtesting from my Ta Kai: having only a win condition wasn’t enough. Players need ongoing feedback, reasons to keep playing, trying, and improving. A scoring system would help with that.
So I got to work on the final iteration. I added:
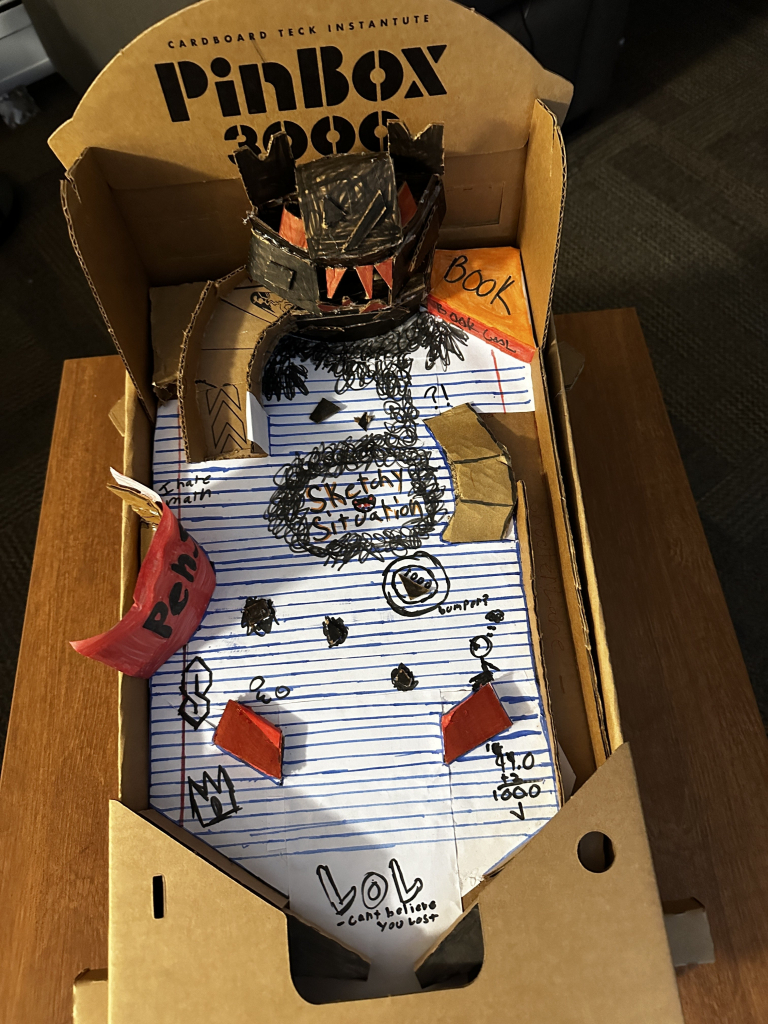
Scoring zones: Black blobs across the board represent the monster’s attacks. Hitting them gives you 100 points.
Point bonuses: The previously useless ramp now leads to a block worth 500 points.
Combat scoring: Hitting the monster gives 2000 points. Getting the ball into its mouth? A satisfying 10,000 points.
These additions made the game feel way more dynamic, adding the replayability and engagement it was missing before.
Final Design: The Sketch is Complete
The final version of Sketchy Situation is bold, colorful, and fun. The ramp mechanics work smoothly, and the monster’s dramatic presence at the top of the playfield gives the game a clear focal point. The layered cardboard build gives it depth, while the notebook-themed backdrop and hand-drawn elements sell the idea that it came straight from a kid’s imagination.
Stepping Stone to the Digital Version
This machine is just the beginning. As I move toward building a digital version of Sketchy Situation, I see so much potential for expansion:
Real-time score tracking with animations and effects
Combo multipliers if you hit multiple scoring blobs in a row
Dynamic visuals (scribbles that animate when hit, explosions, pencil-drawn UI, etc.)
Sound design to emphasize hits, bonuses, and boss fight moments
This physical build helped me test ideas quickly and solidify a theme, but in a digital space I’ll have more freedom to go wild with feedback systems, progression, and flashy polish.
Conclusion
Building Sketchy Situation was both chaotic and satisfying, just like a real sketching session. What started as a cardboard mess turned into something that feels cohesive and playable, and I learned a lot about how to pace a game, when to pivot, and how to turn feedback into stronger design.
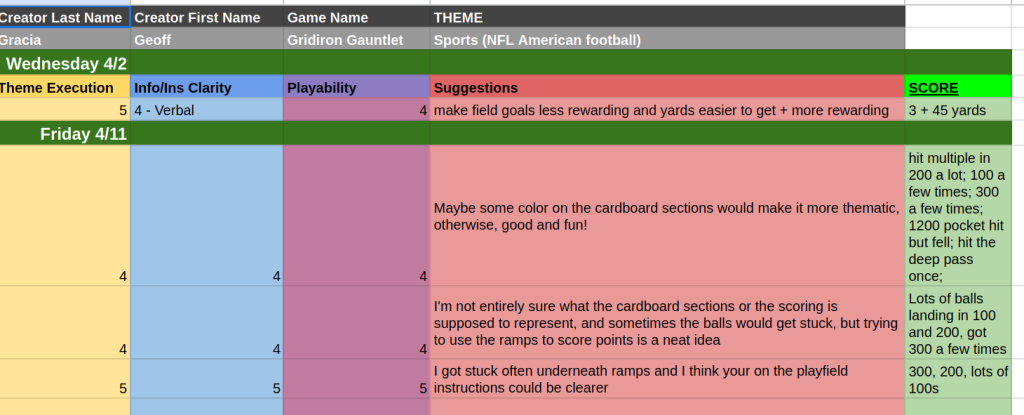
Design drafting I had the idea and use of this come to my very early into the semester. It was based on a table called “ABC’s Monday Night Football”. It was a super interesting and complex array of lights, targets, and ramps. It had an awesome metagame system that used the lights to track your “distance” on the field, which you increase by hitting the ramps. Hitting them would move your light up the field until the Endzone! In my mind it truly felt like it was ahead of its time. There’s also not many other tables like it. I wanted to recreate it and then some: I wanted to have you playing against an enemy team that would be scoring based off your mistakes and progress. I planned to include a lot of playfield toys and I was hugely excited to undertake!
First version
After a lot of tooling and toying, I settled on what elements I thought were on the necessary course, and rendered my first version of my Pinbox pinball machine:
this was version 1 of 3; version 2 is not captured in any media
Below is the user feedback I got with this rendition
My general consensus was that the “homage” scoring system was too confusing, especially with, and because of, the limitations of Pinbox. I abandoned the “yardage + score” tracking system. Also I found that in order to keep the ramps, I needed to create a surrounding perimeter that would prevent the balls from launching out of the field. I also decided to ditch a “spinner” target feature at the top that was suppose to be for field goals. I didn’t find a way I liked and that worked.
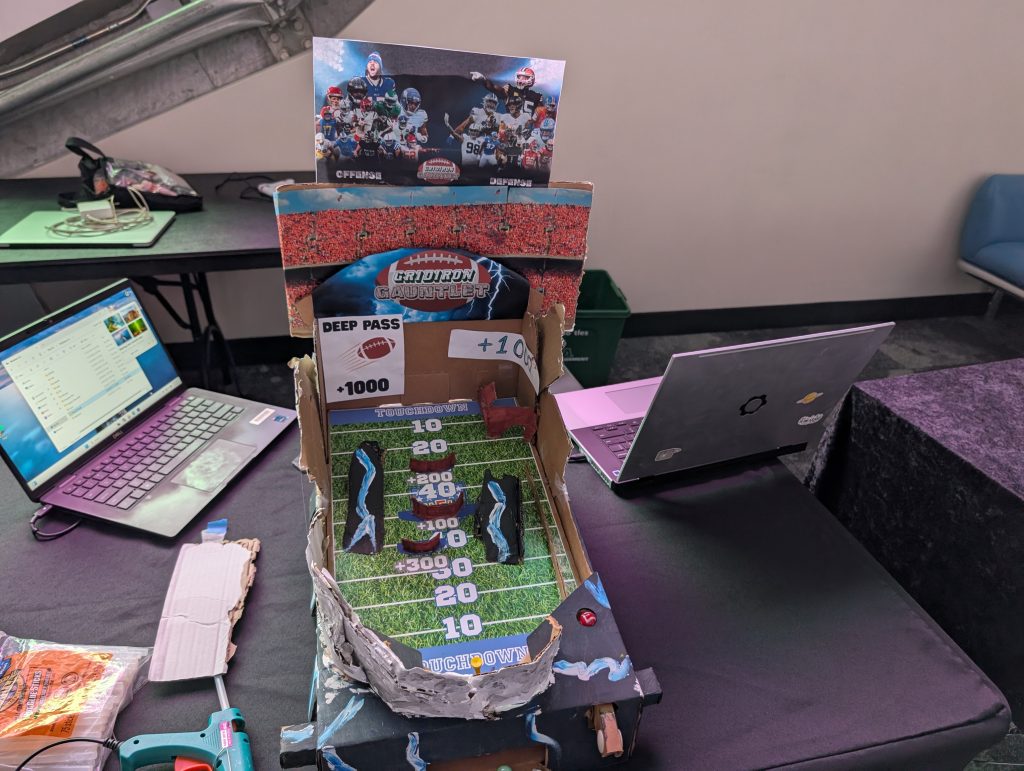
There was a version that I demo’d at Imagine that was the in-between phase, it was basically the one you will see below with the paint job and graphics. I wanted to confirm that the walls and movement of the on field pieces would positively impact the final. I did find out even at Imagine, that I needed to move around my “buckets” and shrink them a little bit to prevent people from only landing in the bucket and never reaching the flippers.
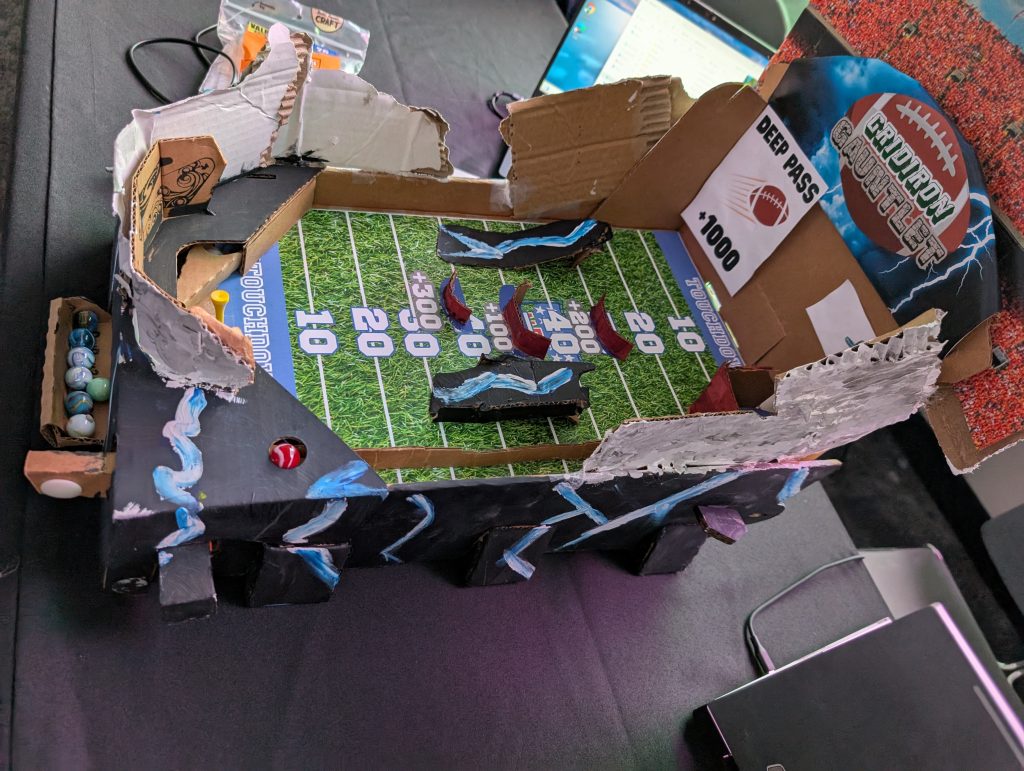
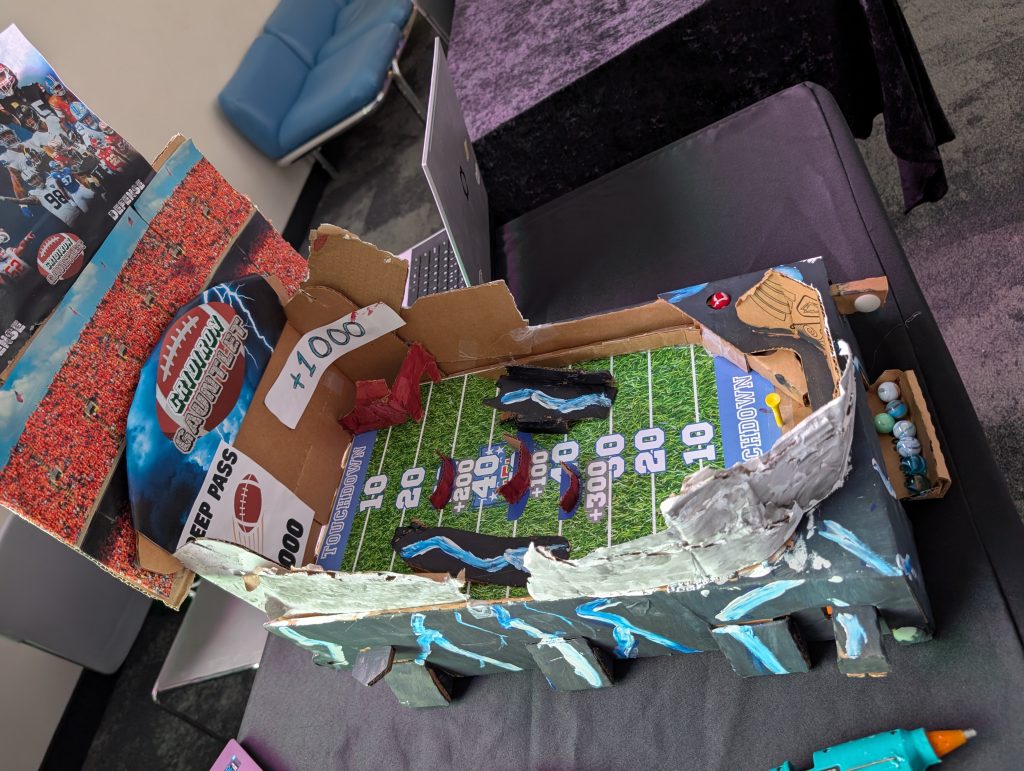
“Final” version
This is my culminated final version. I added the paint job and my personal created graphics. You are supposed to use the ramps to land in what is supposed to be a broadcast booth, and to hit the deep pass target on the wall. Both of these require a lot of force and accuracy in the shot to make the full velocity off those ramps, but they’re equally feasible. The buckets are the same and labeled better. I also added the golf tee from the kit as a ball save peg, I also painted it yellow to emulate a goal post. This is a feature I love in other pinball tables, and is something I always like to try to incorporate.
While it didn’t feel like an appropriate space-with the people needing to just quickly play and pass through-to ask them to type up on a user feedback sheet, I was able to observe the people playing. My plunger mod worked well, since I noticed at Imagine that older and younger age crowds tended to struggle with the pull and it would pop out of its socket semi-frequently; at The Strong, it worked pretty flawlessly. The ball only came out once in a freak marble overload situation, but the walls all worked as intended! All the users were drawn to its loud colors and graphics and had fun with the mechanics.
Visual Pinball gave me trouble on mobile systems since we started working on them. I got the app to install and could see the editor but I was never able to actually run the game outside of the classroom desktops.
from my Laptop running Linux Mint
In the muck of getting it to work on my multiple laptop attempts, I also decided to deviate my digital table away from Gridiron Gauntlet, and instead revive my “Hockey Night” Pinbbox bagatelle in a pinball machine format in Visual Pinball.
When creating our physical machine, we wanted to approach a challenge of making something pretty unconventional- a multiplayer game with two connected pinball machines. Initially, there was a lot of discussion about whether we wanted this to be a competitive or cooperative game. There were originally ideas of making a competitive wizard themed pinball game where players would send their opponent additional balls by hitting difficult shots, and if either of the players drained any of the balls on their playfield, they would lose. We discarded this idea for a couple reasons, one of which being the logistics of how we’d send balls to the other player’s side. Ideally, we wanted some way to “unlock” the shot to get a ball to the other side, but we wanted to stay away from moving parts relying on electronic components on our cardboard machine for logistical reasons. The other, and bigger reason, was that one day Audrey wore a Frog and Toad shirt into class and Professor Jacobs commented on it. The three of us discussed how much we liked Frog and Toad, how fun it would be to make a machine based on the IP, and it just felt right to make a cooperative game based on the cooperative spirit of the Frog and Toad brand.
In our discussion, we decided to steer away from a game based on points because, for one, it would be very difficult to track points in a game with no electrical components and may feel stressful, and two, it may cause players to get too focused on their own game and largely ignore the cooperative aspects we were trying to achieve. We decided that a game of “completing objectives” could be much more cooperative and so we decided to design our game around this idea. Each player has an identical playfield, which has multiple holes placed around with specific ways to sink a ball into them. The hole in the top right (visiting the sparrow) is achieved by launching your ball up the log ramp. The hole below it (jumping across lily pads) can be made with a skill-shot. The hole on the left side (picking flowers) can be filled by guiding your ball down a series of spinners (although we have seen players send it in by pure luck and avoiding the fields). The hole at the top (cleaning the house) is one of the most difficult shots to hit, since it requires a high amount of precision and power. The most difficult part of this shot is the hole in the backboard behind it which can send your ball to the other player’s side of the machine. This can prove to be an issue if done accidentally (can potentially overwhelm the other player and require them to send you a new ball), but if done purposefully can provide opportunities for cooperation, and you could also get your ball in your partner’s top hole. One of the most unique parts of our machine is our ball launching system. We subverted how balls are typically delivered to playfields, and modified it to foundationally encourage cooperation- you deliver balls to your partner’s playfield. If you drain a ball and need a new one, you need to communicate this to your opponent and they have to send you a new ball. We made the ramp much longer, and instead of following a curve to the back of your own playfield, it passes through a hole that delivers it to the back of your partner’s field- right above the flower field spinners.
We had multiple ideas for our ruleset, but eventually decided on our current rules of a “blackout” like game. The game is won when both players have put a ball into each of their holes, and they have two minutes and 30 seconds to do it. 2:30 was found to be a lenient enough amount of time to allow players to win without being too stressful, but still provide enough of a challenge to be fun. There are two balls on the playfield at any given time. The typical state of the field is one ball on each playfield, but this can be changed by one player launching a ball through the middle, or if a player drains a ball. If a player drains the ball, it is their responsibility to shout it out to their partner, and for their partner to send them a new ball while making sure they don’t drain the ball they have in play.
The most important part of making the machine come alive was the art and design. Audrey did a fantastic job designing the art on the playfield, and it really pulls the whole thing together. The art on the playfield gives the whole experience a feeling of whimsy, and really helps the players feel encouraged to work together. Many parts of the gameplay experience, such as the log, and flowers, were inspired by the art direction and it makes for a cohesive and fun experience
The art, layout, ruleset, and cooperative style of our game proved to be highly successful in our playtests. Players were having fun, frequently communicating things they needed like additional balls, but also enthusiastically communicated their successes! We’re overall quite satisfied with this machine, and are excited to see people play it at Imagine RIT, and at the Strong Museum pinball event.
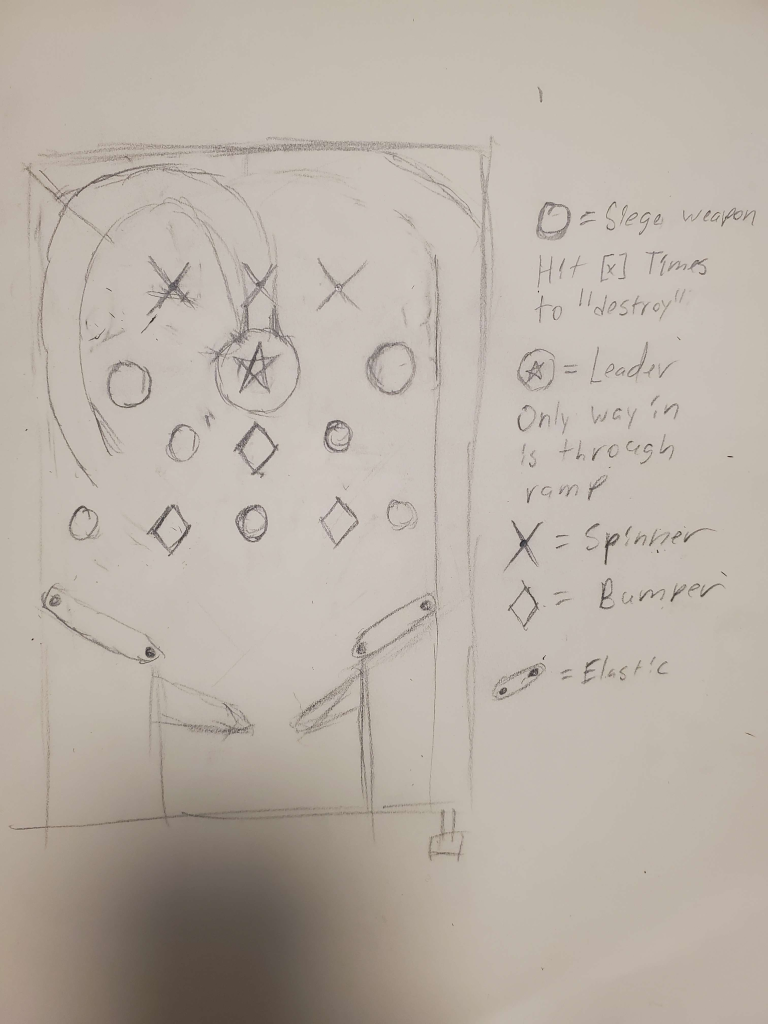
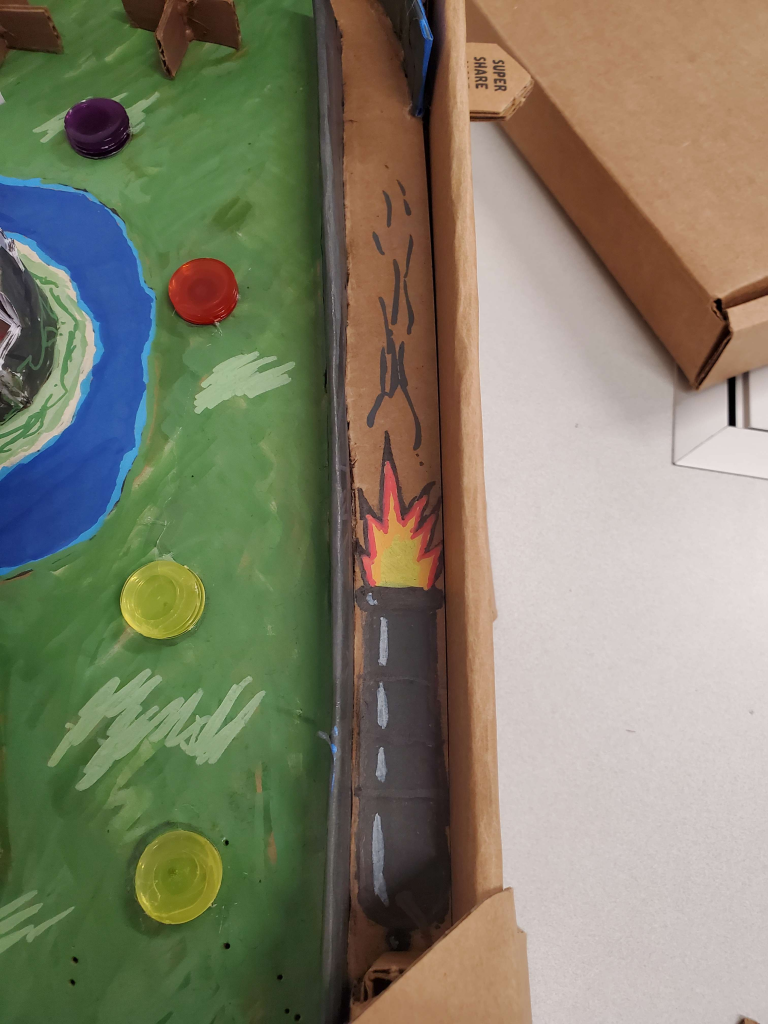
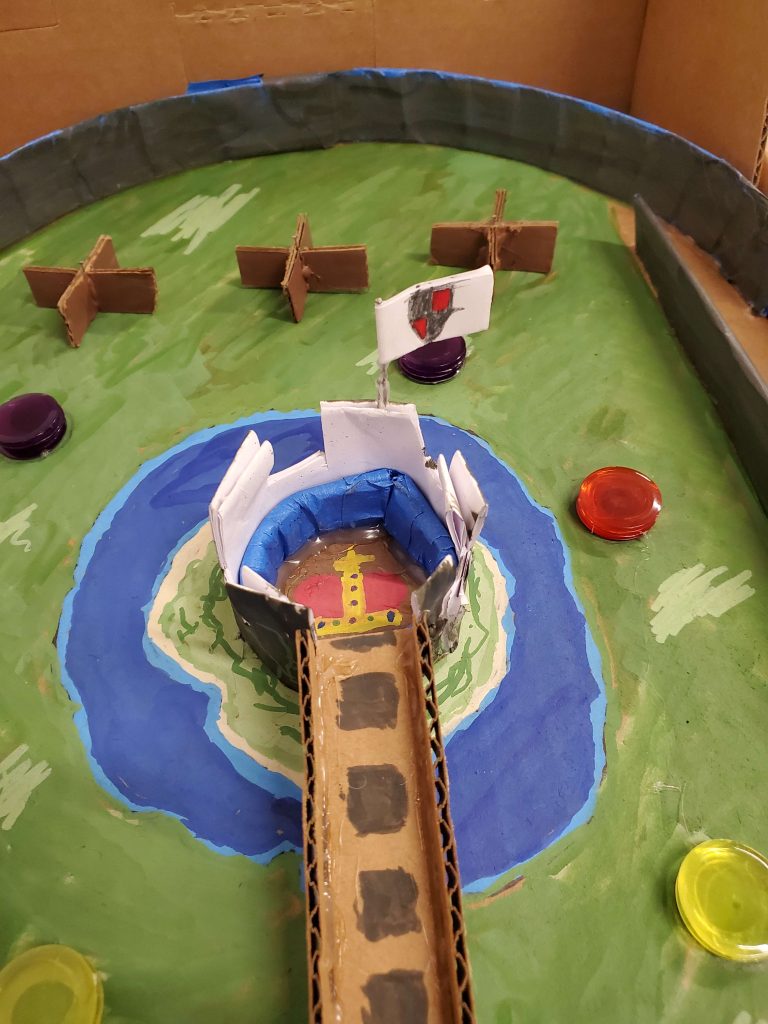
For my Pinbox Pinball table, I initially wanted to do a magic/wizard-themed pinball table, as the idea of a “Magic Missile Multiball” mechanic sounded really cool. However, as many others had a similar theme they wanted to execute, I decided to pivot to a more general medieval theme; one that would keep the era the same, just with a different overall theme. As such, I went with a castle siege.
Design
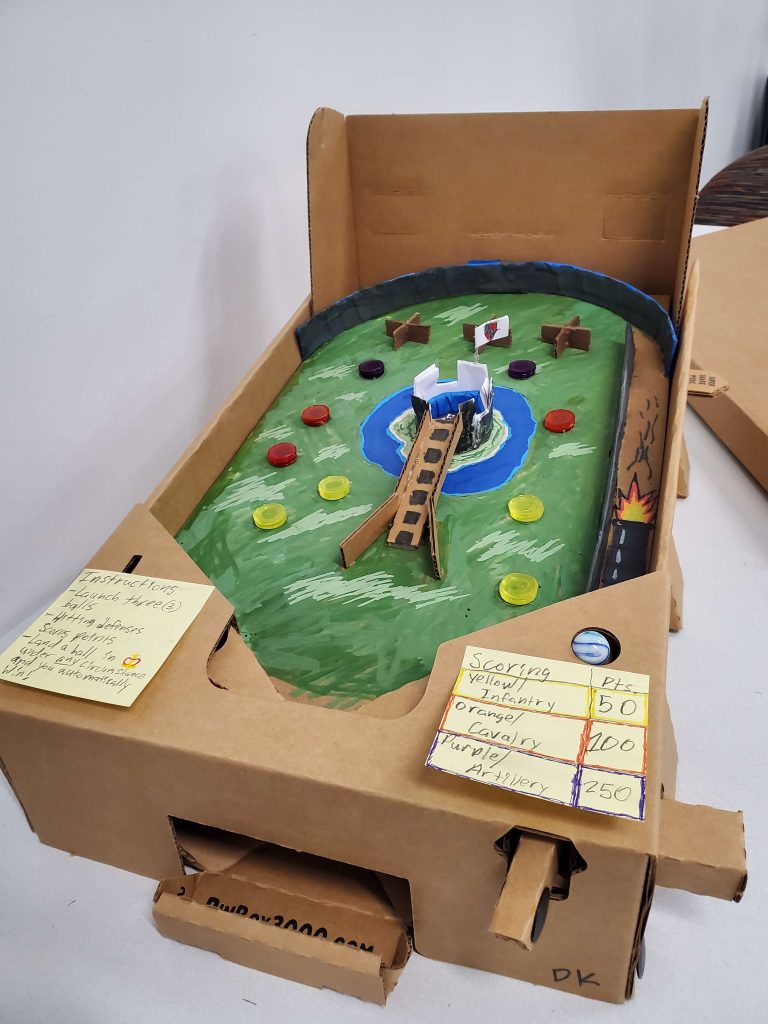
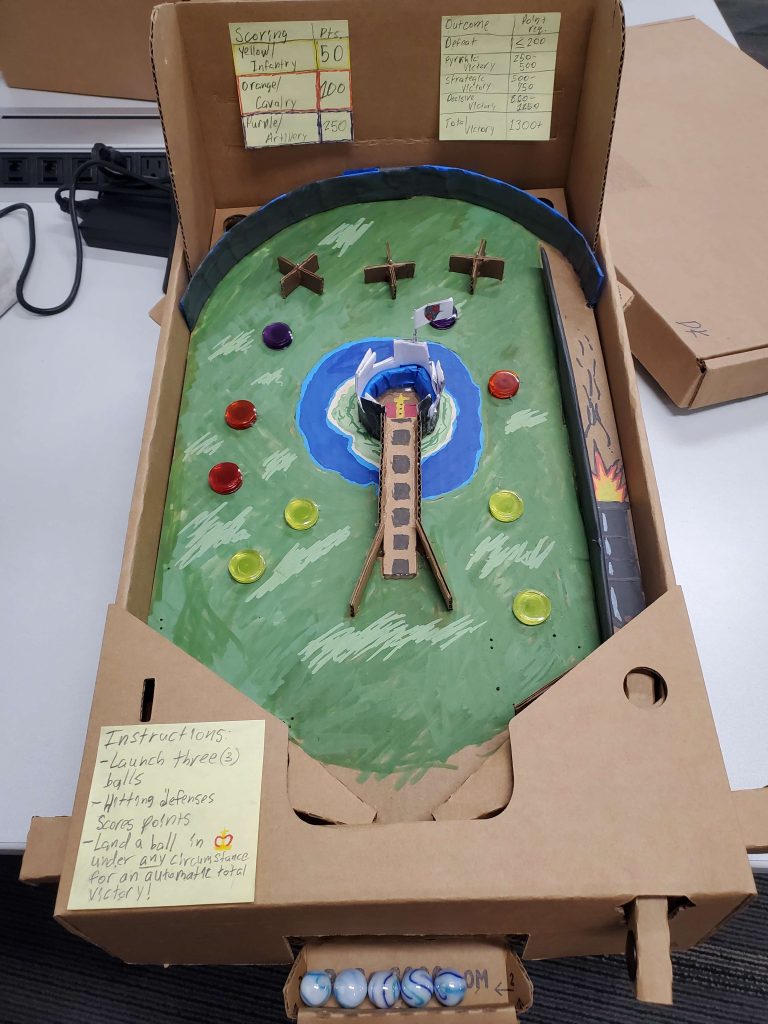
The main thing I wanted to implement was a central castle that would be the fastest way to “win” the game. You could only get in via using a ramp to launch your ball into the castle. Alongside that would be supporting forces to defend that castle, all of varying degrees of strength.
The initial concept for the table layout.
The overall playing field was designed to represent the kind of field a castle would be in, complete with a moat to deter any ground invasion.
To fit the theme of trying to attack the castle, I designed the launcher track to have a cannon motif. It’s most likely not 100% era accurate, but I think it works much better than having a top-down view of a trebuchet or catapult.
The cannon in the launcher track.
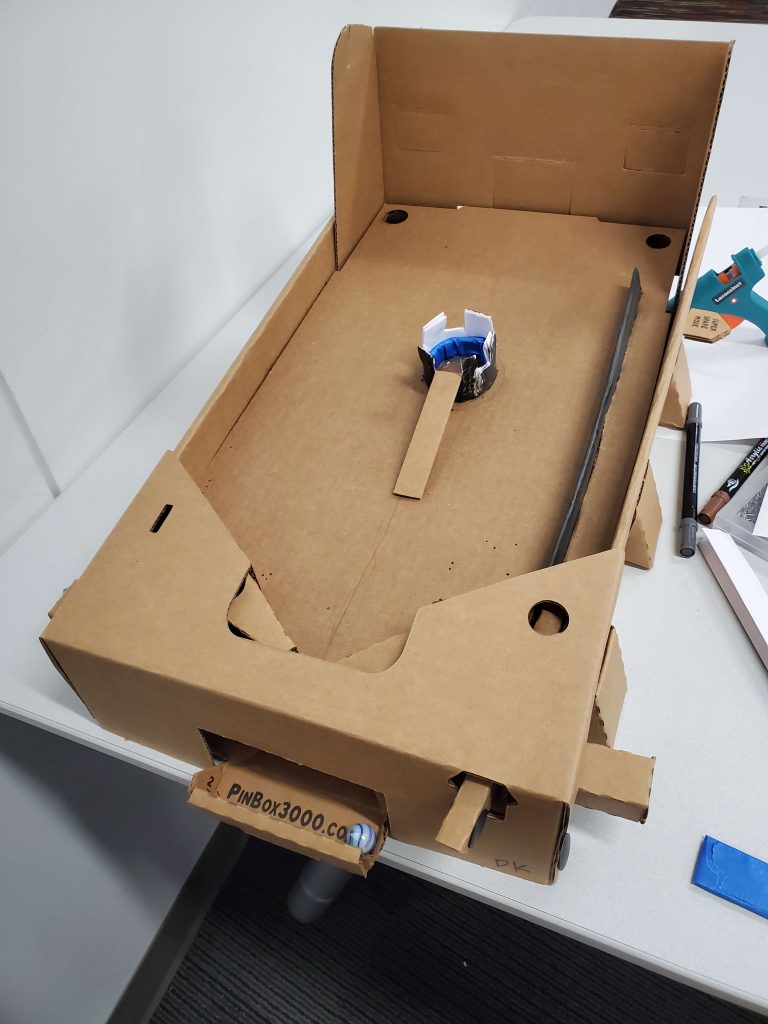
When it came to building the castle itself, I admittedly had a lack of foresight into the design process; as a result, launching a ball up the ramp into the castle was extremely difficult. Because of this, I decided that getting a single ball in the castle, under any circumstance (whether actually using the ramp or some sort of crazy bumper shenaniganery), would result in an instant total victory. Additionally, I included a crown motif to represent the significance of attacking the castle; with the fall of the castle, the kingdom would fall too.
The initial placement of the castle.The finalized look of the castle, complete with moat, flag, and crown.The castle in context with the rest of the table.
Around the castle were the bumpers representing the defending forces. Because of how I placed the castle, it was harder to hit the bumpers towards the top of the table (aside from the initial launch of the ball); as such, I made bumpers towards the top of the layout (i.e. “behind” the castle) represent more points. Additionally, I had a very basic score rating based on the amount of points someone got before the game was over, representing how successful your “attack” on the castle was.
The full final table, with rules, scoring, and ranking.
Playtesting and Feedback
Feedback for Storm the Castle! was overall positive. Many people compared shooting balls toward the castle to playing a carnival game; a bit ironic, seeing as my bagatelle table was Skee-Ball, which would fall under similar circles. (Maybe this is a calling for me to design carnival games?)
The main things people praised were:
The visual presentation of the board itself.
This came as a huge relief for me, as that was easily the most time-consuming part.
I feel like I might’ve exhausted some of those paint markers entirely…
The use of the plastic chip stacks to represent the bumpers/enemy forces.
The castle was both a point of praise and a point of criticism. While everyone loved the design concept for it, a good amount of people found it placed awkwardly (i.e. too close to the flippers) or hard to play around. Lots of people enjoyed the idea of going for the castle, while others called it too prominent and luck-based.
Other points of criticism included:
Lack of a topper with the game’s name.
This would’ve been a lot easier to deal with if I hadn’t already used the included one for the Skee-Balltelle.
Balls could get stuck in the launcher, as the exit path was a bit too narrow.
Balls launching off of the table, mainly due to an unintended lip in the ramp.
I’m planning on revising this layout in Visual Pinball, since I think the core idea is still fun and could be improved. What I plan on doing is:
Move the castle a bit back and have all the bumpers forward, that way it seems more akin to attacking an opposing force.
Add some sort of visual representation for each of the troop types (infantry, cavalry, artillery), perhaps with a little cutout drawing on top/in front of each bumper.
Change how the castle works. I can’t exactly keep the balls stuck in a hole in Visual Pinball, since that’ll result in a softlock. I’ll most likely make the castle a walled-off kicker with a rail being the only way to get into it, but we’ll see once I get started on getting this together.
In the end, while there were a few issues that prevented Storm the Castle! from being the absolute best it could be, I’m satisfied with how the Pinbox turned out. I’m glad I could keep the idea intact throughout the design process, and the end result, while not perfect, was still a fun prototype; it gave me the exact steps to take for making it in Visual Pinball.
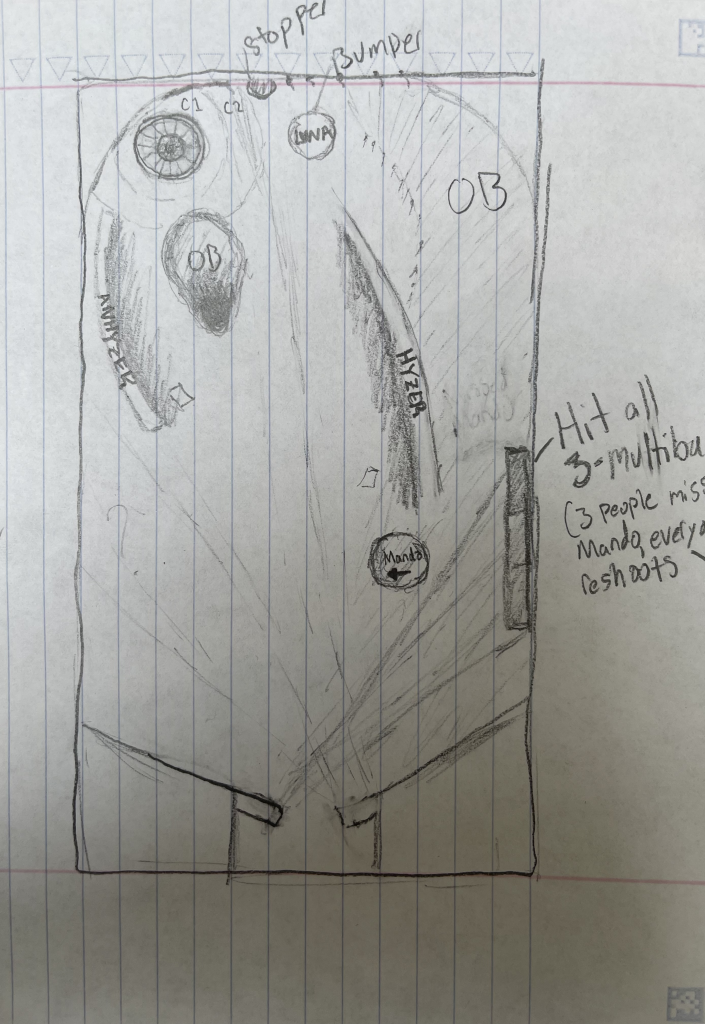
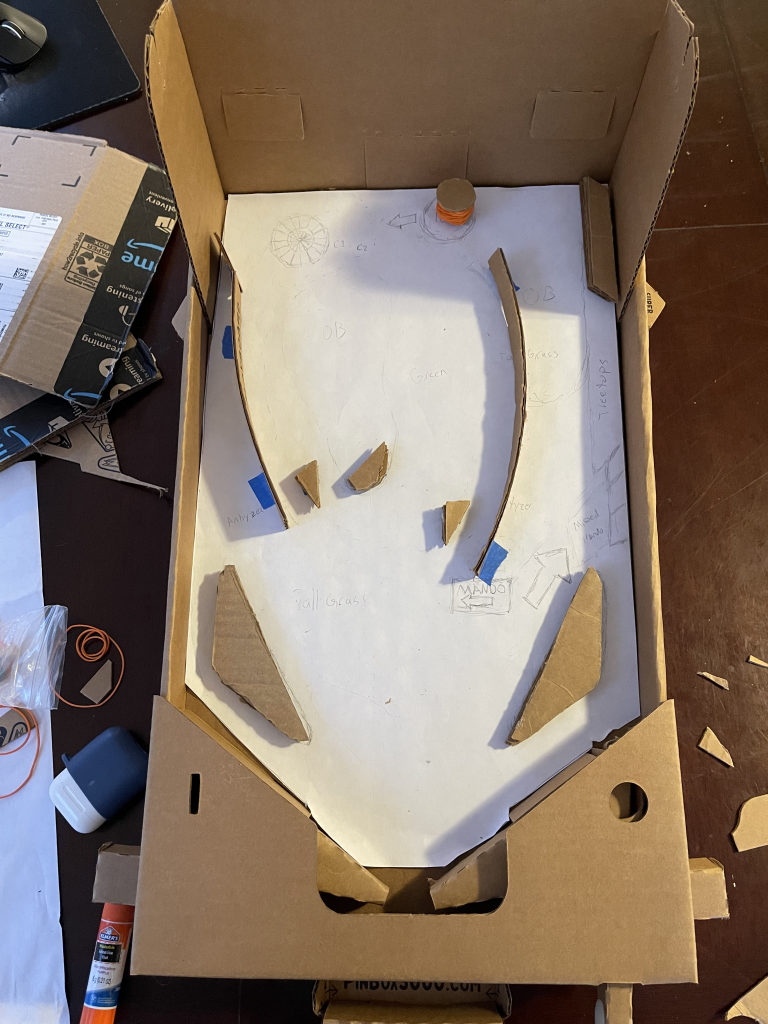
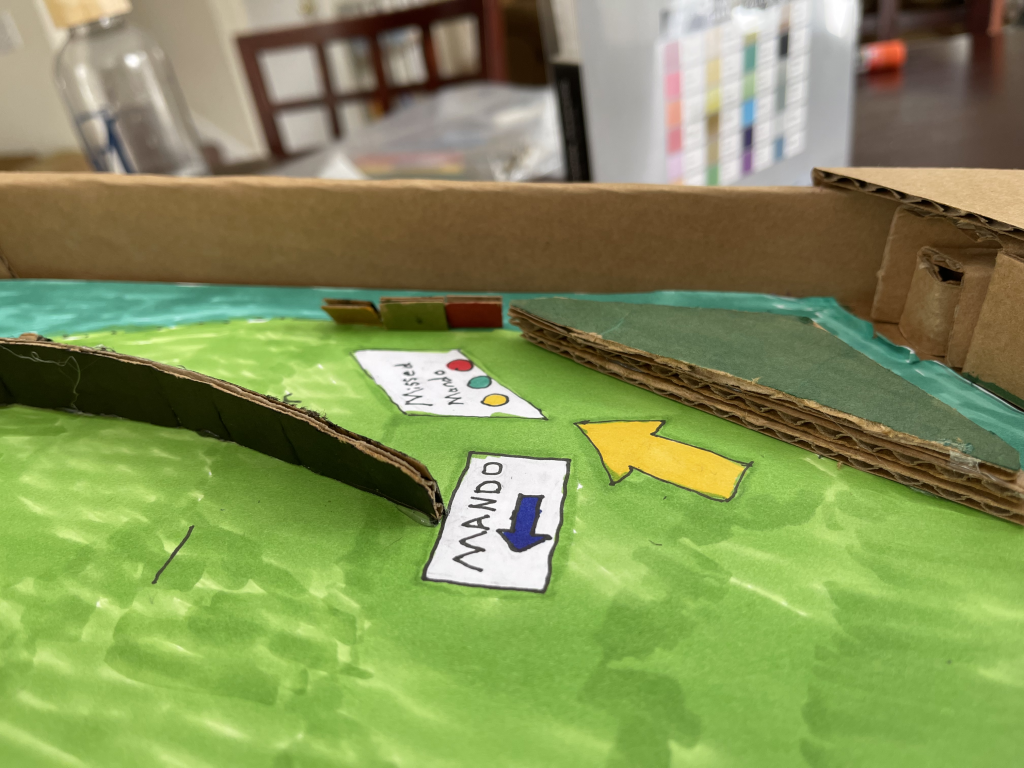
My initial design had 5 main features. A 3D Hole that players should try to hit, OB (Out of Bounds) sections that hurt scores, A Hyzer and Anhyzer line (The different ways you can throw a disc), a putting bumper (It’s almost like you’re actually putting!), and a missed mando section (Explained Later) that would give you a multiball. The recurring theme throughout this design process was that the missed mando section was nearly impossible to get right.
As seen above, the initial build remained very similar to the initial sketch. The biggest difference is that added sections above the flippers for the ball to bounce off of and to. give the missed mando section a clear line to take. These parts made the box feel more like classic pinball, and gave the ball more interesting bounce dynamics when it got to the bottom of the box.
After this layout, I quickly realized 2 main problems. Firstly, I never 3D Printed a basket for the hole, the main thing players are supposed to try to hit. Secondly, If I place any physical objects on the missed mando section as it were, when the player shot the ball, it would just hit the missed mando section. These problems led to solutions of varying success. Firstly, I changed the 3D hole to a 2D image of one that could spin around. This was a great change. As you can see in the design, there are 2 main walls the player can try to play to hit the hole, the hyzer and anhyzer lines, but with a 3D basket, a player would have no reason to go for one over the other. With a 2D plane as the basket, sometimes the flat side will face one line or the other. This encouraged players to go for different lines to get a better hit to spin the basket. The solution for the other problem was not as big an improvement, I just moved the missed mando hits to be passed the launch section.
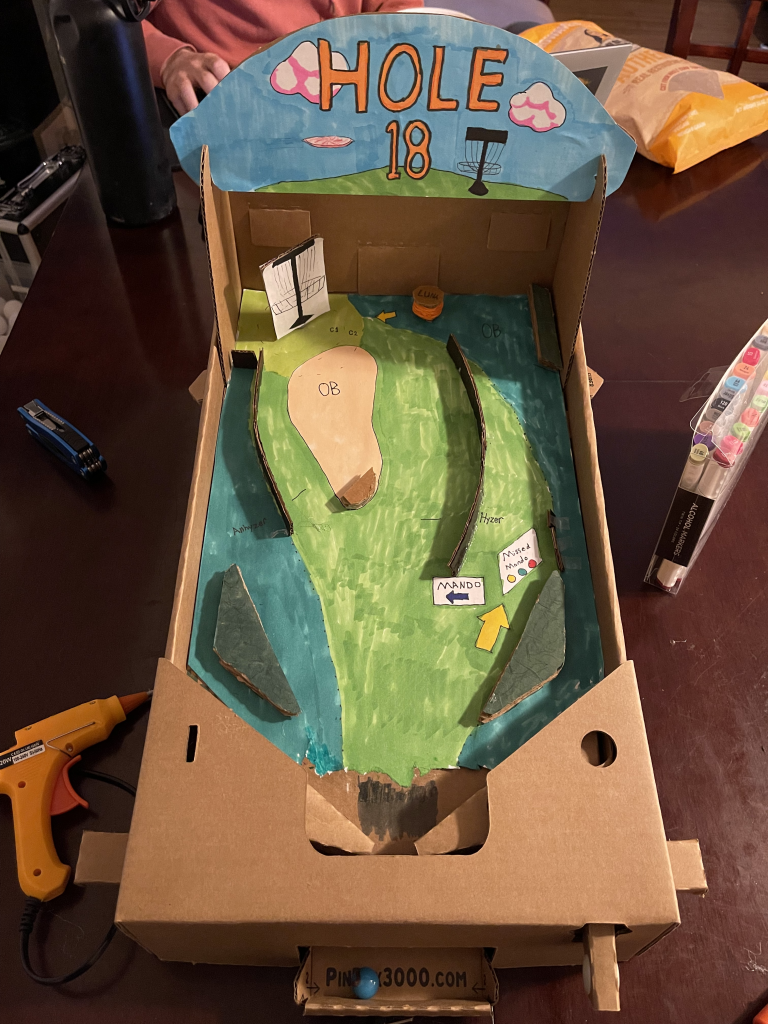
Final Design
The final design yielding one more major change. Originally, I cardboard next to the hyzer and anhyzer lines to force a player to directly hit the shot. In the final design, I decided to get rid of these because it made the game less fun. This is not supposed to be an insanely difficult real pinball machine, it’s supposed to be a fun, casual cardboard pinball machine, and removing these parts helped fulfill its design purpose.
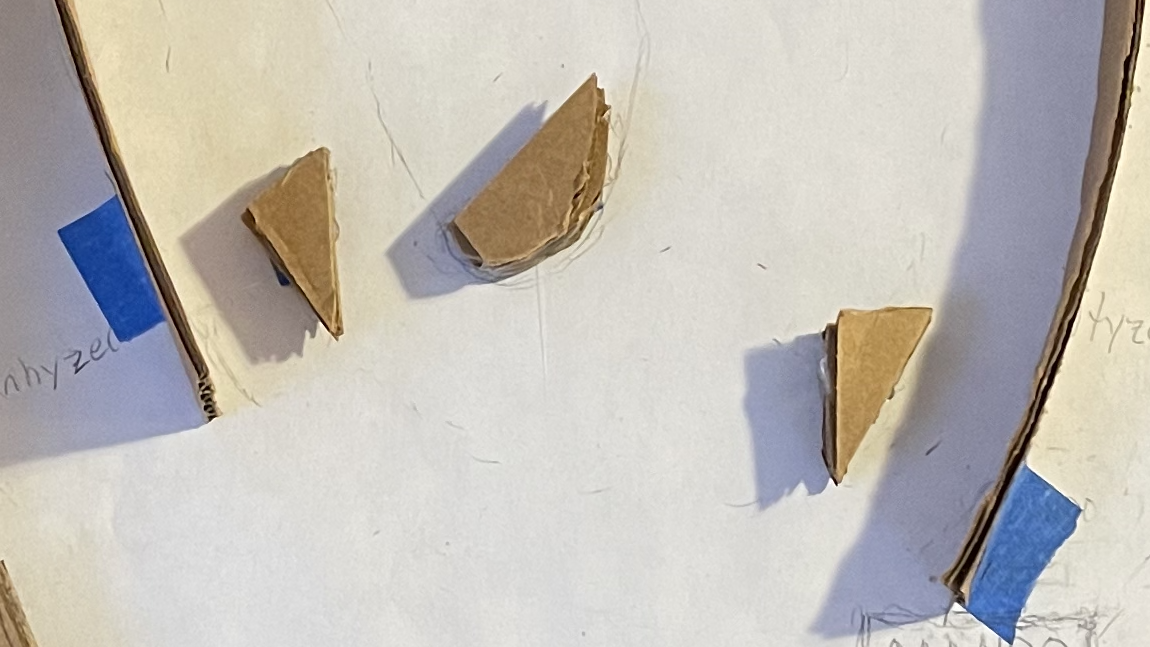
Removed pieces
Playtesting and Feedback
My original rules and scoring for this box were way too complicated. It had score calculations based on the number of shots it took to hit the basket, it involved subtracting 1 from your score when you hit an OB section. This was too confusing. Players didn’t even try to calculate their scores. Additionally, players were confused by what it meant to hit an OB section. I quickly realized that the rules were too complicated, so I boiled them down to the 2 main mechanics. Hitting the basket gave you +1 point, and hitting the 3 missed mando colors would give you multiball. Except how do you do live multiball on a cardboard pinball machine? I simply changed it to just give you an extra life.
These changes yielded much more positive feedback for my box, but one problem still remained. WHAT DOES THE MISSED MANDO MEAN!?!?!? Let me explain, and show why I couldn’t fix it.
Mando in disc golf stands for mandatory. It requires players to throw their discs on a specific side of something, like a tree. If you miss the mando and throw to the wrong side, you take a stroke penalty and have to throw at a drop zone. Why does it give you extra balls? This comes from a house rule of my friends and I when we play. If all players miss a mando, we let ourselves rethrow it. I wanted to put this idea into my game. So I put the section in and put 3 different targets for 3 different players. In hindsight, maybe it would have been better to have 1 small target than 3. Players didn’t understand why there were 3 things you were meant to hit. In their defense, it didn’t make sense (or wasn’t explained clearly). I realized this kind of feature is not intuitively designed, and that was kind of the biggest problem with the box.
Missed mando targets to hit that players never saw
Other than this, feedback for my game was mostly positive. I credit its greatest strength as playing well. It feels like a pinball machine, obstacles are spaced fairly, and you can learn to hit the shots. Despite the missed mando problem, I would still refer to this box as a success!
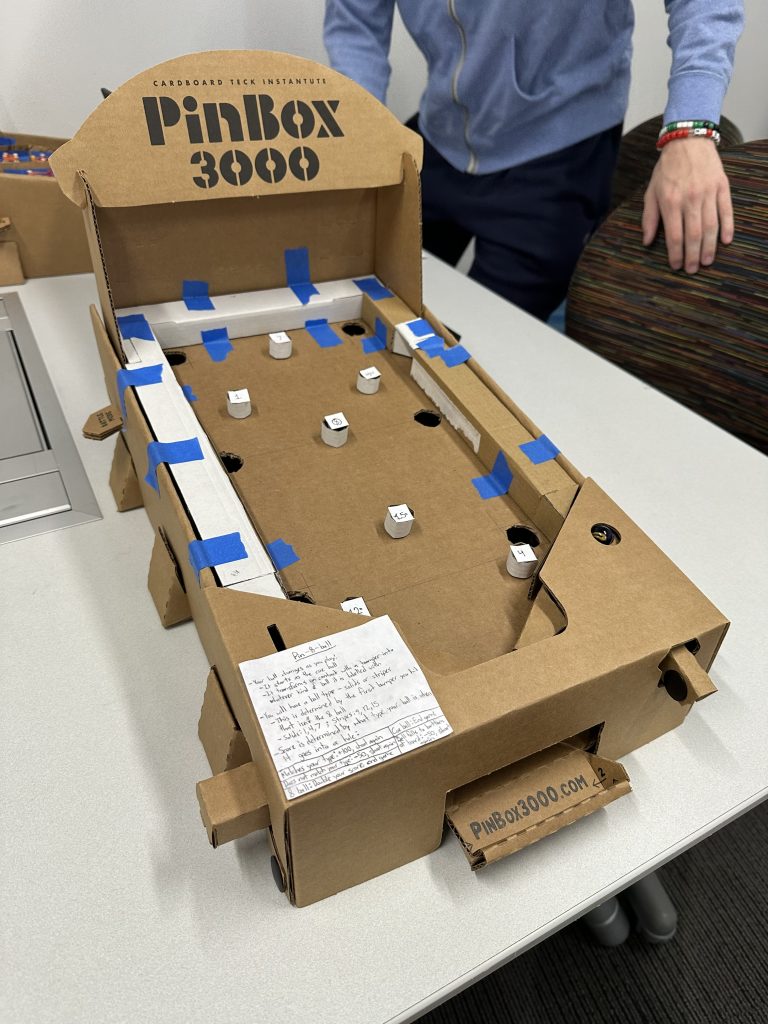
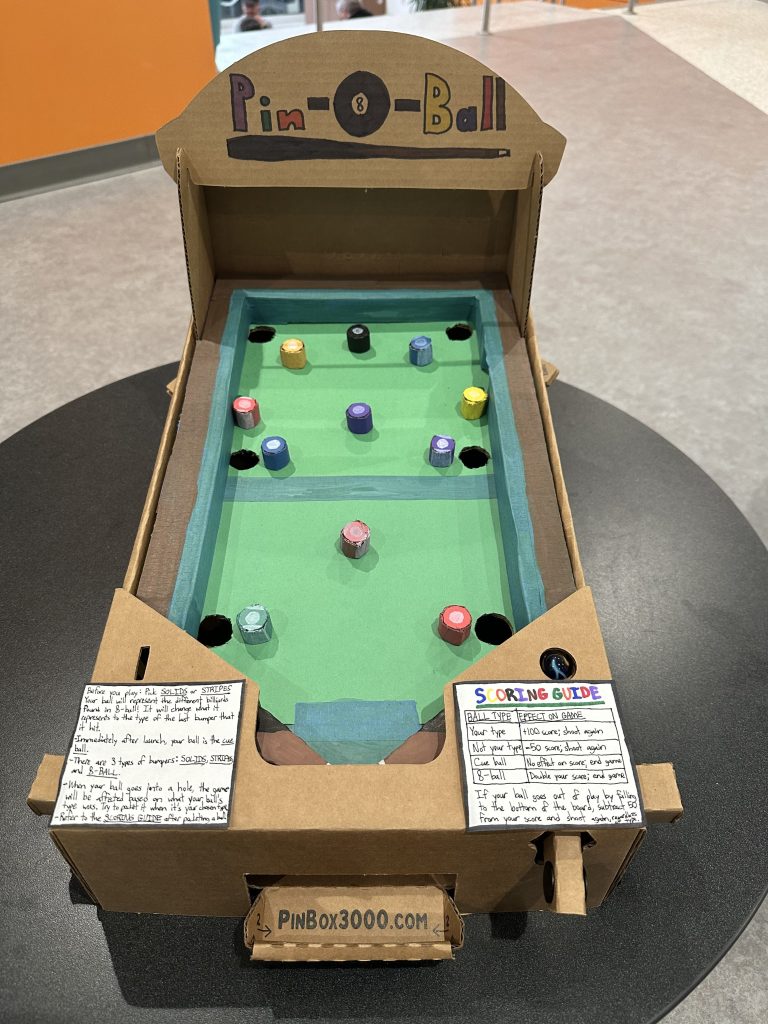
Having a recent obsession with playing GamePigeon’s 8-Ball for iMessage, I knew almost right away that I wanted to theme my pinball game around the actual game of 8-ball as a whole. I have a lot of fun competing with people over the digital version on iMessage, and I also very much enjoy playing it in real life whenever I have the opportunity to. I thought that combining 8-ball and pinball would make for a very unique kind of game.
While initially planning the game, I was going to name it “Pinbilliards“. I did this because I thought that combining the names of the two games would make for a fun title. In order to create a playfield that resembled a pool table, I planned to incorporate a couple of different features, such as:
Bumpers that represent different billiards
Holes that represent the pockets in a pool table
Flippers that resemble pool cues
Trying to think of a way to mix the two games together was a bit of a challenge, but I figured out a way that I think put a different kind of spin on both of the games. The original ruleset for Pin-8-Ball revolved around the player’s ball having its own identity. The identity of the ball would change throughout the game, and the identities that it could have all resembled existing billiards from the actual game of 8-ball. Along with the ball of the player, each bumper also had an identity resembling that of an existing billiard. There would be one bumper for each billiard that has a number. During play, the player’s ball would start as the cue ball after launch and then change its identity to whatever the identity of its most previously hit bumper was. This would happen continuously until the ball went out of play. The player would also receive an assignment: solids or stripes. This assignment was determined by the very first solid or striped bumper that was hit by the player, and it would remain with them for the rest of the game. In order to score, the player would have to get the ball into one of the six holes on the playfield, which would then affect the game depending on what the ball’s identity was when it went out of play. The effects were as follows:
Matches player’s assigned type: Score points and launch again
Matches type not assigned to player: Subtract points from score and launch again
Cue ball: End game
8 ball: Double current score and end game
At this point in designing the game, I notably forgot to determine what would happen if the ball fell to the bottom of the board, past the flippers.
Initial design sketch for Pin-8-Ball
Initial Design
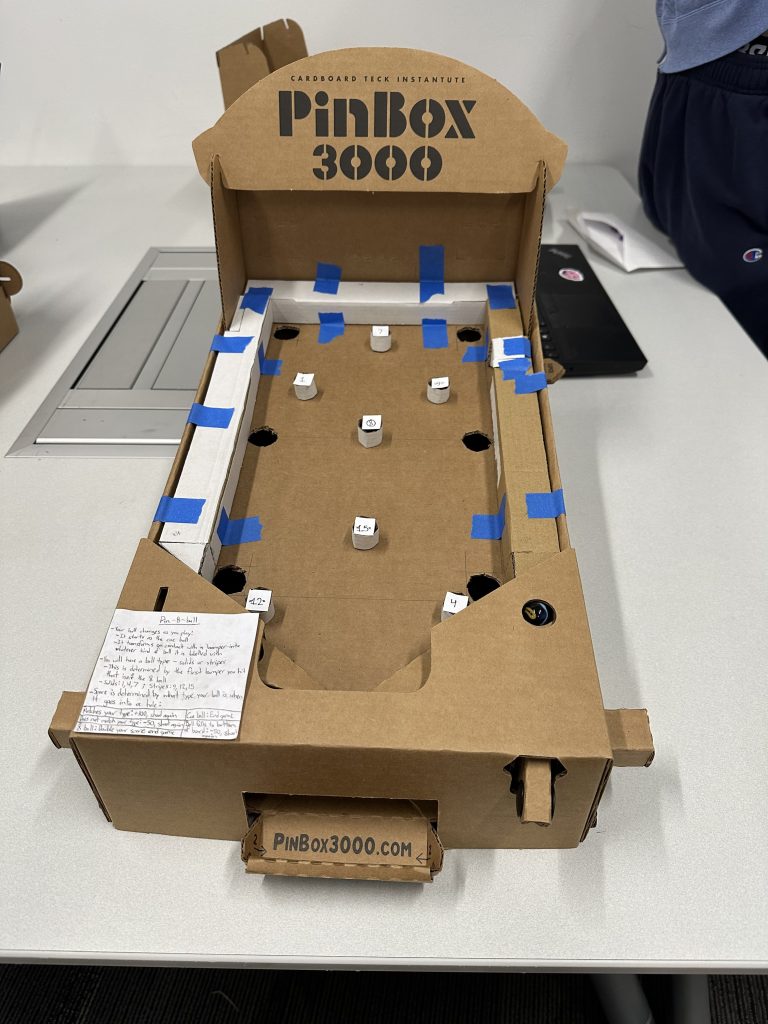
After some planning and beginning to physically build Pin-8-Ball, there were some elements of my original plan that I realized I was going to have to change.
Firstly, in order to make the playfield really look like a pool table, I decided that I’d have to decrease its size and build 3-dimensional walls to place inside of it. This also meant that the ball would have to be spit out of the walls somewhere on the board. I was a little bit worried about making the choice to make the playfield smaller, but I decided to commit to it with hopes that it’d make the eventual final game much more immersive.
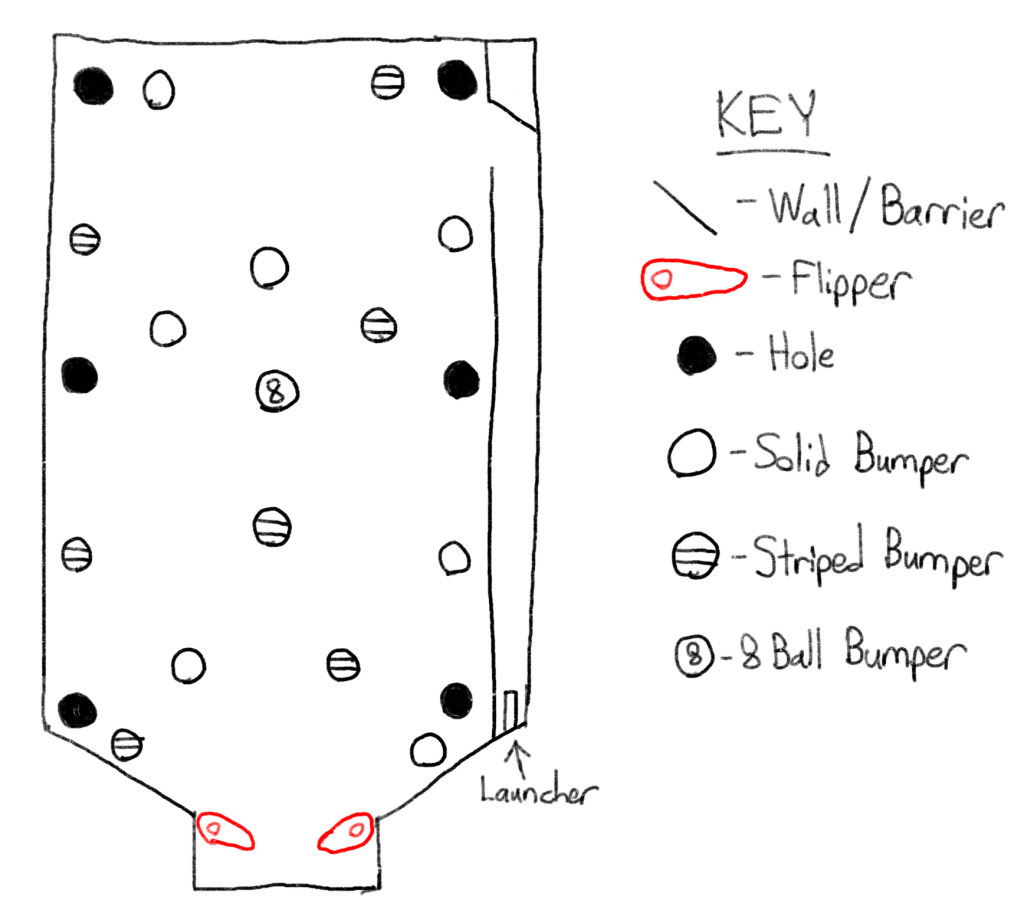
After making the playfield smaller, I also realized that I’d have to decrease the amount of bumpers on the playfield. It was already too crowded to begin with, so I decided to decrease the amount of bumpers that would be on the playfield from 15 to 7. This left the game having 3 solid bumpers, 3 striped bumpers, and 1 8 ball bumper. I chose to use billiards number 1, 4, and 7 for the solid bumpers and 9, 12, and 15 for the striped bumpers. I decided upon these ones because they were at even intervals from each other, but they did not have any real significance in accordance with Pin-8-Ball.
Finally, I decided to try and clarify the rules a bit while writing them down on paper. In doing this, I added actual score values, determined what would happen if the ball fell to the bottom of the board, and started referring to the ball’s “identity” as its “type”. It was at this point that I also changed the name of the game from “Pinbilliards” to “Pin-8-Ball“. I decided to change the name because I thought that it both sounded better and would make game’s the theme more obvious.
The prototype’s rule card reads as follows:
Your ball changes as you play!
It starts as the cue ball
It transforms on contact with a bumper into whatever kind of ball it is labelled with
You will have a ball type – stripes or solids
This is determined by the first bumper you hit that isn’t the 8 ball
Solids: 1, 4, 7; Stripes: 9, 12, 15
Score is determined by what type your ball is when it goes into a hole
At the bottom of the rule card, I made a small table that listed what happened depending on the player’s ball’s type when it went into a hole:
Matches your type: +100, shoot again
Does not match your type: -50, shoot again
8 ball: Double your score, end game
Cue ball: End game
Ball falls to bottom of board: -50, shoot again
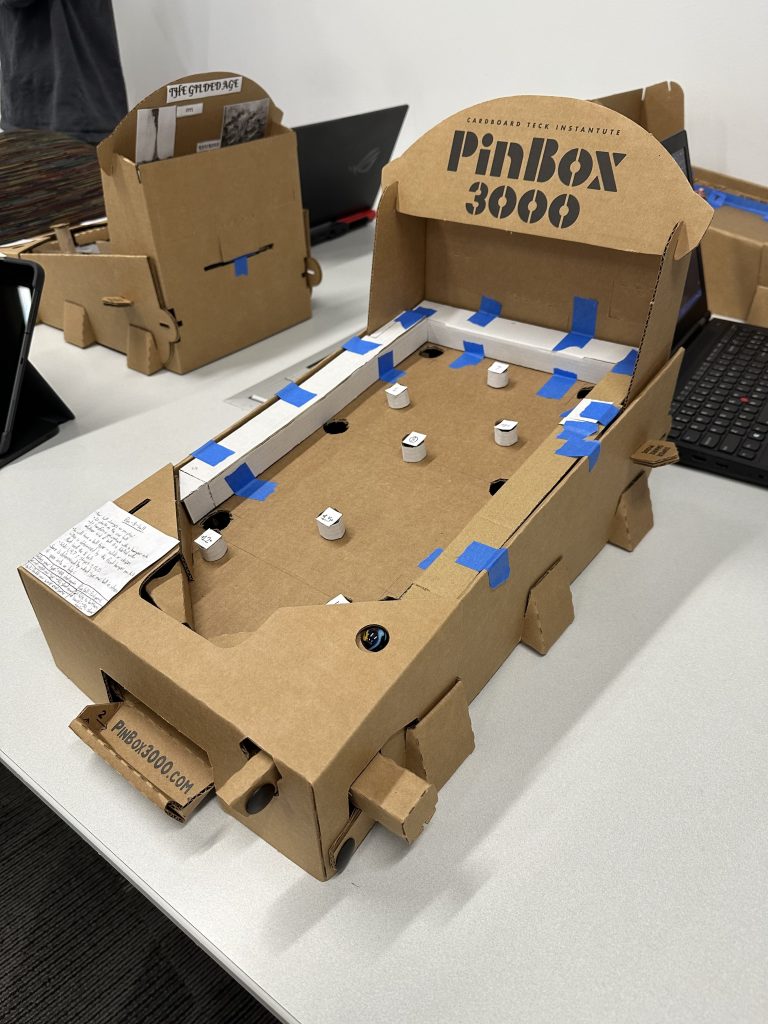
Various angles of the initial physical design of Pin-8-Ball
Playtest Results
After playtesting, the I learned that Pin-8-Ball needed some work to be done. Although there was positive reception regarding the theming of the game, the playertesters struggled both with actually playing the game and with understanding the rules.
A lot of the playtesters reported that their ball would go into the holes on the playboard way too easily, making it so that they didn’t actually get an opportunity to play the game much. Some also noted that it would immediately hit the 9 bumper a lot of the time, and there were a lot of reports of the ball getting stuck on either the 4 or 12 bumpers. There were also some low ratings on the clarity of the rules as well, and according to one playtester, they did not convey how the 8 ball works well enough. On top of this, some playtesters were questioning if the numbers on the bumpers had any significance.
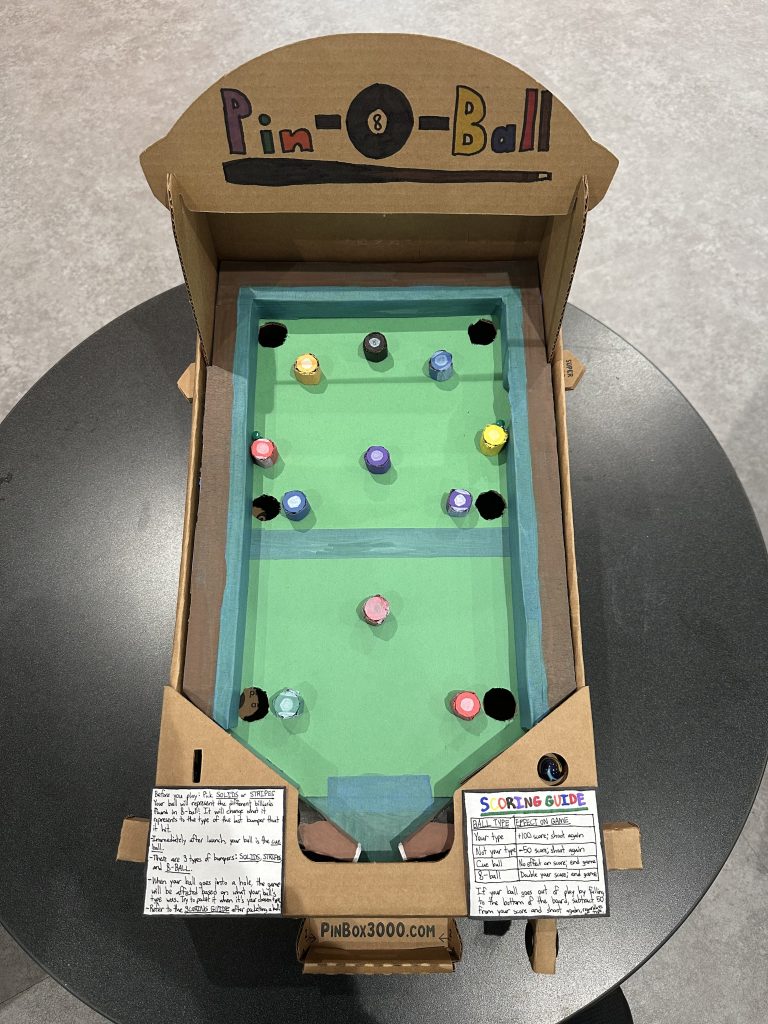
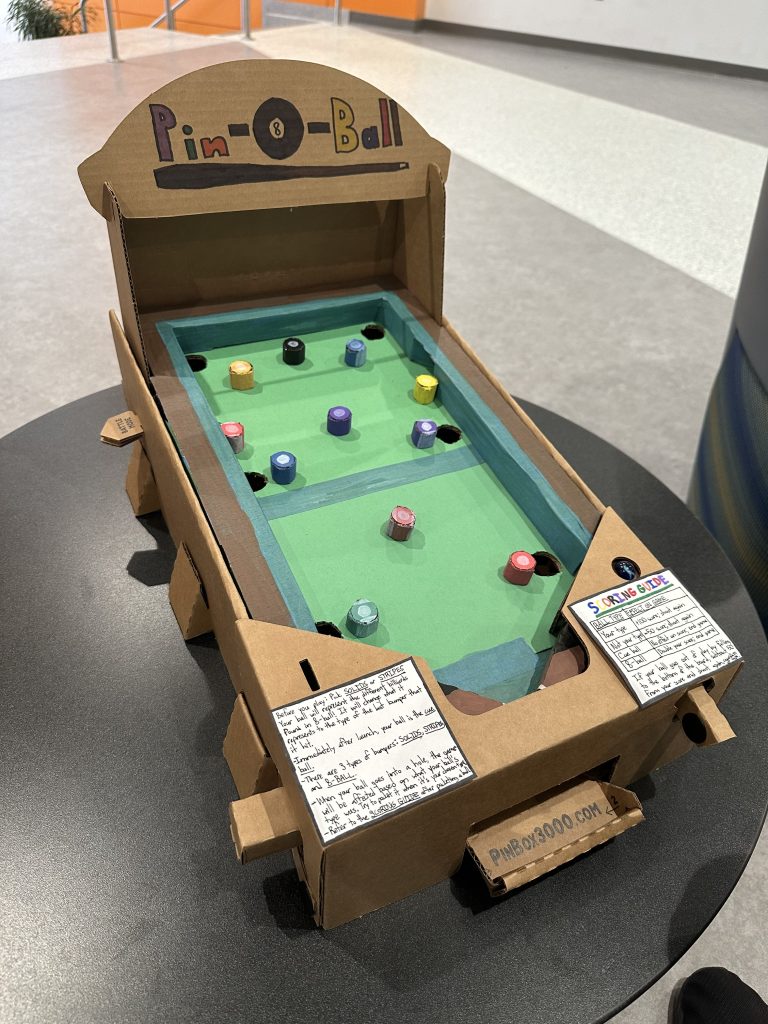
Final Design
Using the feedback I received, I started work on making changes to Pin-8-Ball while also giving it a presentable appearance.
In order to make the game more playable, I added 4 more bumpers (2 solid, 2 striped) to the playfield, particularly around some of the holes. This increased the bumper count from 7 to 11. I also moved the ones that were causing the ball to get stuck and applied pins to the playboard in other areas where it could get stuck.
I decided to try and make the rules more clear by writing a newly reworded card in addition to a separate one that contains the scoring information. I also made a small change to the rules, that being that the player now chooses whether their type is solids or stripes prior to starting their game. The final rules card reads:
Before you play: Pick SOLIDS or STRIPES
Your ball will represent the different billiards found in 8-ball! It will change what it represents to the type of the last bumper that it hit.
Immediately after launch, your ball is the cue ball.
There are 3 types of bumpers: SOLIDS, STRIPES, and 8-BALL.
When your ball goes into a hole, the game will be affected based on what your ball’s type was. Try to pocket it when it’s your chosen type.
Refer to the SCORING GUIDE after pocketing a ball.
The new scoring guide reads:
BALL TYPE
EFFECT ON GAME
Your type
+100 score; shoot again
Not your type
-50 score; shoot again
Cue ball
No effect on score; end game
8-ball
Double your score; end game
The scoring guide also has a note at the bottom regarding the ball falling to the bottom of the board, which reads: “If your ball goes out of play by falling to the bottom of the board, subtract 50 from your score and shoot again, regardless of type.”
Visually, I was planning on changing the game a lot.
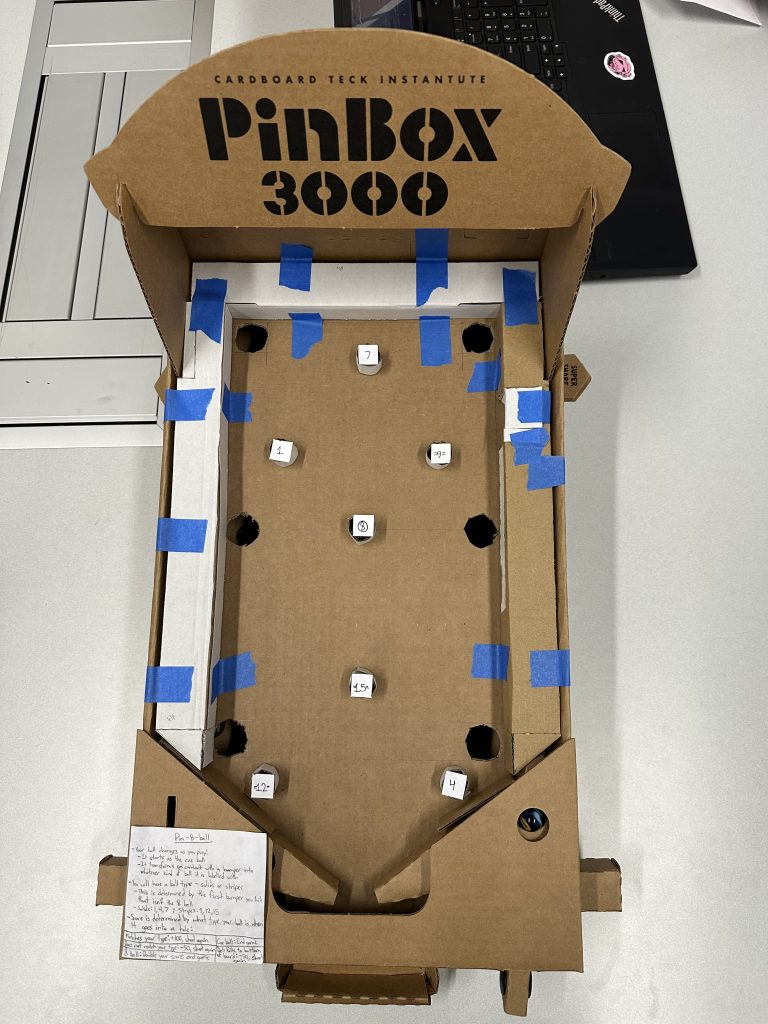
One of the visual upgrades that I made to the game was that I painted the bumpers to look like the billiards that they represent. During the process of painting them, I decided not to give any of them, except the 8 ball, their respective numbers in order to avoid the confusion regarding their significance that was noted during the playtest. Solid bumpers were painted with solid colors with a white circle on top, while striped bumpers were painted with white stripes on their tops and bottoms in addition to the base color and white circle. The 8 ball was painted like a black solid bumper, but I also wrote an “8” on its white circle.
Another visual change that I made was that I gave the playfield a complete makeover. Using a combination of tape, construction paper, and paint, I made the entire playfield green, just like a typical pool table. Additionally, I gave the walls a paint job so that they’d represent the edges of a pool table and painted the flippers to look like pool cues.
Finally, some minor visual changes that I also made include the addition of a header for the game so that it could be displayed and identified more easily and decoration for the rules cards.
Various angles of the final physical design of Pin-8-Ball
Moving Forward With Visual Pinball
Looking ahead at developing a visual version of Pin-8-Ball, I don’t think that I’ll have to make many changes to the game in general. I think that the theme and rules can be executed even better in a digital environment, so I want to proceed with making a virtual version of Pin-8-Ball by sticking with most of what’s included in the physical version. Because of this, I only plan to change a few things.
One change that I am going to make regards tracking the most previous bumper hit. One of the biggest concerns that playtesters had with Pin-8-Ball was how difficult it was to keep track of what the last bumper that they hit was. In Visual Pinball, I plan to include a backboard in the game which will automatically track and display this for players.
I also might have to change the position of the bumpers on the playfield while translating Pin-8-Ball to a digital environment. The bumpers that exist in the physical version of Pin-8-Ball aren’t super bouncy because they are made out of cardboard, so I imagine that having bouncy bumpers in the digital version can potentially change up how the game plays and feels. Because of this, I plan to do a lot of testing with both bumper positions and how bouncy they are while building the virtual game.
Final Thoughts
After executing a second playtest, I learned that a lot of players enjoyed the changes that I made, particularly the visual overhaul. There were a few lasting issues, and some new, such as continued difficulty understanding the rules, new spots where the ball can get stuck, and it being a bit difficult to actually pocket the ball while it is the cue ball or 8 ball to end the game, but I feel as though the final version is a major improvement in comparison to the prototype.
This was a fun project to work on, and I had a great time building it. Just like with my bagatelle game, Skitelle, I am happy to say that I’m proud of my creation!
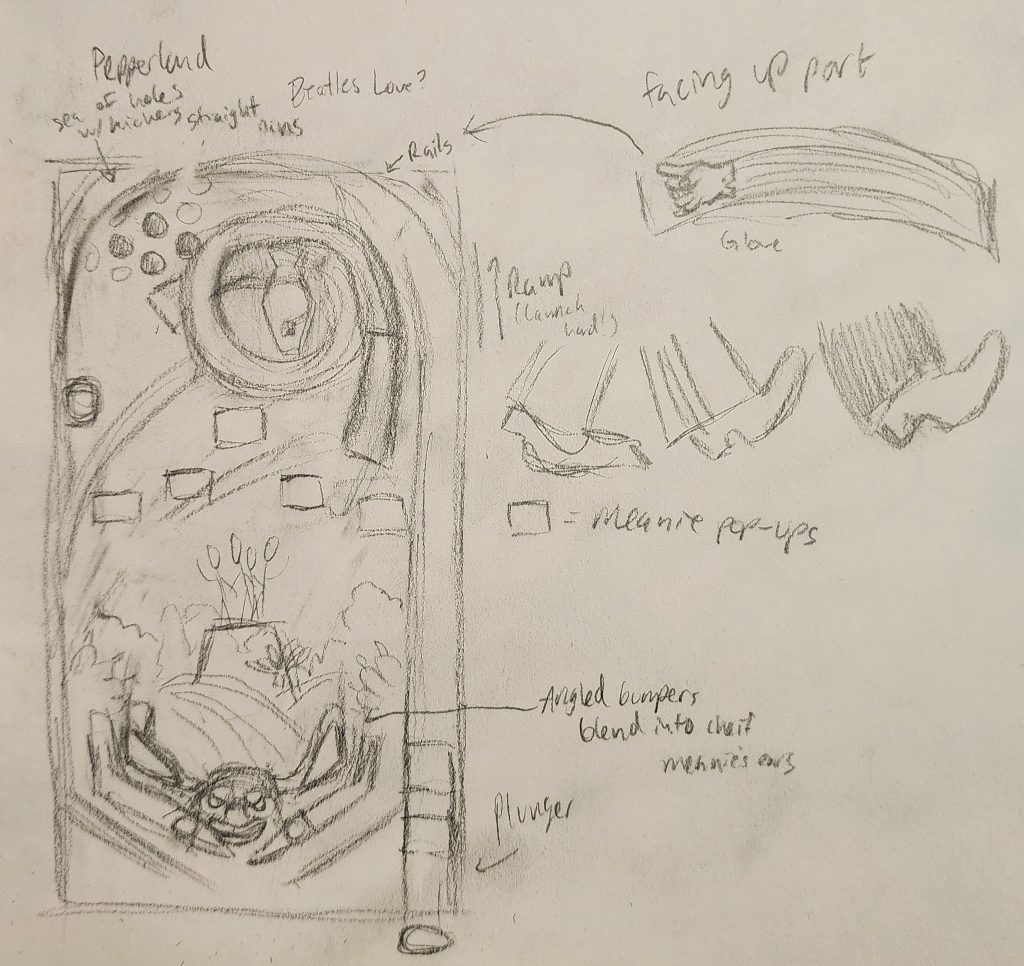
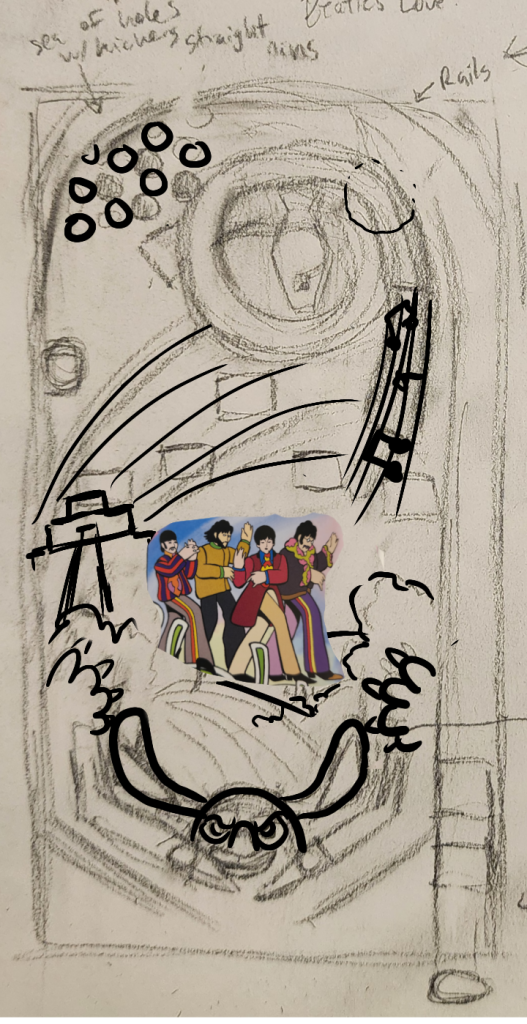
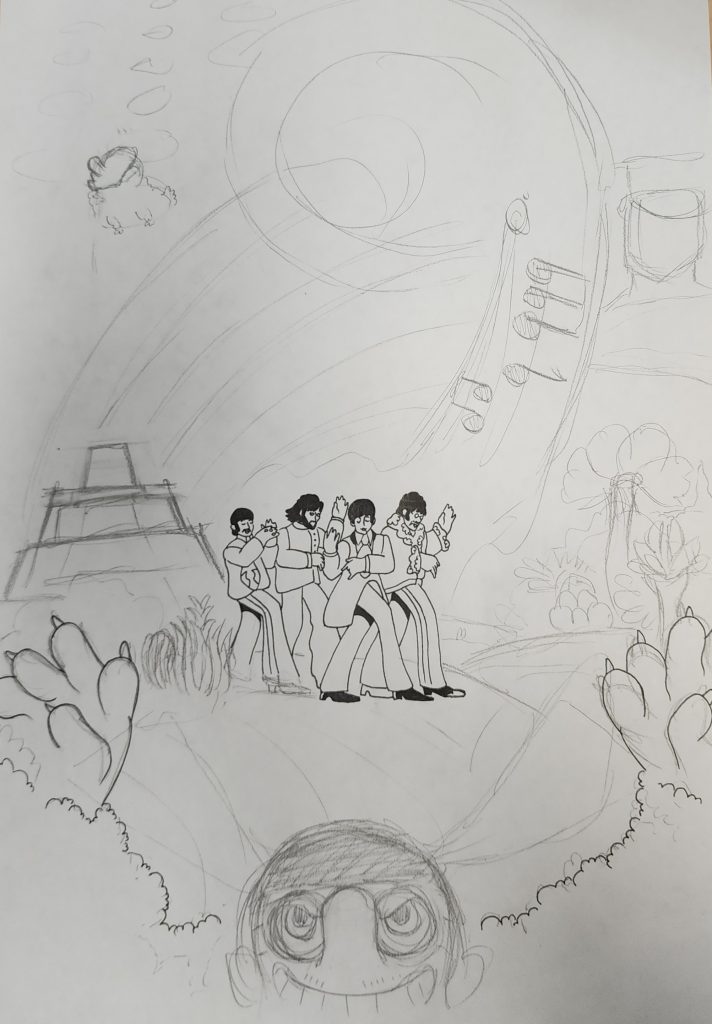
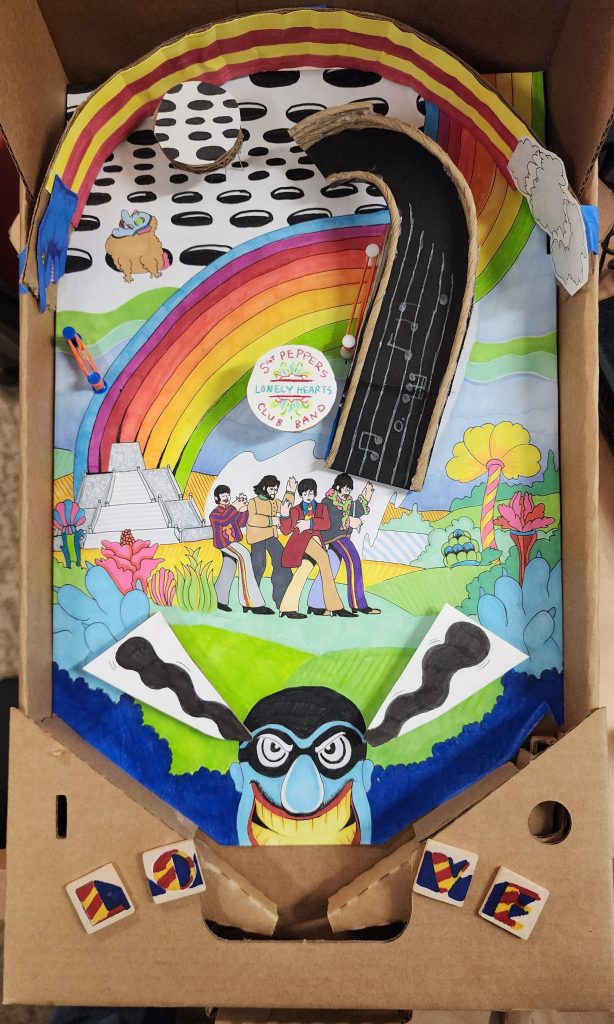
My “Pepperland Pinball” machine is inspired by my favorite childhood movie, Yellow Submarine. I was (and still am) a HUGE Beatles fan, ever since my parents played me my first Beatles CD when I was ~3 years old. In middle school, I found a VHS tape of Yellow Submarine at the local thrift store and I was hooked– I watched it religiously after school and I used to keep a tally of how many times I had seen it.
So, I decided to pay tribute to one of my favorite films through my pinball machine.
My design includes locations from the film (like the Sea of Holes and Pepperland), The Beatles in the middle of the machine, and the chief Blue Meanie at the bottom of the machine, menacingly reaching up the playfield. All of the artwork is either adapted from the Yellow Submarine graphic novel (Thank you Professor Jacobs for lending me your copy!) or the film itself.
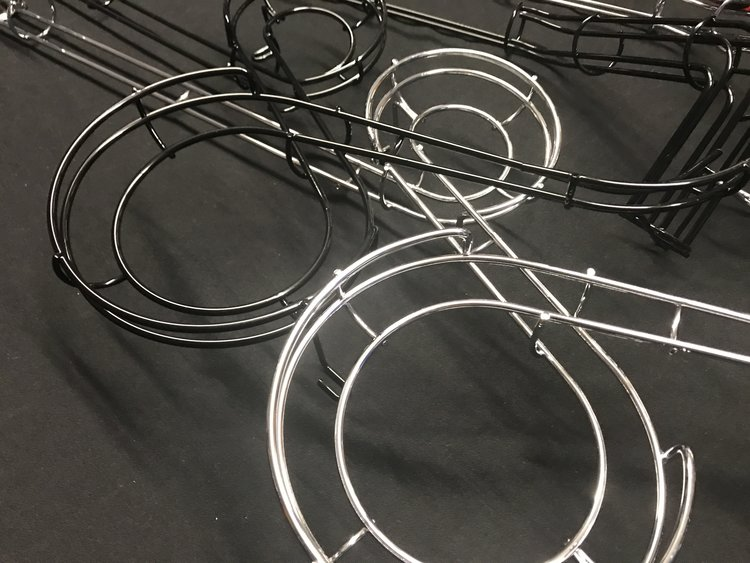
For 3D elements, I planned on having a ramp connected to a wire spiral on the upper righthand side of the playfield that spirals down “around” a 3D printed yellow submarine and bumpers inspired by the movie’s abstract foliage.
Design Iteration
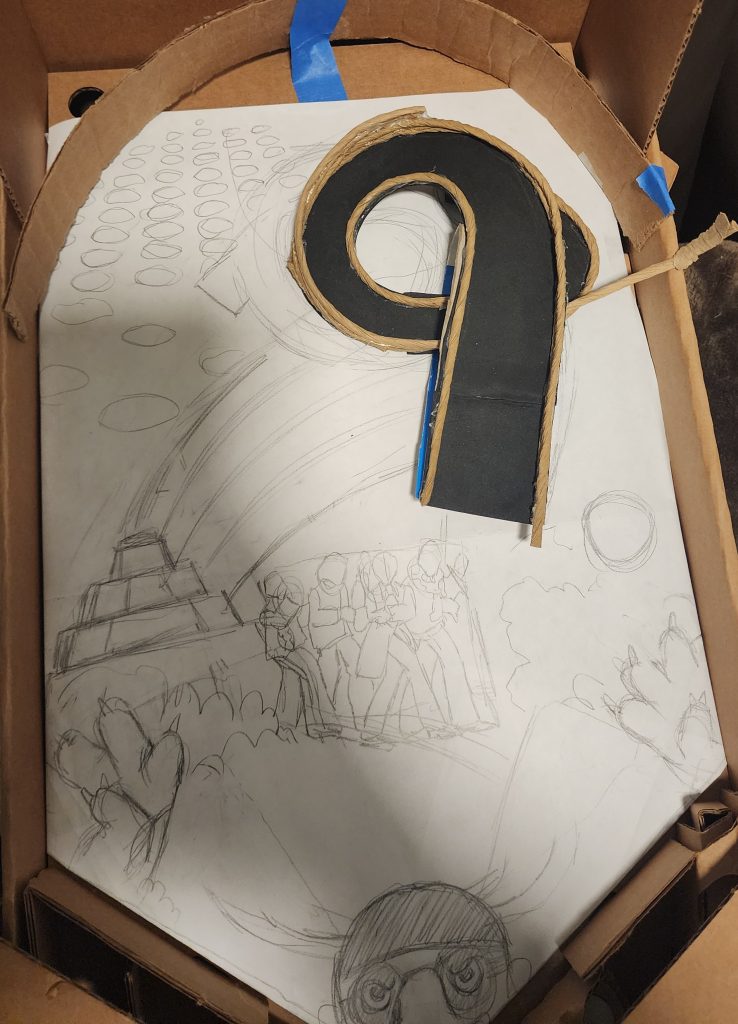
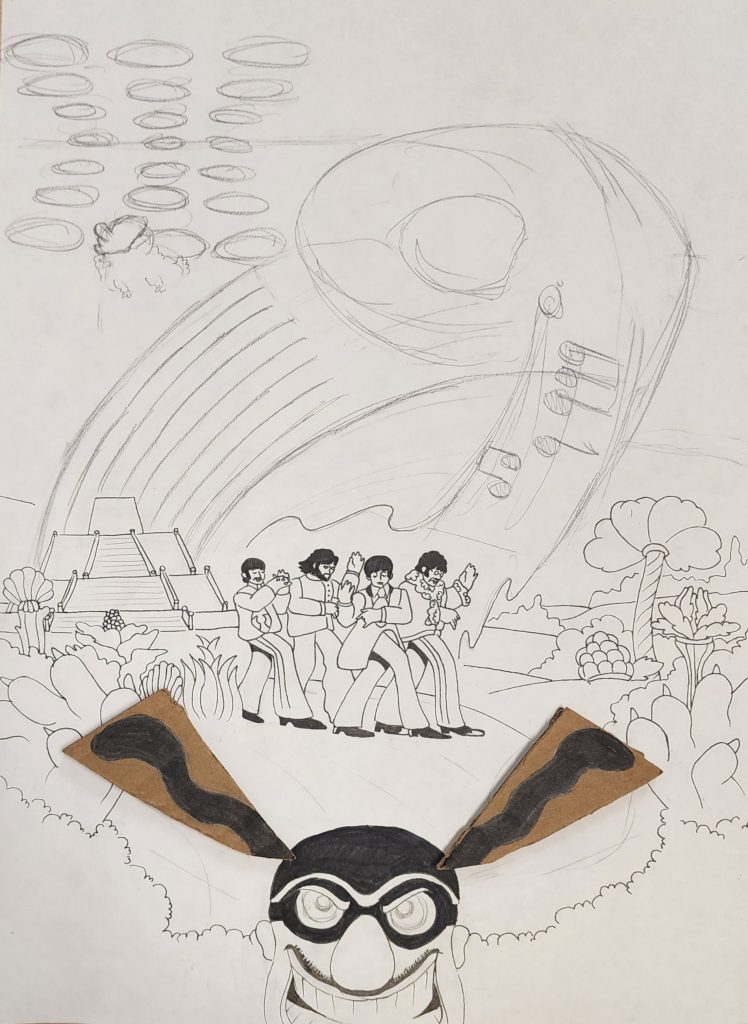
I started by making a sketched version of the artwork for the playfield and created the 3D elements like the spiral ramp to test where it made the game feel the most fun.
I created the ramp for the spiral out of cardboard, then made the spiral itself out of foam after making a cardboard mockup version. I wanted to make the spiral down out of wire/metal instead of a flat ramp with rails, but it wasn’t holding the shape properly. To keep the marble from flying off the ramp, I added rails out of paper shopping bag handles.
Due to physical limitations, I ended up having the ramp release the pinball behind the spiral rather than to the left of it.
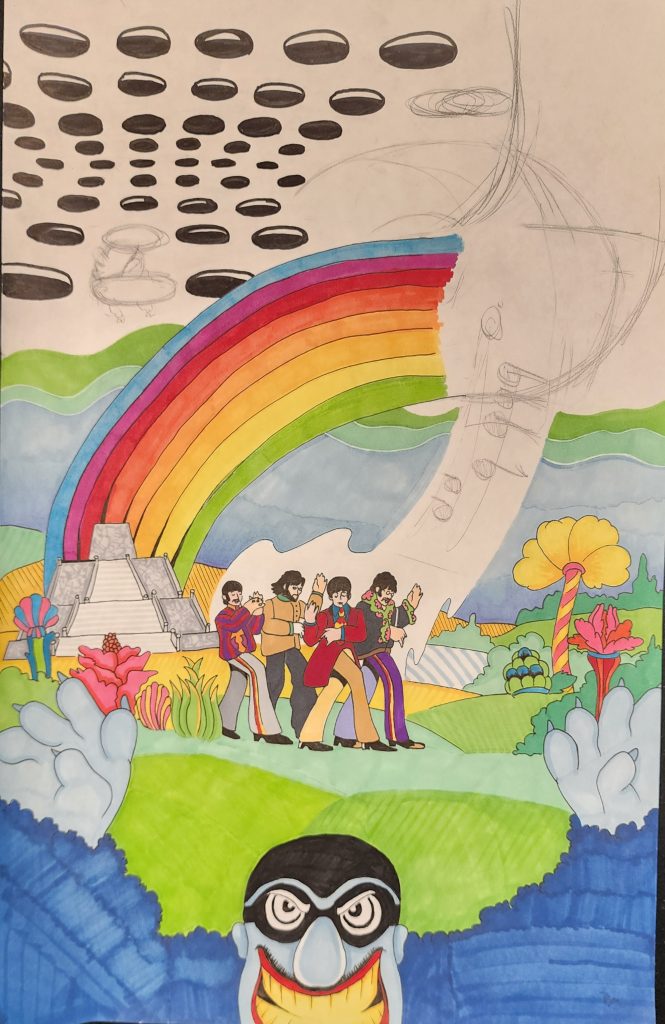
At the same time, I worked on creating the final version of the background used for the playfield (The Blue Meanie’s ears on the cap are part of the 3D triangles to direct the ball toward the flippers). The lighting is different in all three photos, but this shows the progression on the artwork as I was working.
Playtesting and Changes
In contrast with my Bagatelle Wizard Machine, I did not have it ready in time for proper playtesting. I presented a functional version of the machine without the aesthetics completed.
The main feedback that I received was the triangles that guide the ball toward the flippers were too close together (causing the ball to go down the center) and that there were technical difficulties with the spiral (ball would get stuck behind it, ball would get stuck on the ramp, needs another layer of rails in some places). I plan on fixing these as soon as possible, and the playtesters gave me some ideas on how to fix the ramp which I appreciate.
Post-Playtest to Final Version
Due to time, the solutions I tried with the spiral ramp simply were not working, so here’s the last picture of the machine with the full spiral ramp.
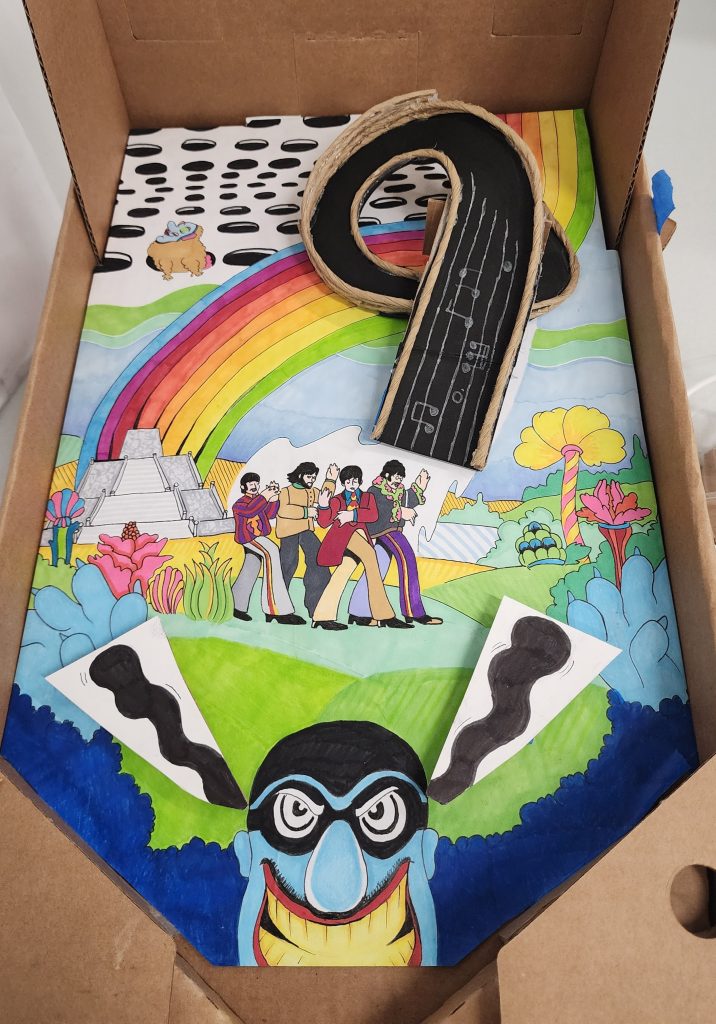
Due to the spiral ramp not working, I ended up having to trim it in order for the ball to be able to make it up the ramp, and not get stuck behind the machine. Instead of releasing the ball behind the ramp, it sends the ball to the “Sea of Holes” in the upper left-hand corner of the playfied.
I added two “bumpers” using straightpins and cardboard circles, as well as two sets of thumbtacks with rubber bands. I also added the design of the flying glove to the curved backboard.
Future Digital Design Version:
I am planning on recreating a lot of the design from the analog to the digital version, with some changes due to the capacity to program the machine. For example, my stretch goal is having a “march of the meanies” minigame where targets pop up out of the ground of the machine, and you have to hit them all to score a large bonus.
For other changes, I’m planning on using a “wire” spiral instead of a ramp as initially intended, and add sound effects from the film.
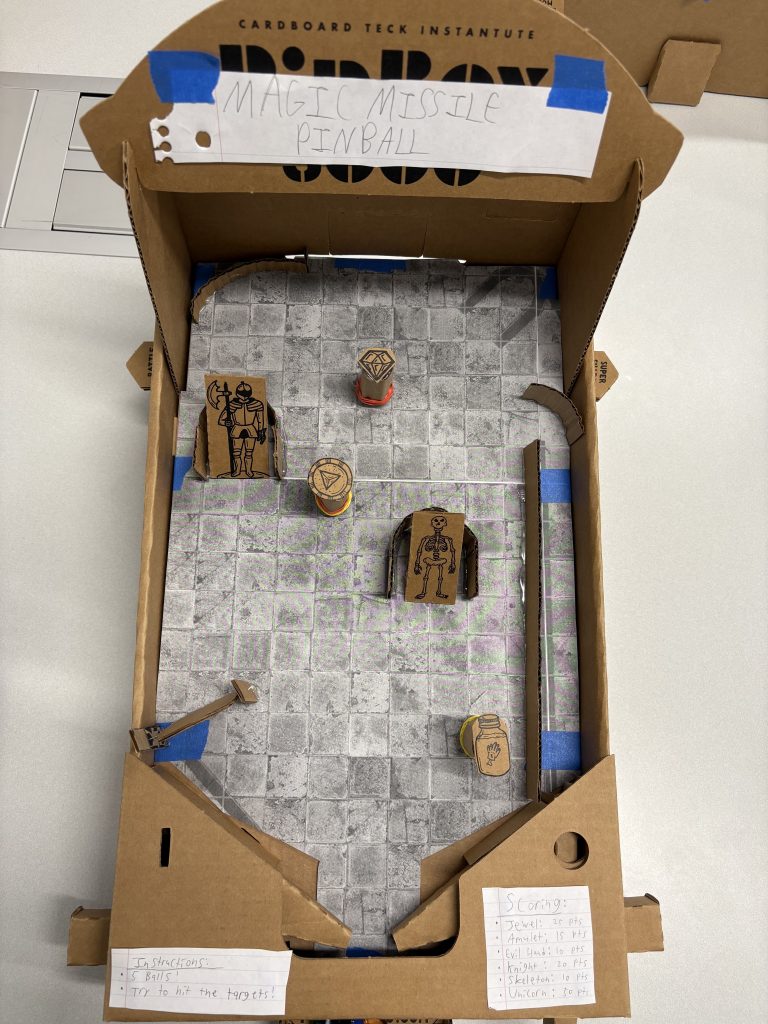
Initial Draft for Magic Missile PinballThe Initial Build of Magic Missile PinballA closer look at the playfield of Magic Missile Pinball.
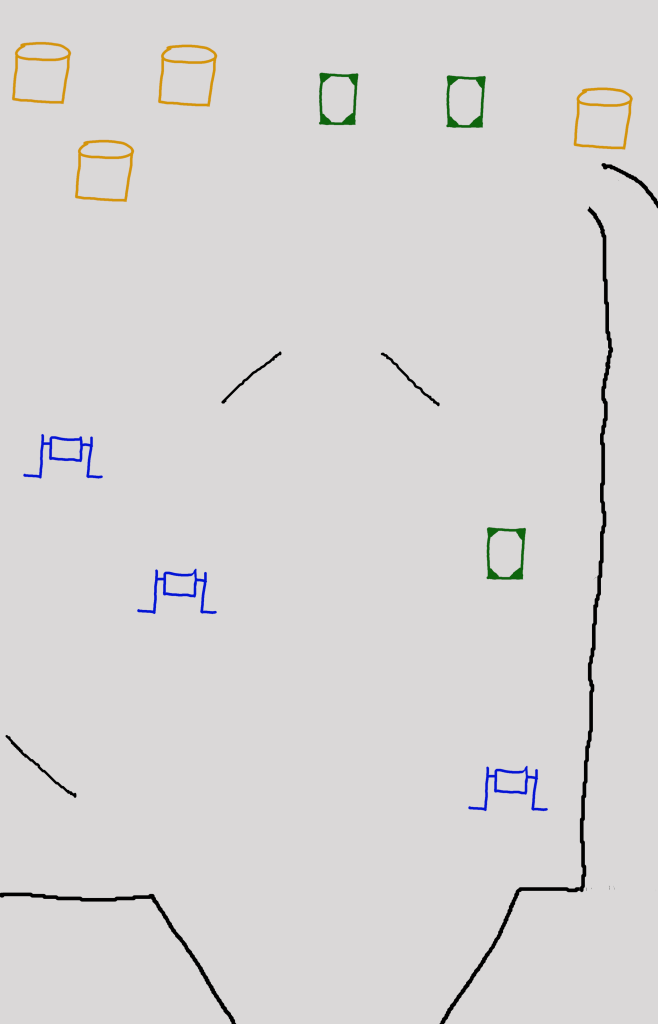
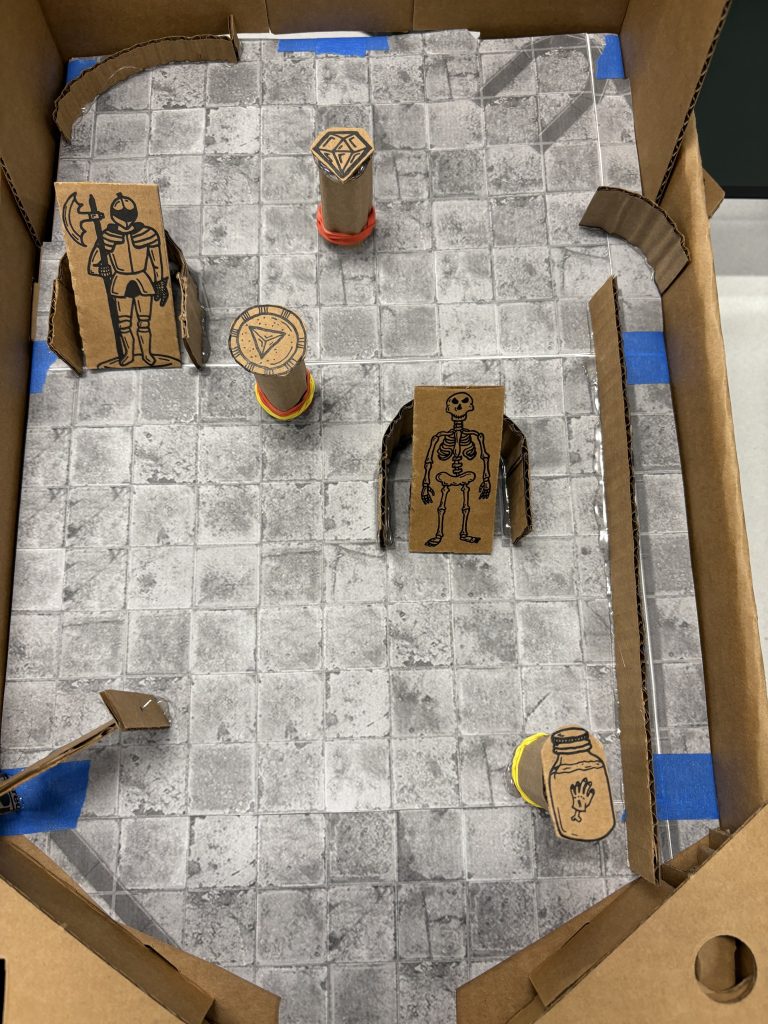
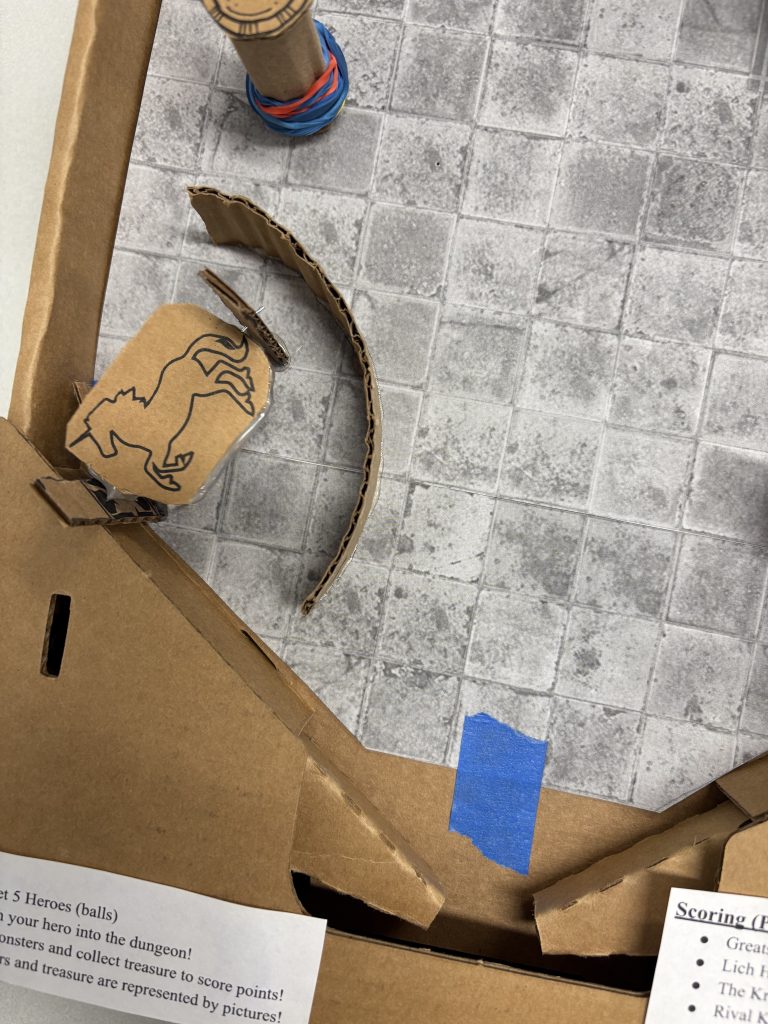
While building the body of the Pinbox 3000, I saw all of the classic fantasy decorations on the side of the frames and knew I wanted to use them for my machine. My initial idea was to have the player take on the role of a wizard casting a spell to try and hit various targets, but that did not come across in the initial build. I struggled to think of what I could build out of just cardboard and in a limited amount of time, so I settled on some classic pinball elements: spinners, bumpers and targets. The pieces from the Pinbox 3000 kit proved to lend themselves well to these kinds of components. The knight and skeleton are tall pieces that make good targets, the unicorn and octopus are wide and shorter to make good spinners, and the other pieces are small enough to make good bumper tops.
The general idea was to place the elements around the playboard so that the ball could ricochet between a few before rolling down to the bumpers. I originally planned to section off the unicorn spinner such that the ball would have to roll into it from above, but I mismeasured my playfield cover, which I used to position the other playfield elements. I decided to angle the knight and skeleton targets slightly so that the player could more easily see them. I added an angled stand to the underside of each to create this effect. The bumpers were made of cardboard tubes with an image glued on top and a couple of rubber bands wrapped around the bottom.
The rules are incredibly simple. The player gets five balls and tries to keep them alive while hitting targets to score points.
Iterations and Player Feedback:
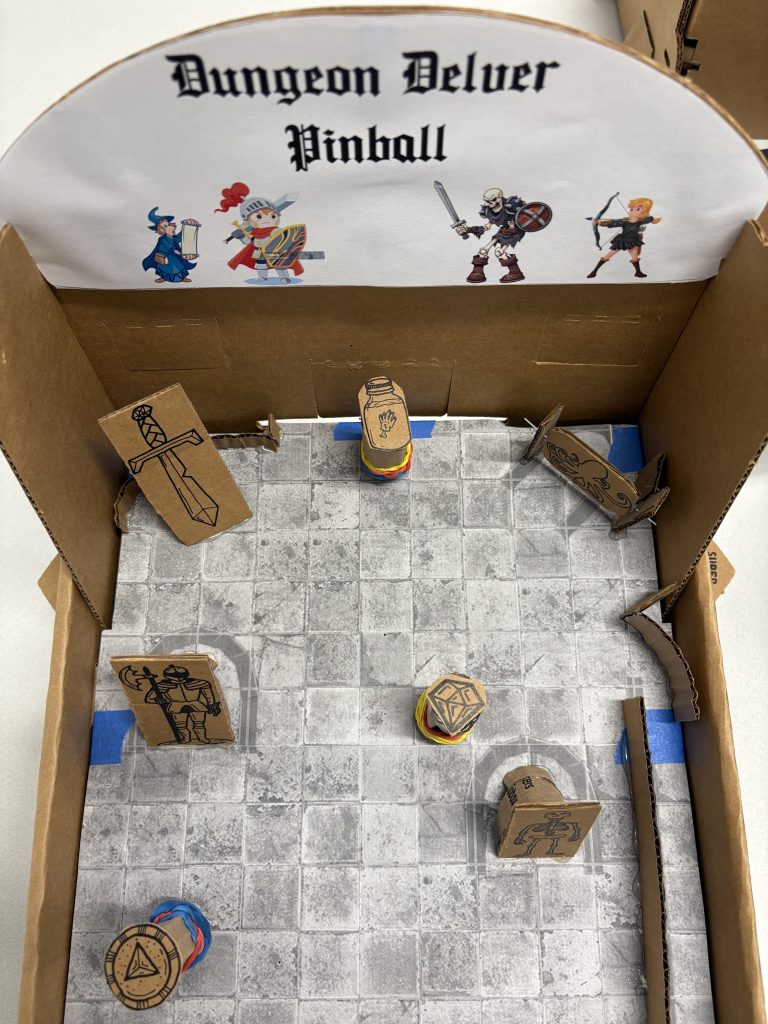
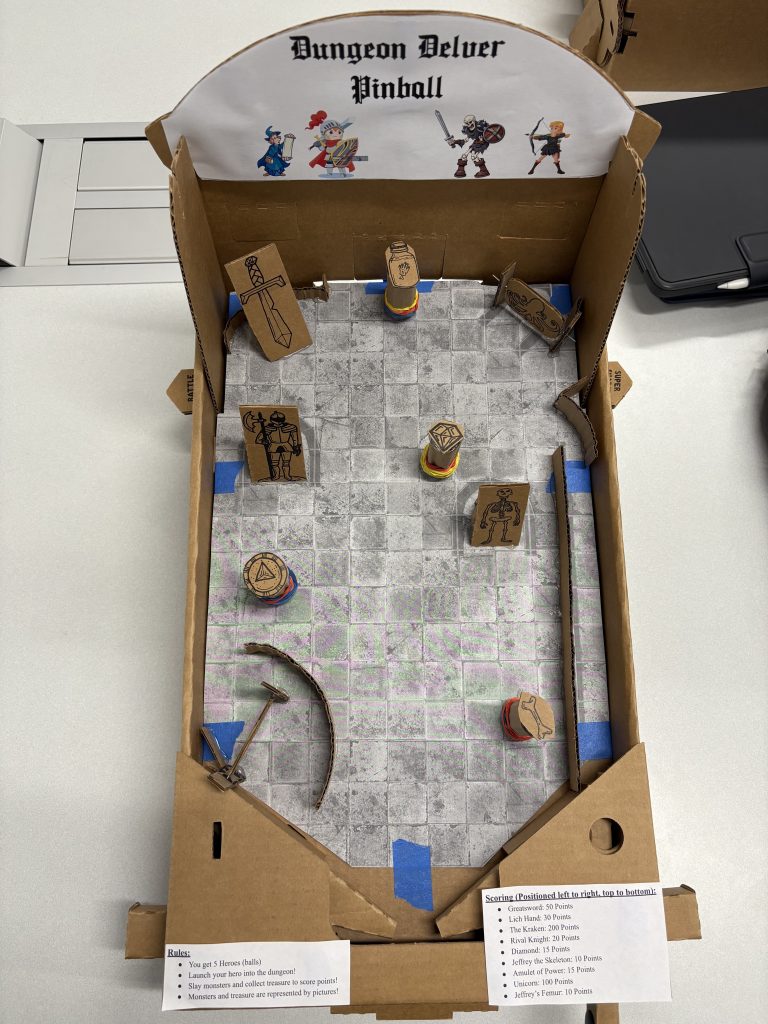
The Header for Dungeon Delver PinballDungeon Delver PinballThe Beloved Spinner
The initial build had a lot of smaller problems that quickly added up. First and foremost, none of the players were able to pick up on the theme. I made the quickest fix possible by changing the theme from a wizard shooting spells to the player sending heroes into a dungeon. There were also issues with the scoring instruction formatting, namely the lack of rhyme or reason to the order of objects. I had ordered them by element type (bumper, spinner, target), but the players preferred having them organized from left to right, top to bottom.
The players did like how each element felt very tactile and satisfying to hit, with the unicorn spinner being the overall favorite. The targets and bumpers both had their issues. The angle on the targets was too low, making them more like ramps. Several players launched the ball out of the playfield after hitting these targets. The teaching assistant suggested that I put a sheet of plexiglass over the playfield to prevent this. However, I cannot afford that and I only had two days to make improvements, so I used cardboard to boost the targets forwards a little. The bumpers were initially not very bouncy. They were not secured very well and did not have enough rubber bands. Now they are attached to the playboard with a thumbtack through the bottom and have between six and eight rubber bands apiece to increase the bounce potential.
Moving to the Virtual Version:
The main thing I want to add in the virtual version of this machine is more complexity. Right now, it is the most basic a pinball machine could be: it has flippers and things to hit. I would like to have a machine that has other features that players expect, like a multiball or some kind of score multiplier. I think some kind of combo of hitting pieces could trigger the multiball.
I would also like to find a way to make the knight and skeleton targets more interesting. Currently, they are the most static pieces in the prototype. I would like to add some sort of movement, either horizontal or a pop-up, that makes them more engaging.
I would also like to add some sort of ramp or rail. I find them to be very satisfying elements of pinball games, but I was not brave enough to make one out of cardboard or try to figure out the physics to get one working on a physical board. I also want to add a kicker, possibly behind the octopus spinner, to add a bit more variety to the game.
I am excited about a few physical quality of life features offered by Virtual Pinball, such as score tracking and the gate on the ball release. I could also add a gate to the unicorn spinner corral to keep the ball out unless it enters from above. Also, having true bumpers will be very helpful in making the game feel more like pinball.
Lastly, as a challenge, I want to try and add more for my theme. In my instructions, I say that the balls are all heroes. I think it would be interesting if each ball had something unique about it that would change the game slightly as it progressed. For example, the final ball might be a “healer” who can restore one other ball if the player completes a challenge, or a “thief” that scores extra points from “treasure” elements. However, this is a stretch goal that will depend on other projects that I also need to work on.