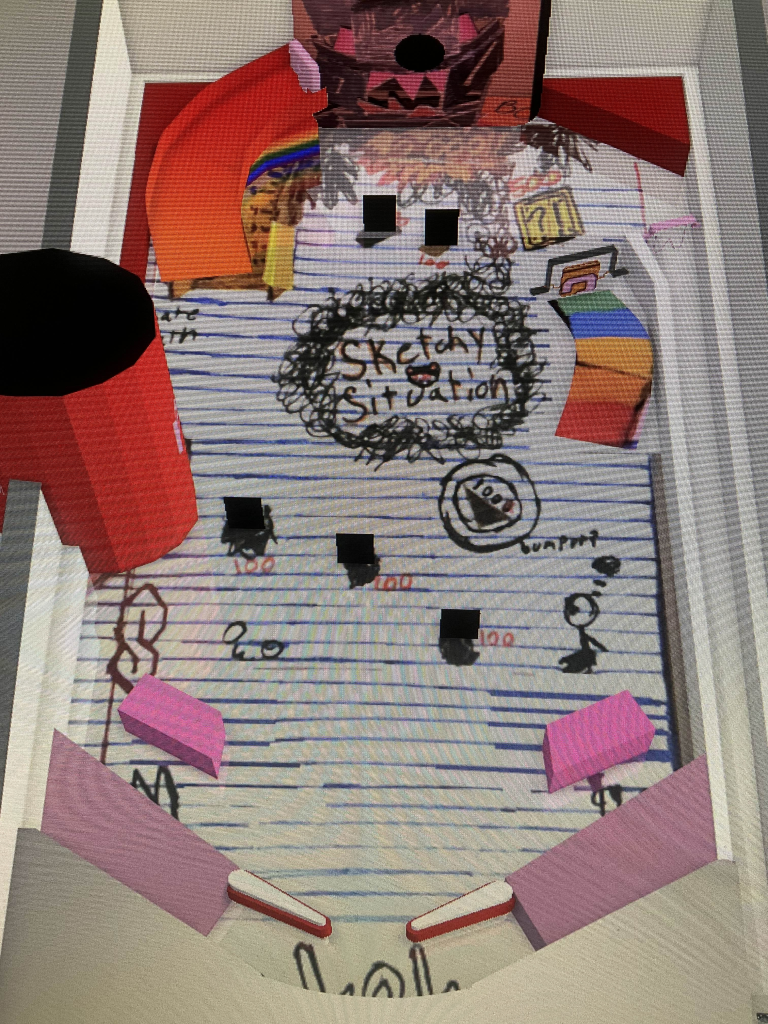
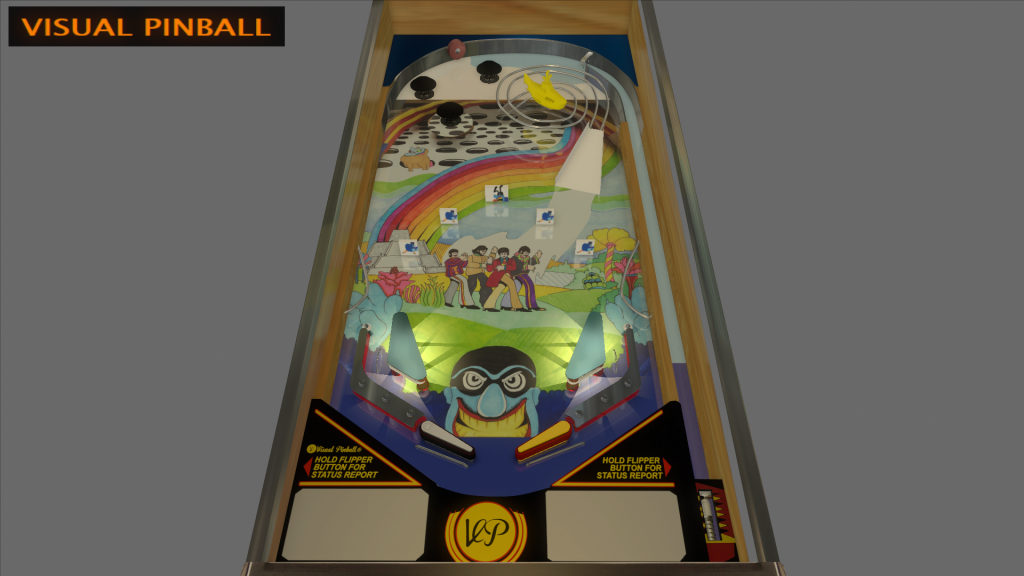
When I began planning the digital version of Sketchy Situation, my goal was to do a one-to-one adaptation of the physical version. I didn’t want to reinvent the machine, I just wanted to elevate it. My plan was to preserve the layout, theme, and game mechanics from my cardboard Pinbox while introducing one key feature missing from the original: a proper point system.
In the physical version, the game focused on a singular win condition, hit the monster’s mouth and you win. But in the digital version, I wanted the game to feel more like traditional pinball. This meant rewarding players for hitting different areas, encouraging replayability through score-chasing, and giving feedback beyond just winning or losing.
First Digital Design
This was my first time working with Visual Pinball, and while I had high hopes, my progress was slower than I expected. My first digital prototype was essentially a wireframe version of my Pinbox. I focused on function over form, mapping the ball flow, adjusting ramps, and adding invisible walls to fix areas where the ball would get stuck in the physical version.
I did make some smart mechanical tweaks during this phase. For example, the pencil cup at the bottom became a point bumper instead of a purely decorative element. I also ensured that the main ramp and top area had proper ball physics to avoid the jamming issues I had encountered during the Strong Museum event.
Final Digital Design
In my final version, I added visual elements to bring the game to life. Unfortunately, this is where I fell short. Rather than designing new assets specifically for the digital format, I scanned pieces of my cardboard pinball machine and used them as graphics. While this helped maintain the original art style, it didn’t translate well into a digital environment. The result felt flat and a little unpolished.
I also added drop targets to represent the monster’s attacks, giving players point-scoring opportunities that echoed the ink splotches from the physical design. While the functionality was there, the presentation didn’t live up to my expectations.
To be honest, this final version might be the project I’m least proud of in the class. I spent so much of my energy on the physical build that my digital one ended up feeling more like a rushed port than a proper sequel. I watched tutorials, explored Visual Pinball features, and tried to make the most of what I understood, but I struggled with the tool and it shows in the final product.
Playtesting Reactions
Playtesting for the digital version echoed the physical one in terms of layout and mechanics. Since I kept the designs almost identical, players immediately understood the rules. The new point system added a welcomed layer of engagement, and people enjoyed seeing their score rack up for different actions.
However, the most consistent feedback was about the visuals. Players said the game felt “unfinished” or “messy,” mostly due to the scanned cardboard textures. While the physical aesthetic worked great in real life, it didn’t feel intentional or refined when brought into the digital world. If I had more time, I would definitely focus on creating unique, stylized assets tailored for screen use.
Citations
All scanned art assets were taken from my physical Sketchy Situation pinball machine.
Me and the team from Questball wanted to take each machine and make it it’s own cool Visual Pinball.
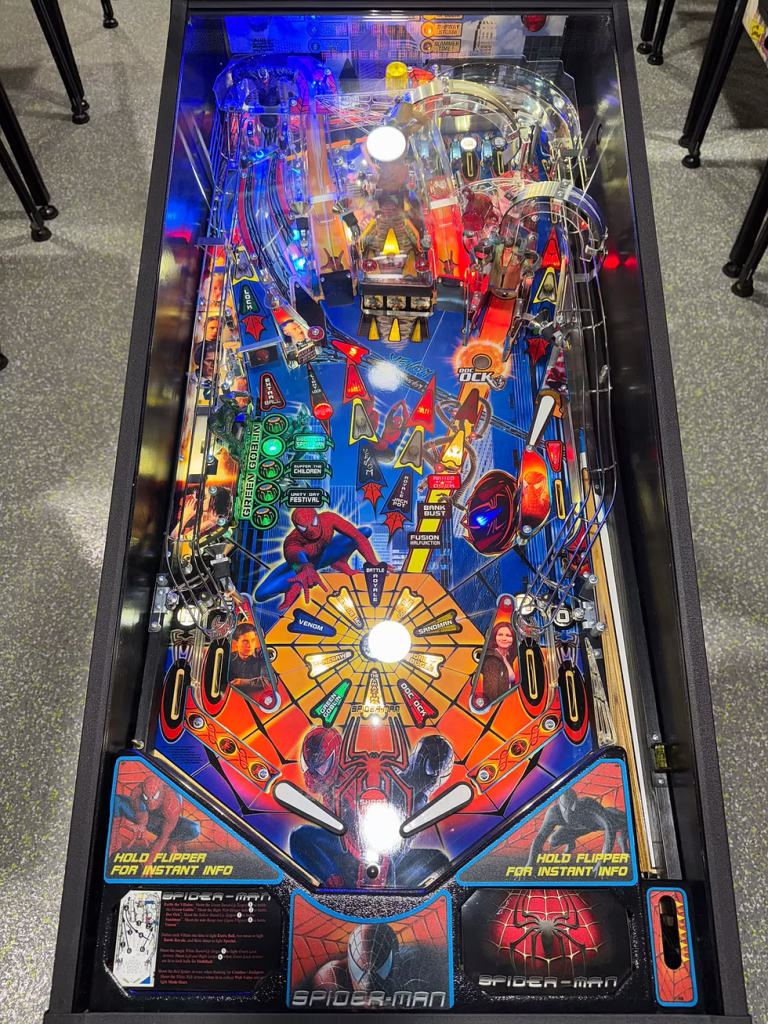
So with mine, the Archer Edition, I wanted to bring back the bullseye, add some drop targets, and have tons of long ramps. I was super inspired by the Spider-Man Pinball machine, which is one of my favorites.
I will admit, I was waaaaay too ambitious with this one. I thought Visual Pinball wasn’t that hard to use.
Readjusting/Struggles
I’m on a Macbook so I had to use VMWare Fusion to make Visual Pinball. And therein lay my biggest issue. Because Fusion does NOT like Visual Pinball. I had made a fair amount of progress, but my game was laggy, the preview screen wouldn’t work, and overall it was just not fun to use. So I pivoted to helping Jacob with his!
We edited his initial design slightly and added some more ramps and got to mess with the flipper gates. It was very fun! We didn’t end up doing too much since we were more focused on making sure our Physical Questball Machines were good for Imagine. But I enjoyed the little time I had with Visual Pinball, especially the drag and drop aspect of the whole thing.
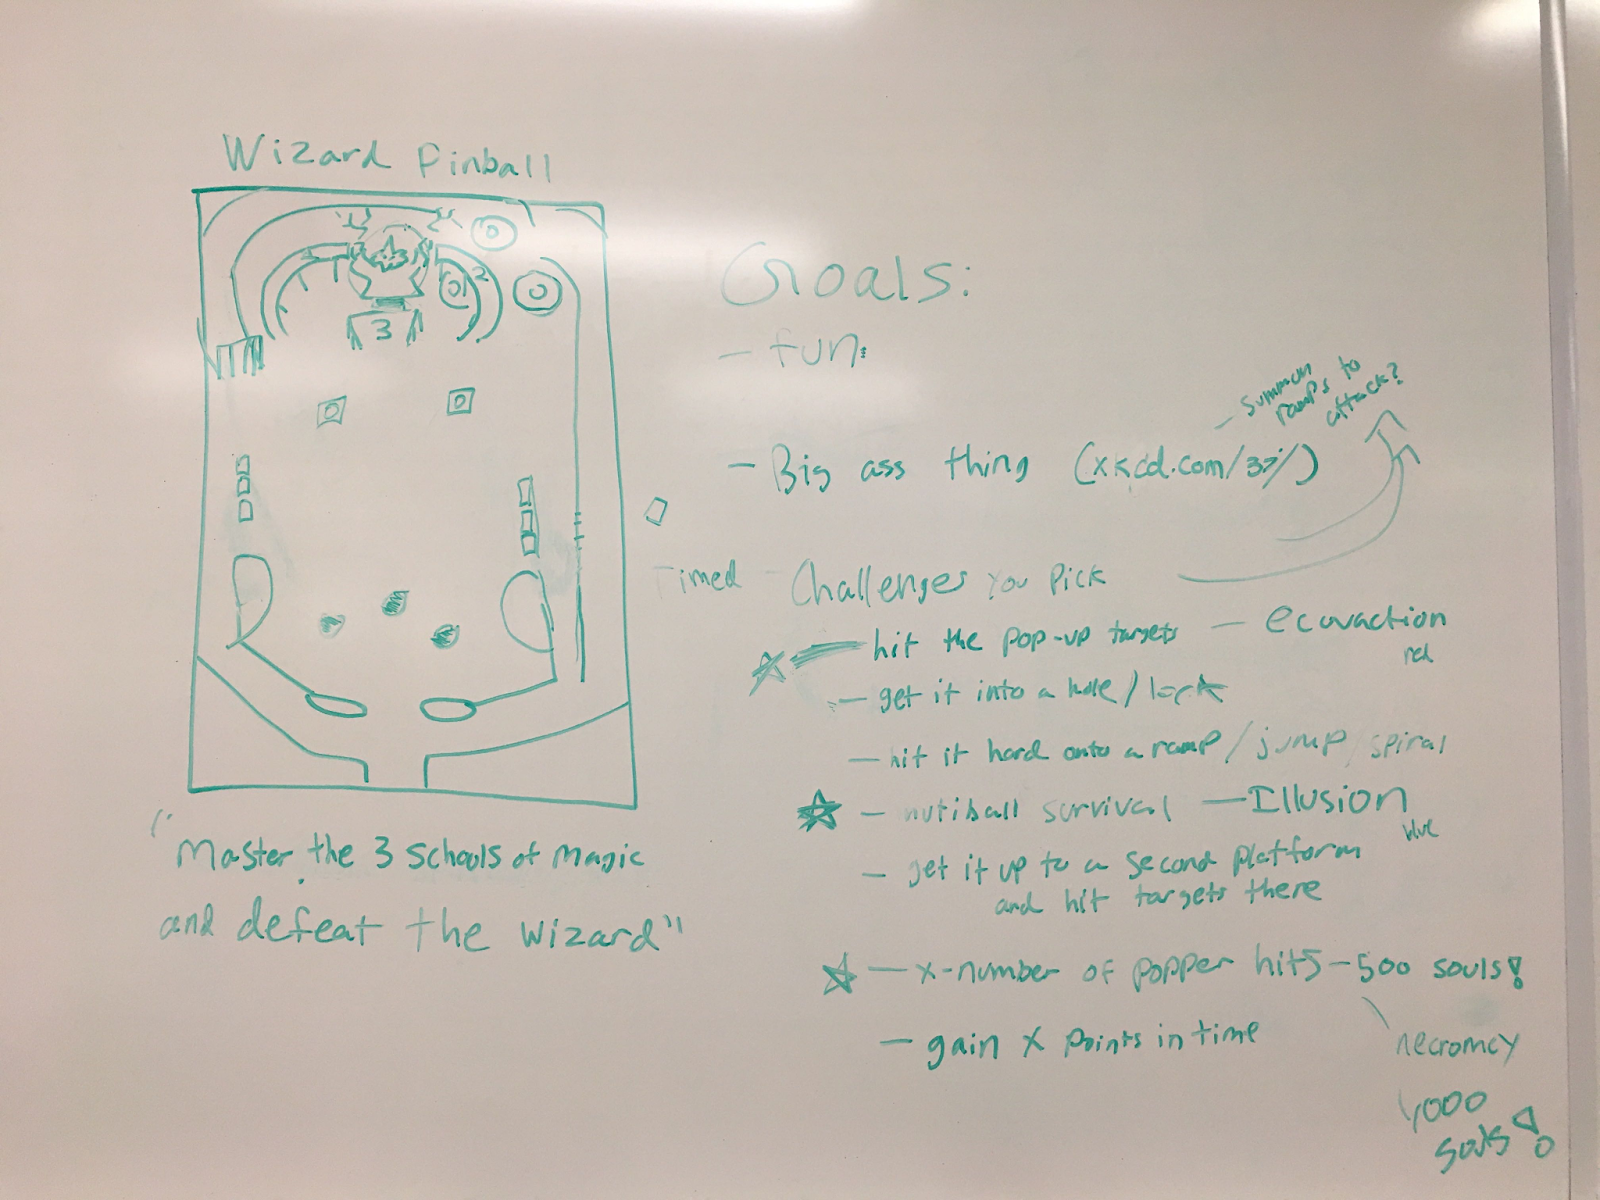
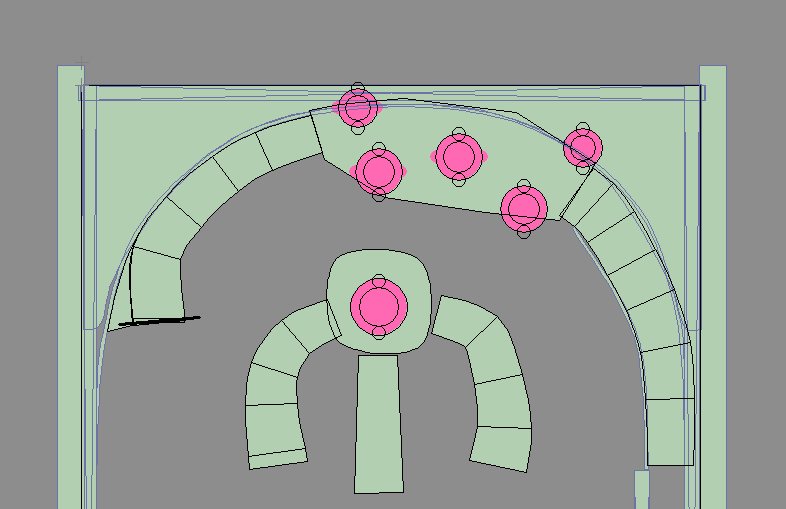
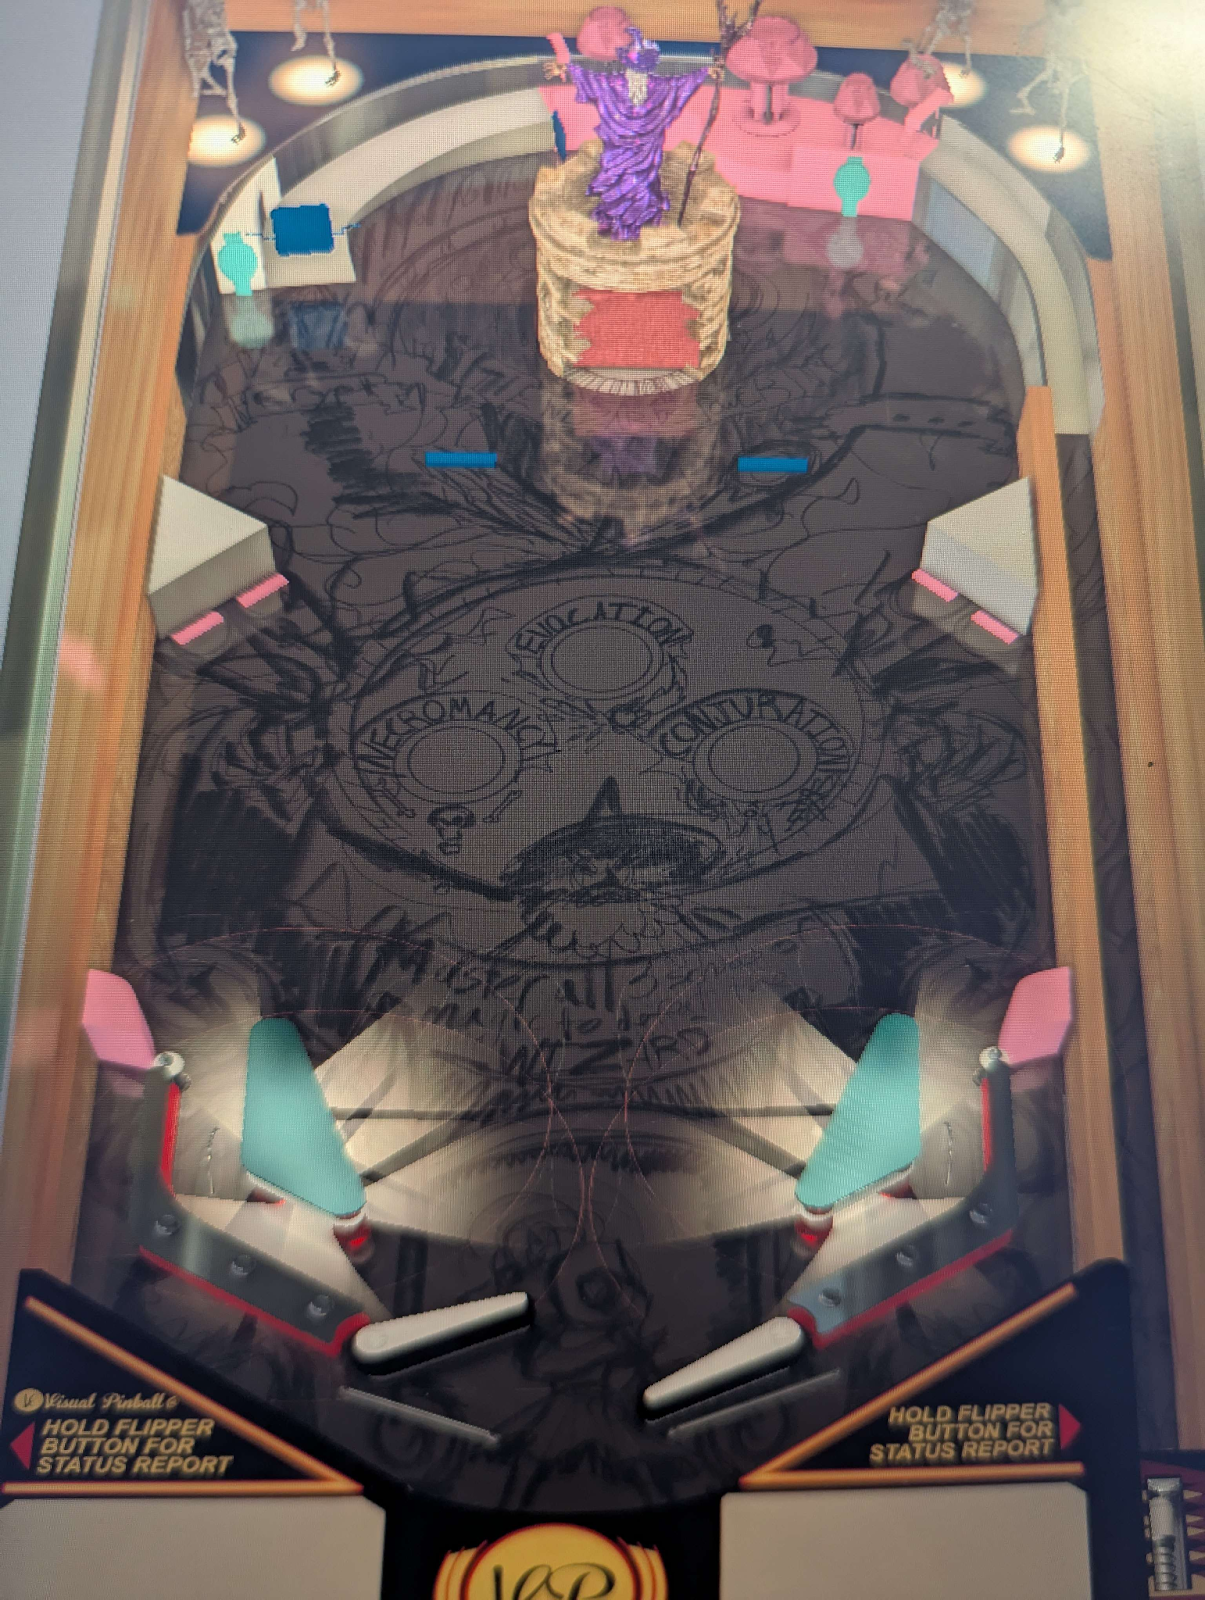
Wizard Pinball, just like “Frog and Toad’s Big Day Out,” was a collaborative project between myself, Brandon Korn, and Audrey Fuller. For our digital pinball machine, we decided to not iterate on our pinbox machine because the visual pinball software didn’t have good functionality for the co-op mechanics we designed for the frog and toad pinball. Instead we pivoted to Wizard Pinball, a previous idea we had. We wanted to emulate 70s/80s wizard stylings and put the player fighting against this evil wizard for points. The main gimmick was to get points by hitting the wizard statue that is up on a pedestal, and the ramps would be lowered until the player beat certain challenges (flavored as mastering different schools of magic.) Then the ramp associated with the “school of magic” would rise and the player could attempt to hit the wizard statue.
We wanted to have the ramps be unlocked by completing challenges. You can start a challenge, then select either hitting pop-up targets, multiball, or bumpers, and when you complete a set amount of those things, a ramp will rise and you can hit the wizard, gaining the most points.
When we got to designing it in visual pinball, not all of our challenges were quick to implement. We kept the idea of bumpers and drop targets to open ramps to hit the wizard bumper, but we couldn’t raise the ramps from the ground like we wanted and having them “always raised” took up much of the playfield, which we didn’t like. We made the gimmick to start challenges a kicker in the wizard tower. First, you have to knock down the outer wall of the tower to reveal the kicker, and then you can enter to start a challenge. After a delay, and the drop targets are raised, your ball is ejected through a one way gate at the back of the tower. The targets are on a timer, and if the ball drains or the time runs out, the rest of them drop for no points. As the pedestal is the main centerpiece, we wanted that to be the main target, and we think the current mechanism feels very fun.
Our final design added in more spinners and targets that are always active in an attempt to keep the playfield interesting for players who may just be trying to keep the ball alive, and to just generally give players more things to do. The ramp shot to enter the area with the bumpers (which we very lovingly referred to as “BumperWorld” during development) is very difficult, but we found that if you slightly miss, you fly around the right side of the ramp and follow a fun path. Because it felt so good when we accidentally hit this shot, we decided to put a spinner towards the back to encourage players to make the shot for points! Although we didn’t implement the “multiball challenge” how we initially wanted to, we still have multiball in our machine. Multiball can be activated while the challenge is active by hitting the right back target during the challenge. Our compromise for still being able to “fight the wizard” without being able to raise ramps was to have a ramp on the right side of the playfield, mostly out of the way of other shots, with a gate that opens allowing you to attack the wizard during the challenge. Similar to the ramp on the left, it is a very difficult shot, but it feels extremely good to hit and gives you the most points of anything on the playfield.
Overall, we were sad we weren’t able to do some of the unique things we initially wanted to do, but we still think the game is fun, and we certainly learned a lot in the process- both about Visual Pinball and how to design satisfying shots! It was harder than we imagined developing and designing at the same time, instead of adapting our pinbox machine, but we think this machine plays very well, and has some fun challenges!
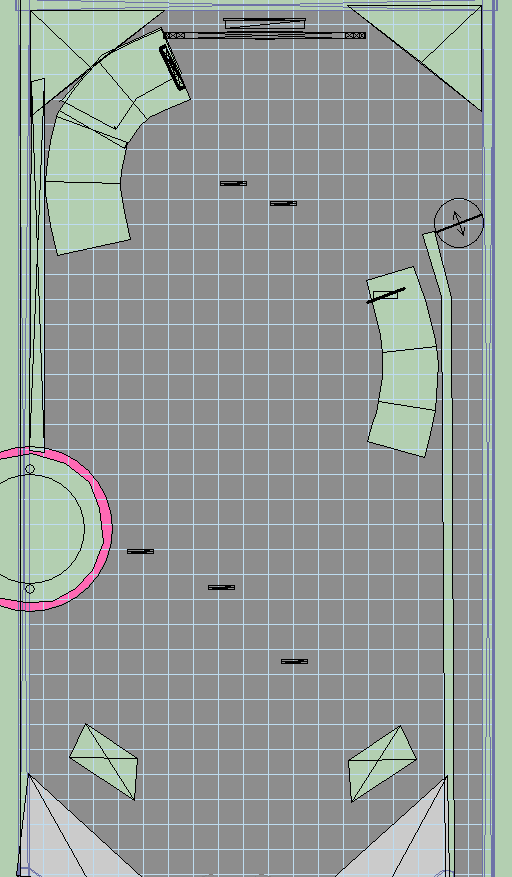
This drafting was a stripped down version of my original intent because after looking into with the idea in mind of digitizing Gridiron Gauntlet. Eventually I moved away from it, but in this, I wanted to keep “buckets” where they are, then use ramps to have multiple levels of the field. I had bumpers and targets planned in the back. I sort of gave up on the idea of complex light coordination based on what I saw it was built like in the software. I tried to just keep it simple within reason for myself, also advised by S.J.
Visual Draft Version
Physicals
The above draft and demo video, as mentioned, was a digitizing of the table on the right. While doing so and building it out, I realized things just weren’t panning out creatively and the gameplay wasn’t as engaging. I realized that Hockey Night (left) was much more engaging and well recieved by players. I also felt more stimulated by its straightforward gameplay and more concise assets. And while it was originally a bagatelle, I just tweaked some placements and it ended up fitting pretty well into that format.
I went with this for VPFinal pinball and my Strong Demo
This is my screenrecording for my final Visual Pinball game. It ended up coming out pretty solid and I think it is fun and a lot more stimulating than the direction I was headed before.
I couldn’t get the targets to go down as low as I want but everything else sort of worked with me for the most part.
I do wish I was able to have run the projects more often to get more user testing ( (but alas, laptops seemed to be my entire and seemingly always asured downfall) but I did get positive feedback from those I did test with outside of class.
The initial design of the Visual Pinball version of Questball: Warrior Edition was originally meant to be pretty true to the original, however, Visual Pinball does not support any sort of multiplayer battle mode natively and I absolutely did not want to take on that hassle for myself. Instead, the VP version of this table is single player, but still is meant to play as though there is someone else “fighting you” and trying to sink the ball down your chute.
What Changed?
With this idea in mind, the new and improved design features a bunch of rails which bring the ball all around the table and spit it out back towards you as though another player was doing so.
Another feature of the original table was the use of ramps, but I found that the use of ramps and rails combined made for very uncontrollable game play, whereas just rails felt just consistent enough to still emulate the feeling of “battling” while still being easy to predict the ball’s movement patterns so that game play doesn’t feel difficult or unfair.
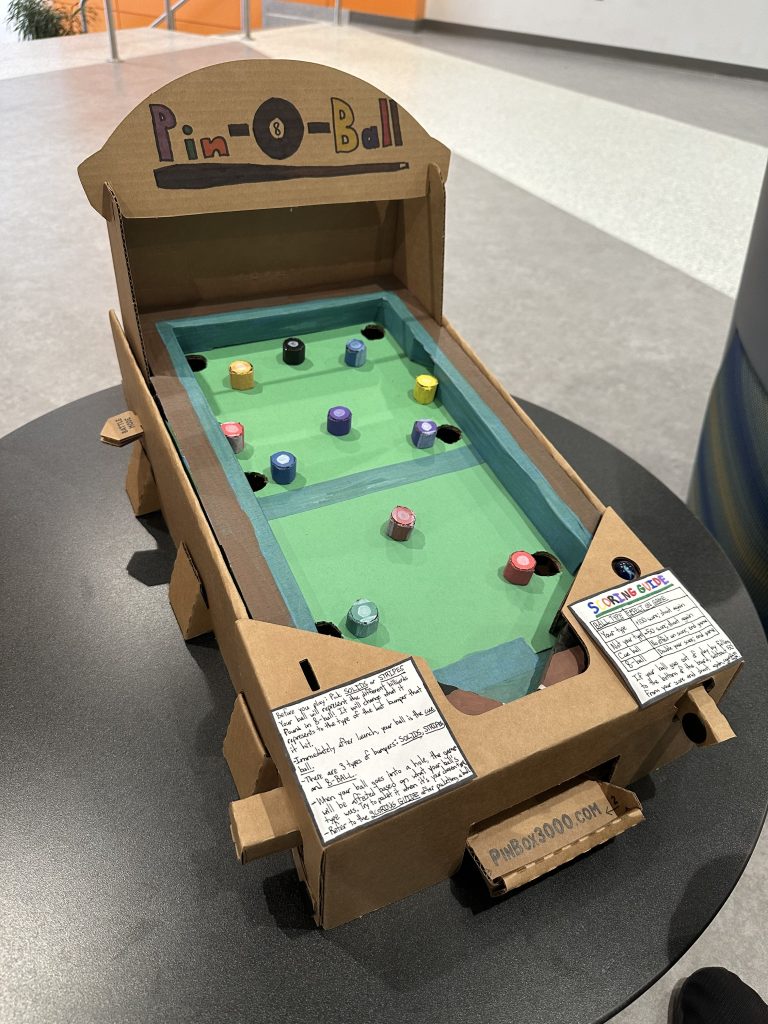
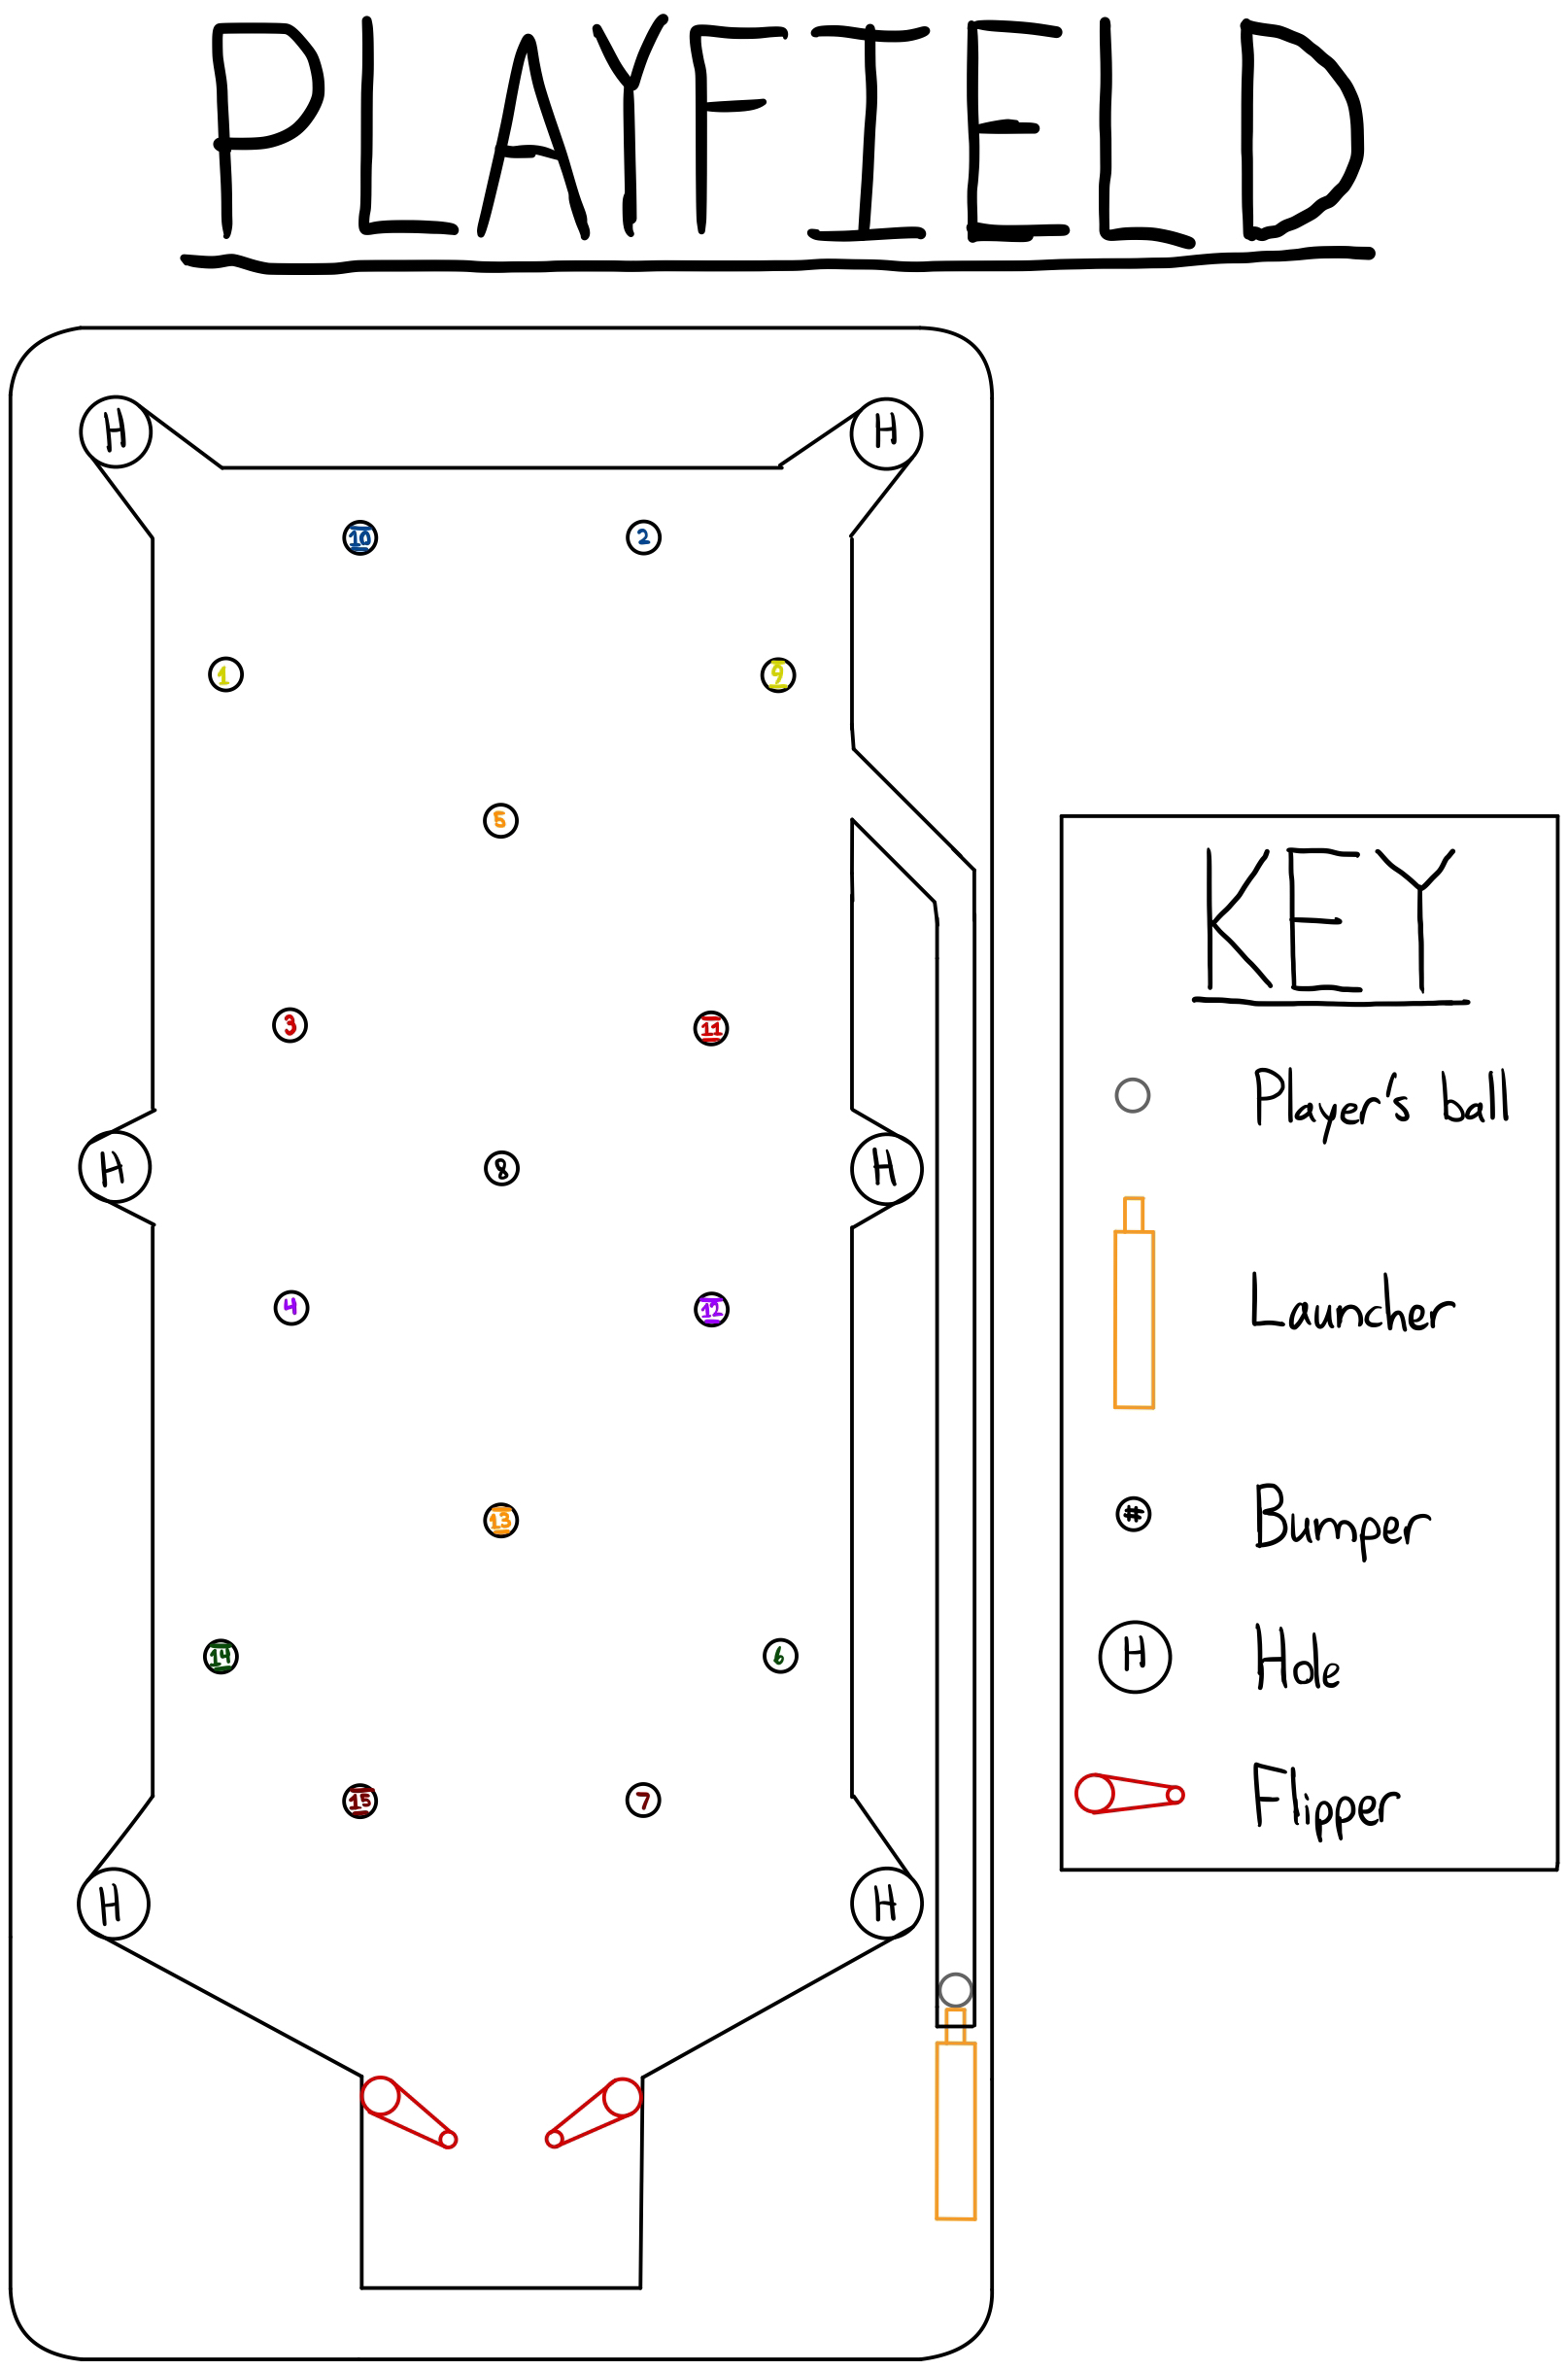
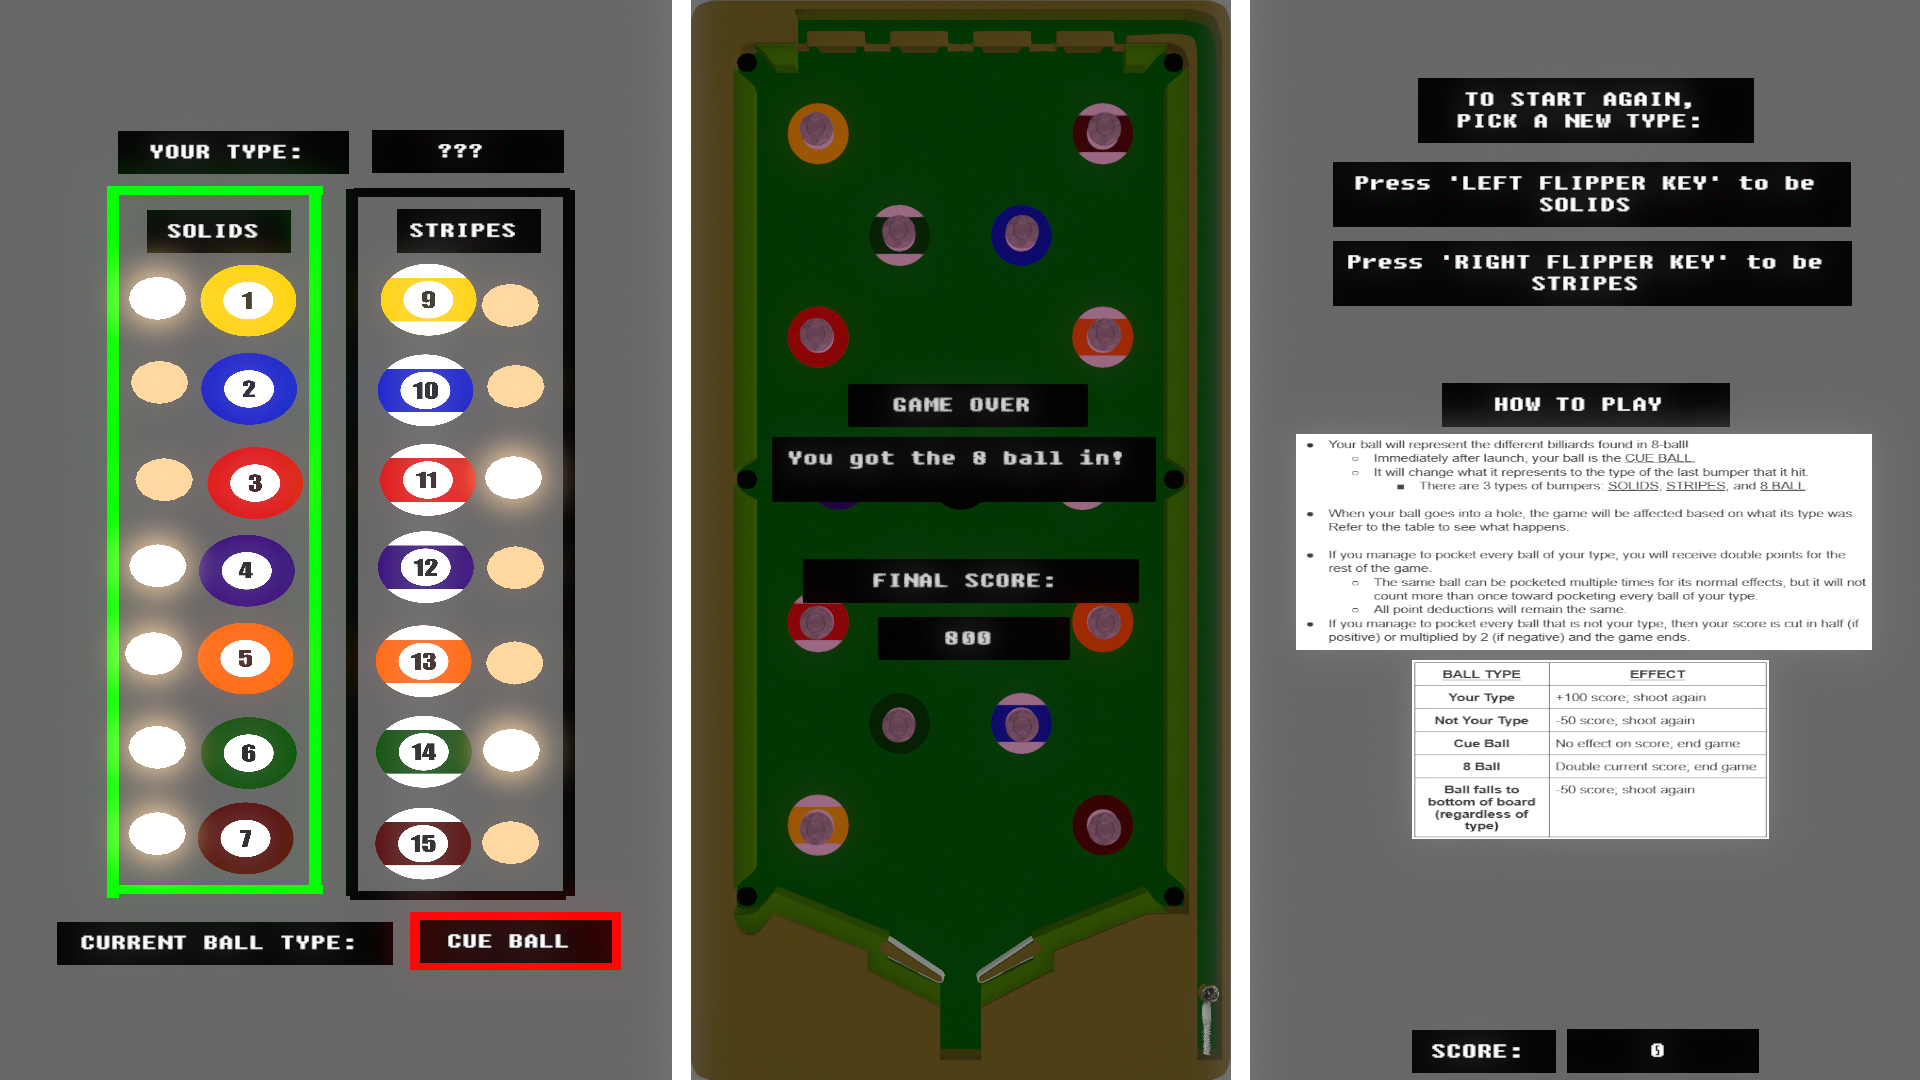
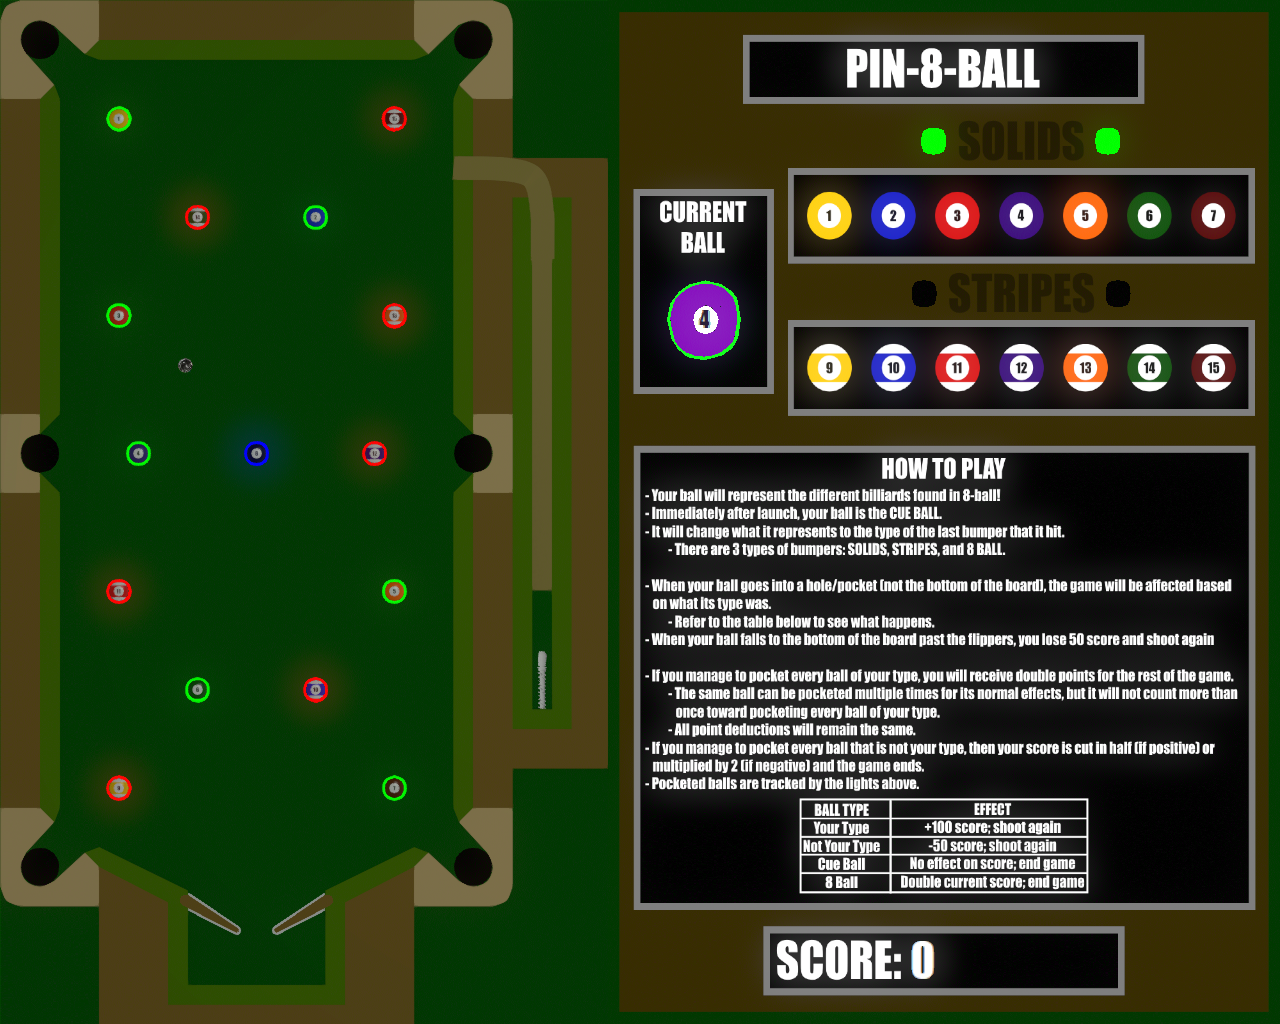
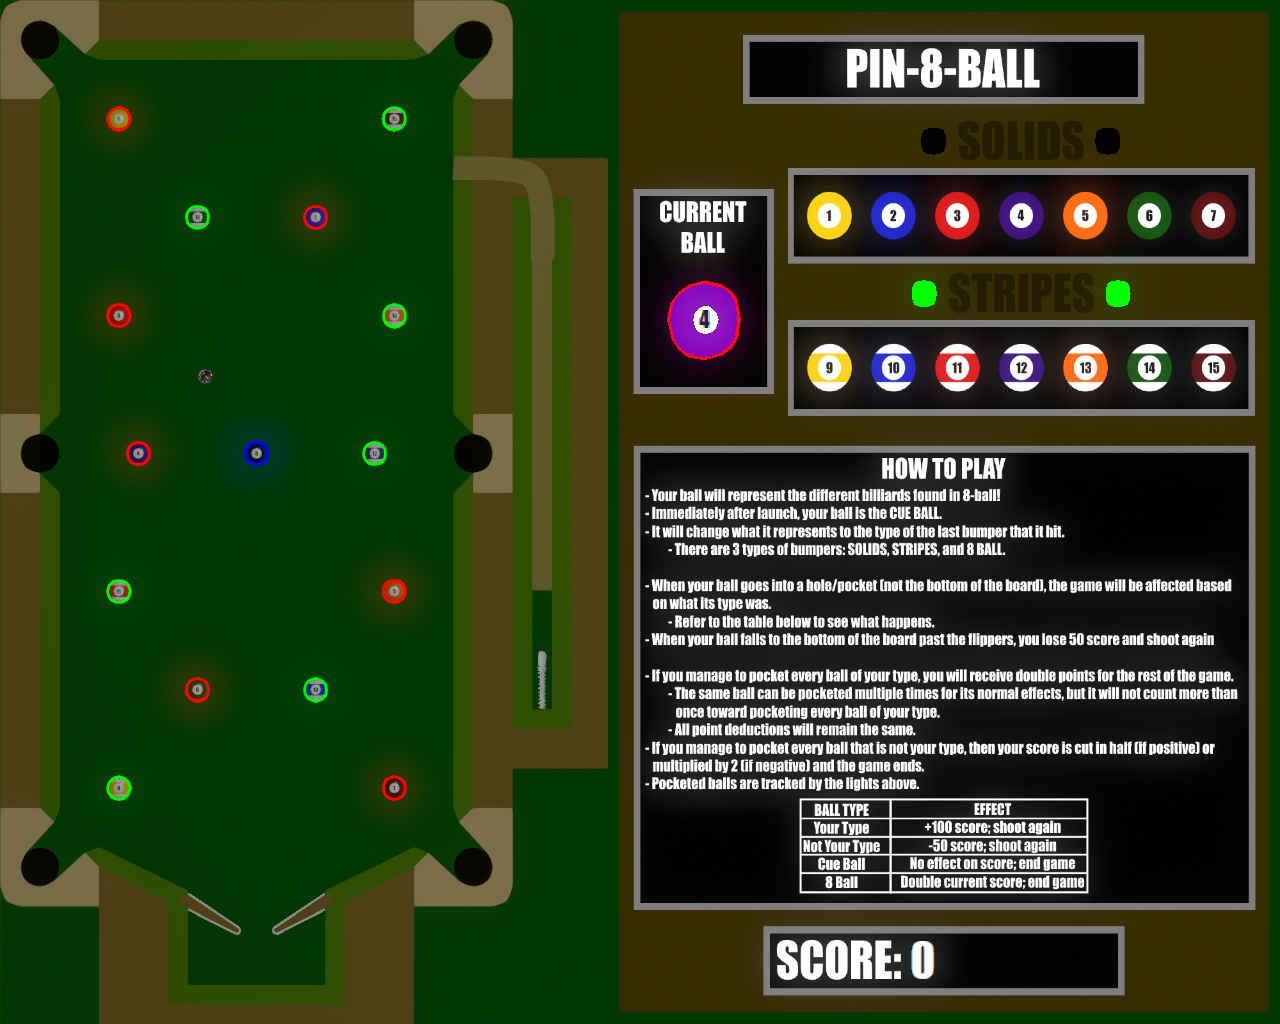
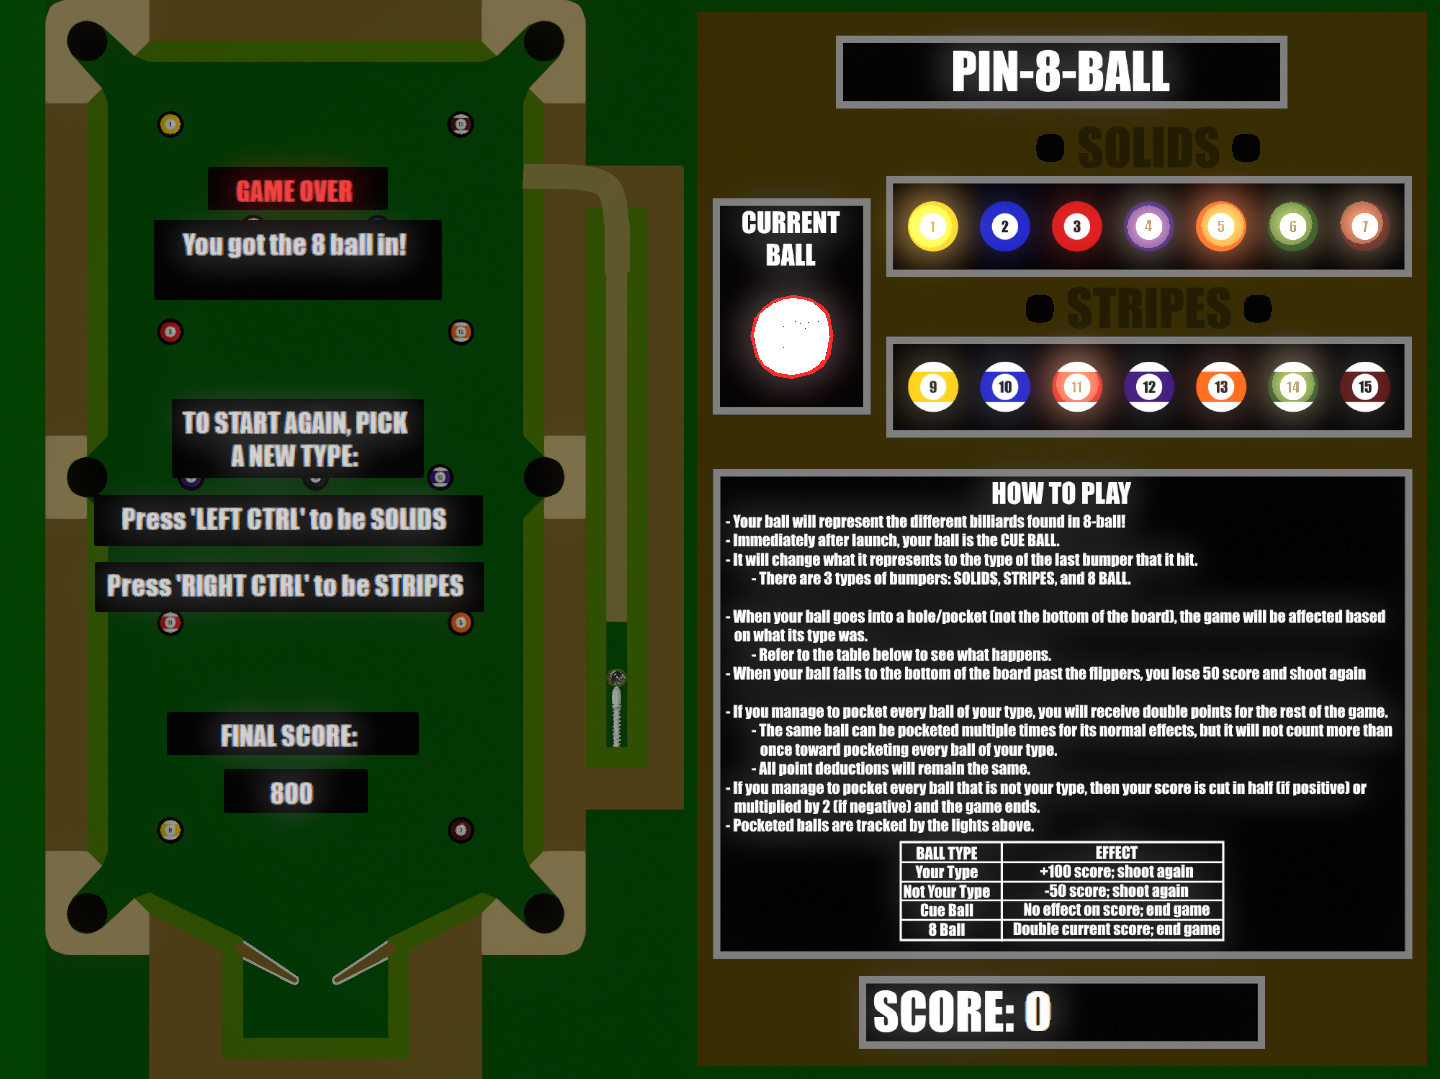
After creating the physical rendition of Pin-8-Ball using the cardboard PinBox 3000, I decided that I wanted to digitally recreate it using Visual Pinball X.
The final physical design of Pin-8-Ball
As with the physical version, I wanted the virtual version of Pin-8-Ball to strongly resemble a tradition pool table. In order to accomplish this, I planned to carry the following features over from the physical version to the digital version:
Bumpers that represent different billiards
Holes that represent the pockets in a pool table
Flippers that resemble pool cues
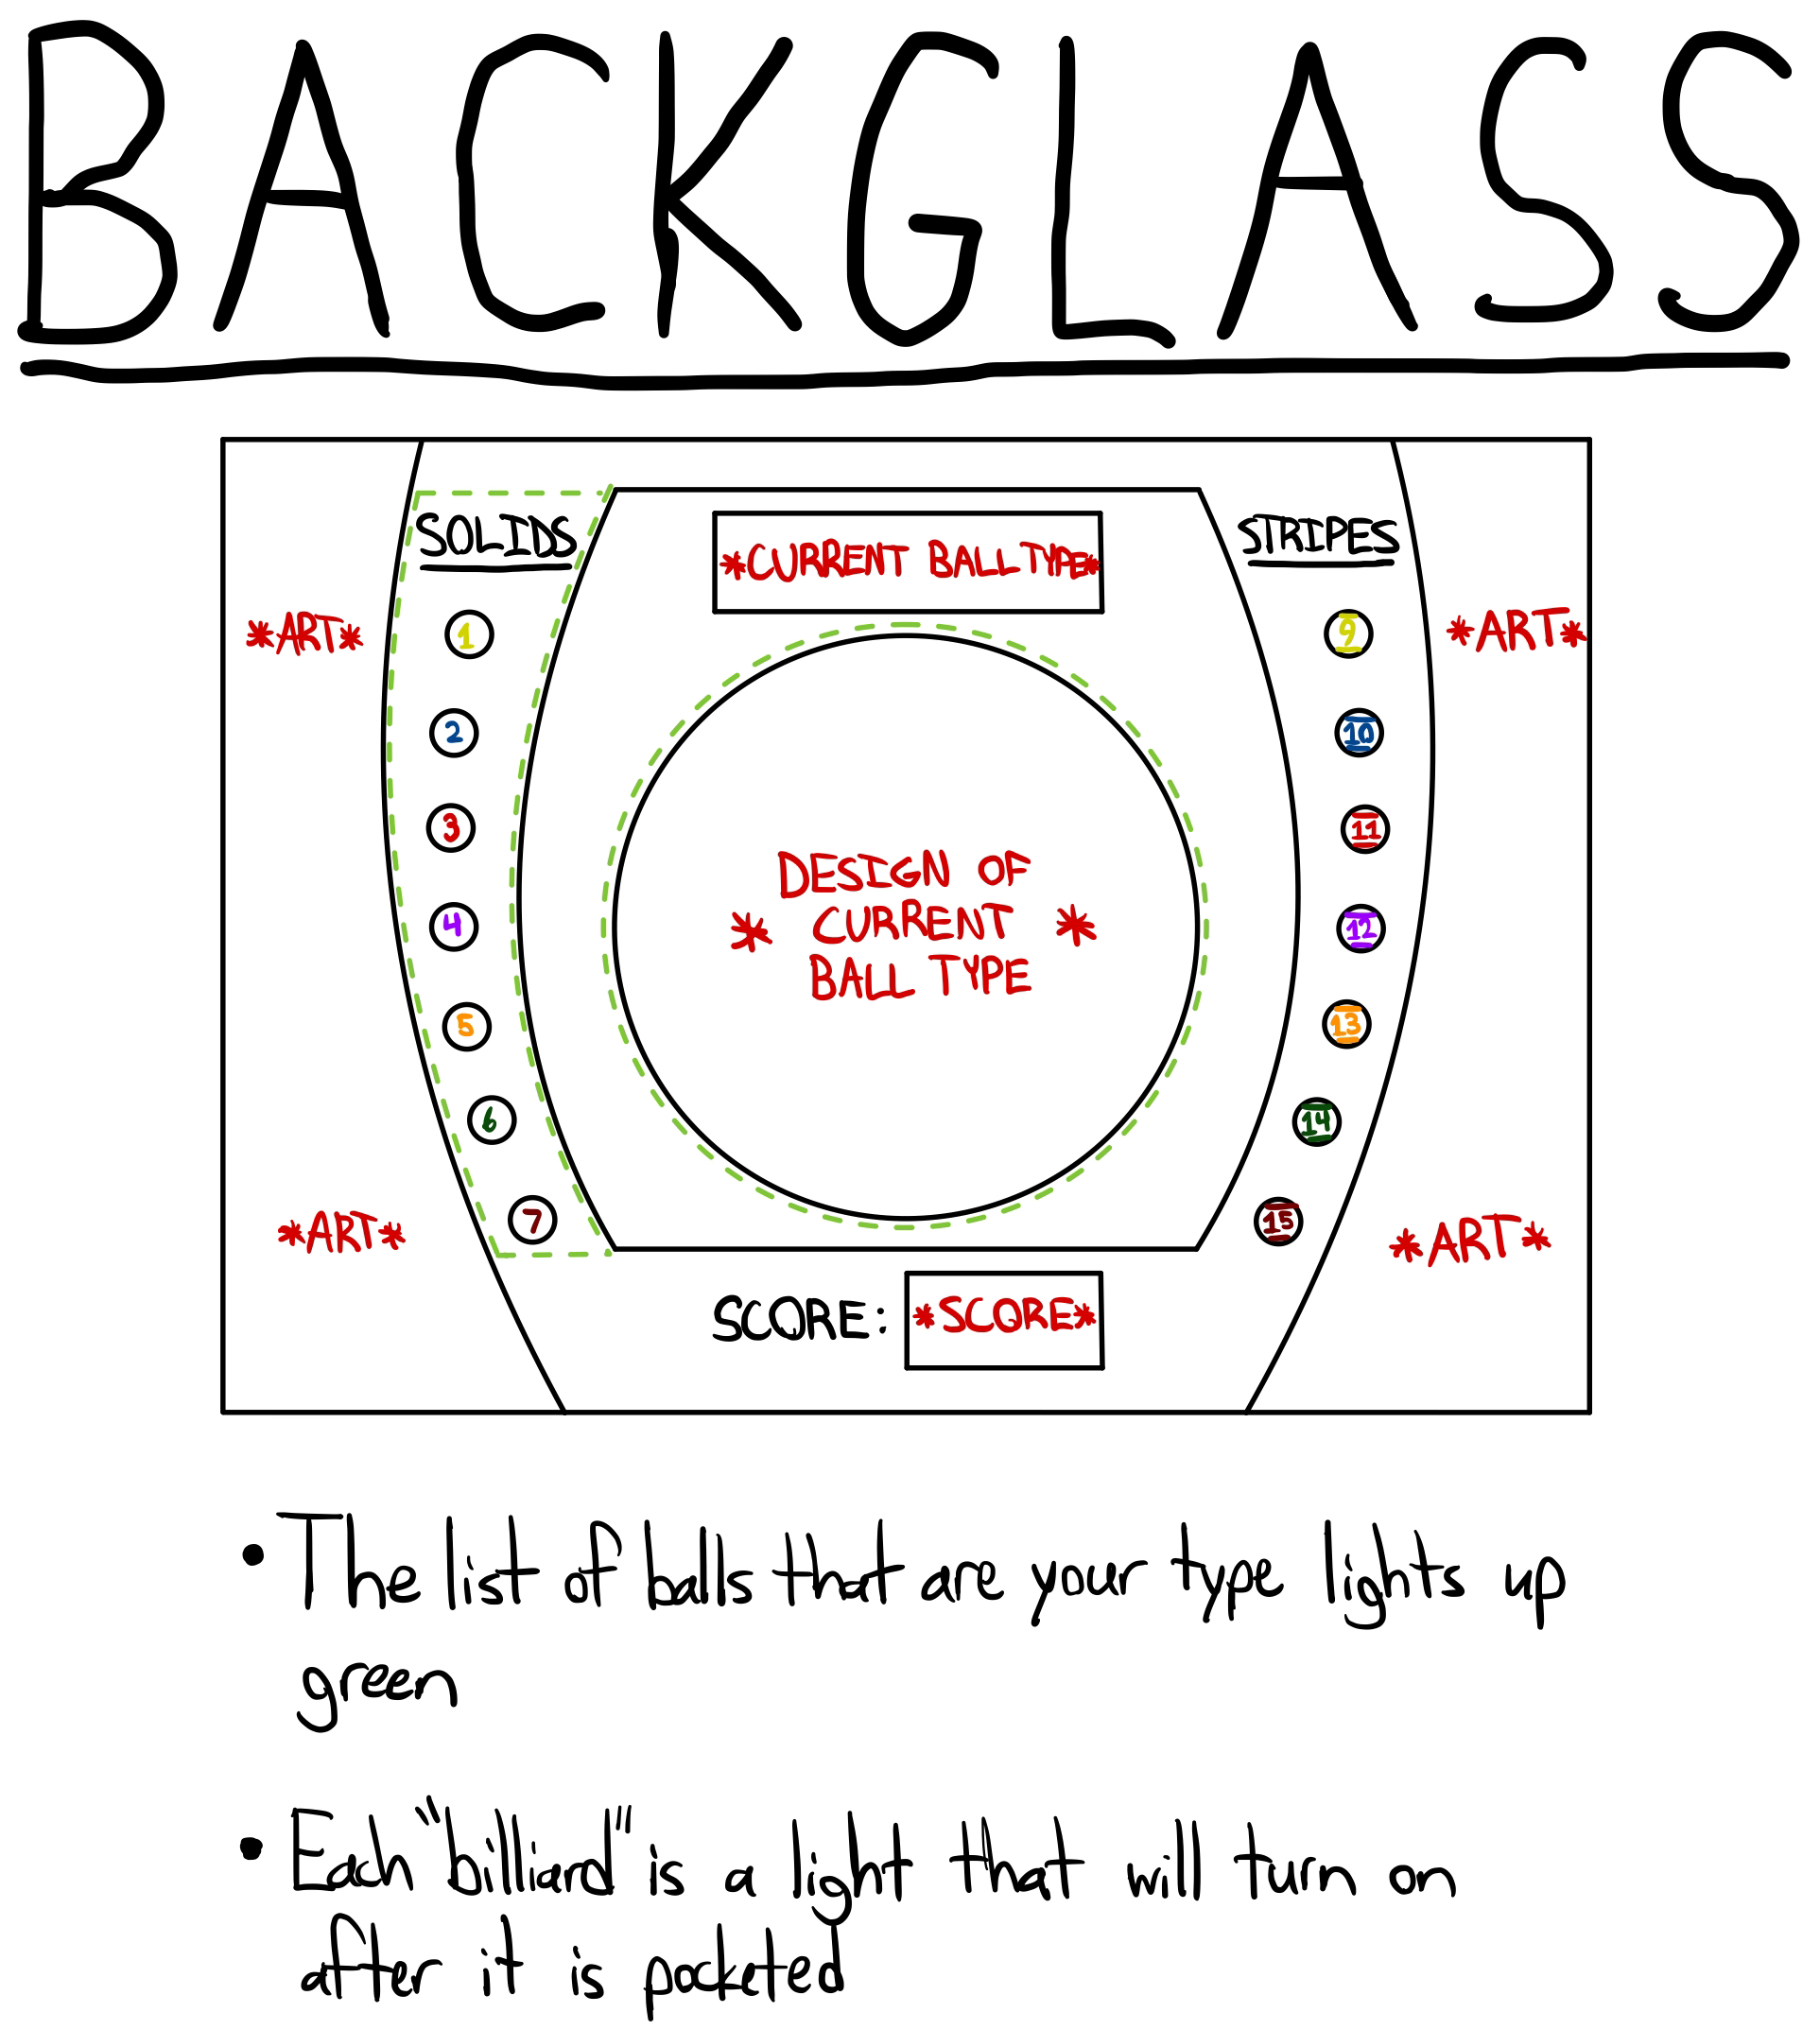
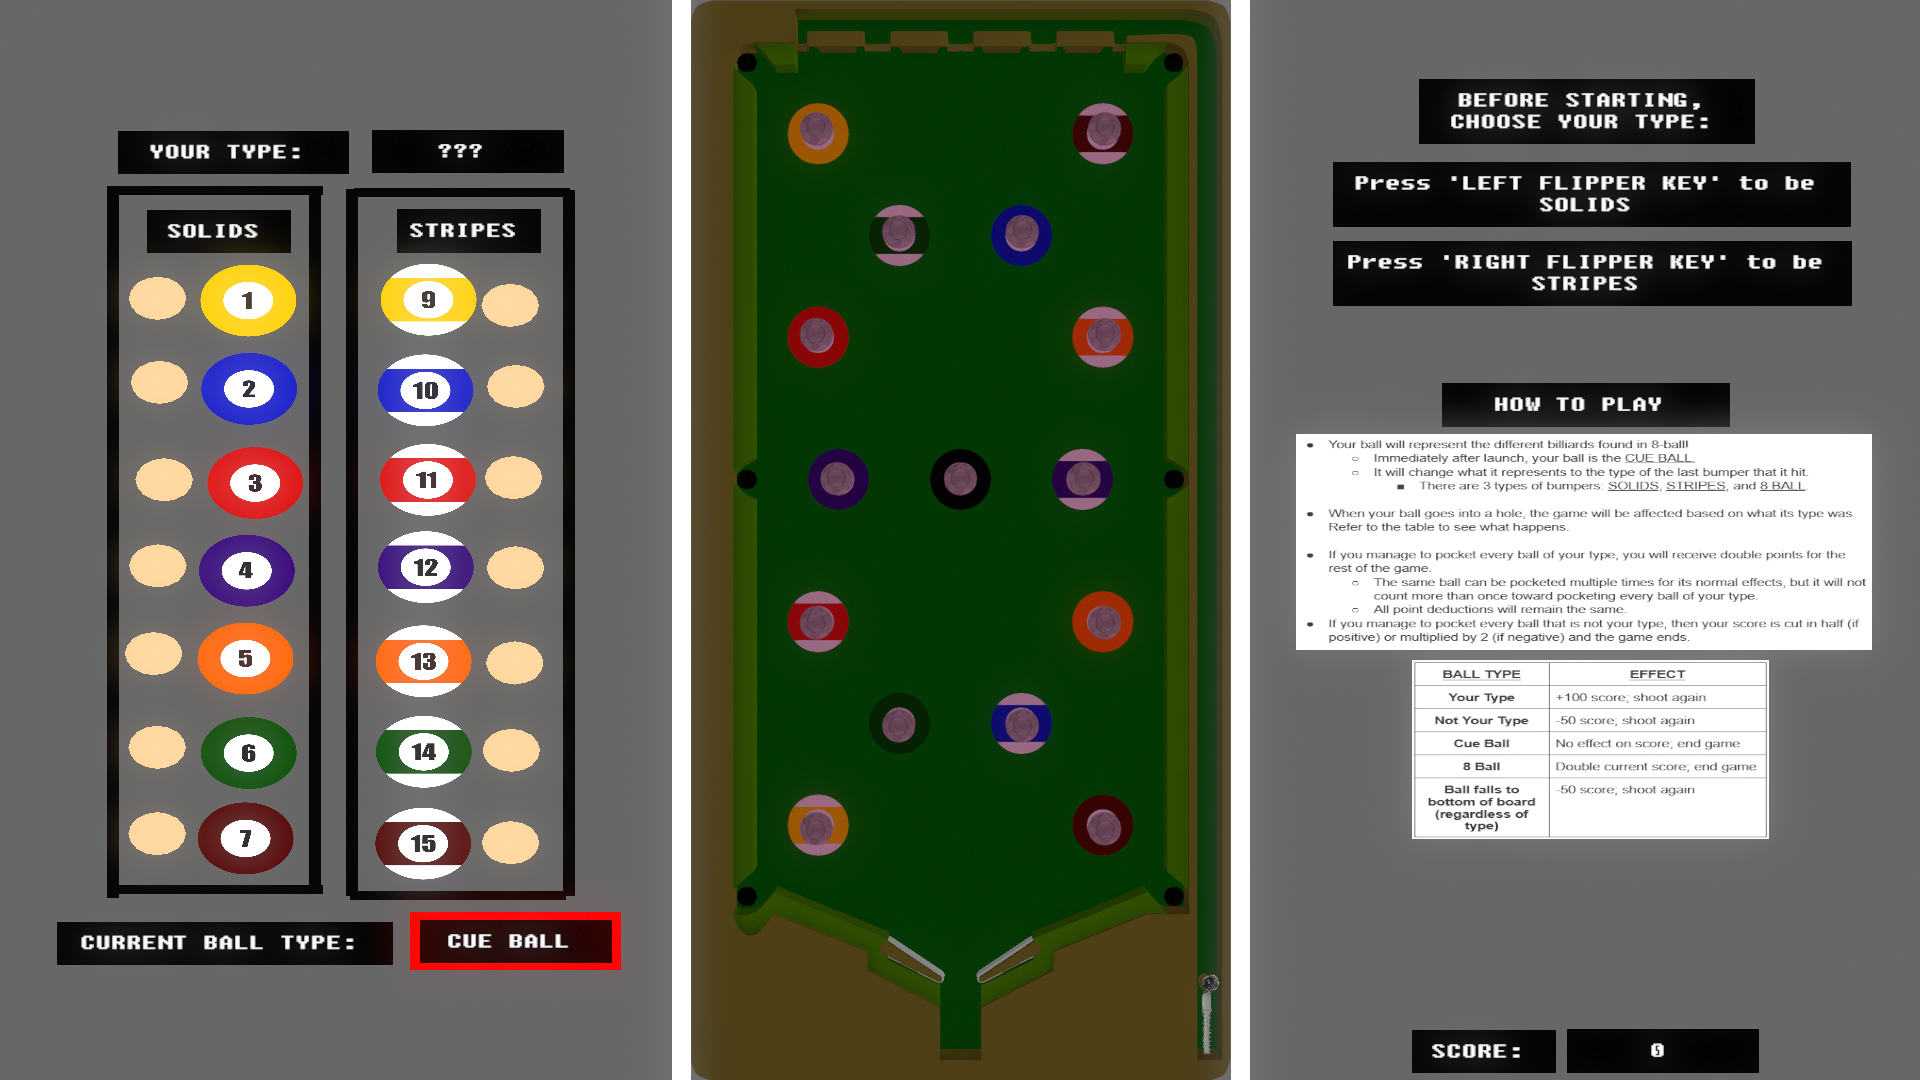
After playtesting the physical version of Pin-8-Ball enough, I made the determination that while its rules are fun and unique, they required the player to keep track of too much information while playing the game. Thankfully, however, I knew that they would translate over to a virtual medium that could automatically track it for the player very well. As a result, I decided to keep the rules the same as the were in the PinBox 3000 edition of Pin-8-Ball. Following in the steps of its cardboard predecessor, I planned for the virtual version of Pin-8-Ball to feature a single ball in play at a time that held onto an ever-changing identity throughout the game. The identity would once again represent the different billiards that could be found on a pool table, and each bumper also had an identity which corresponded with one of the numbered billiards. After starting as the cue ball after launch, when the player’s ball would hit one of the bumpers, its identity would change to become that of the bumper. Before the start of the game, the player would choose either stripes or solids to determine the type of ball that they would be aiming to “pocket” for the rest of the game. Then, whenever the ball would go into one of the six “pockets” that were on the perimeter of the table, depending on the identity of the ball, the game would be affected. The effects were as follows:
Player’s Type: +100 score; shoot again
Not Player’s Type: -50 score; shoot again
Cue Ball: No effect on score; end game
8 Ball: Double current score; end game
Ball falls to bottom of board (regardless of type): -50 score; shoot again
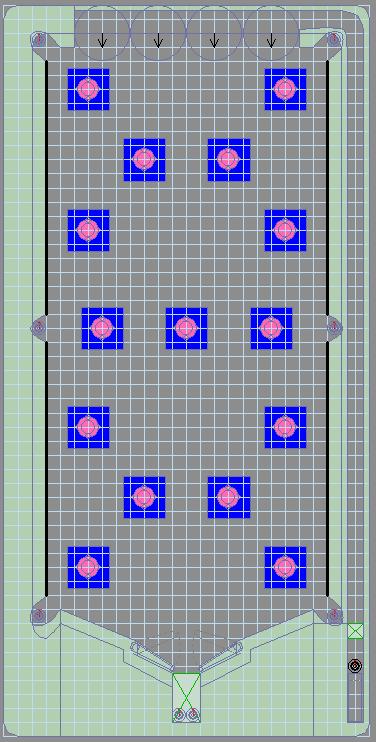
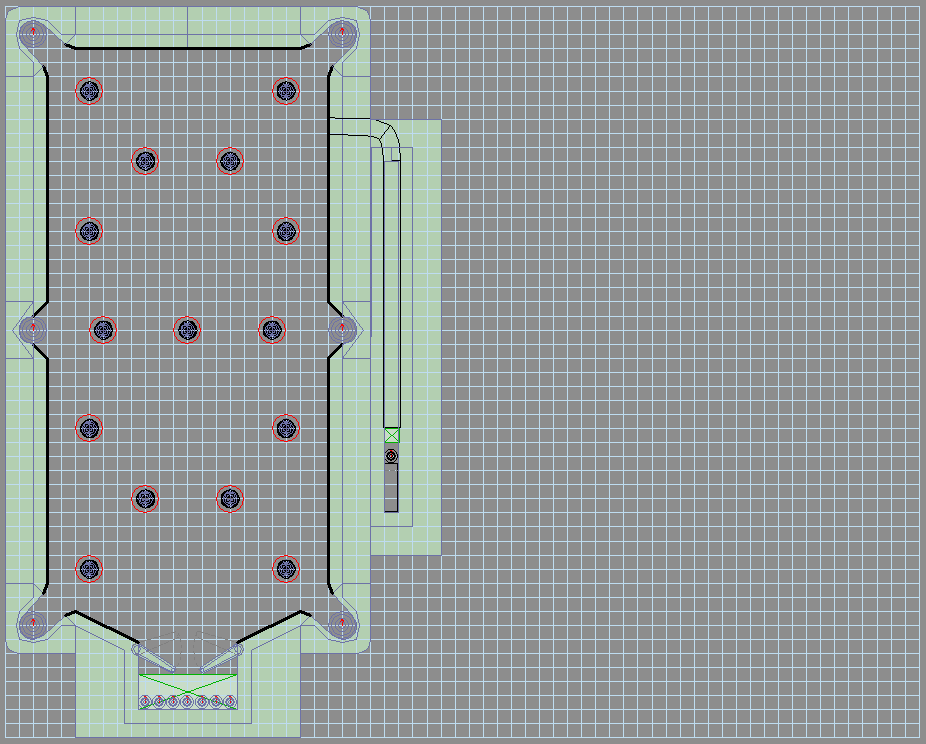
Because Visual Pinball X offers far more opportunities and flexibility in its editor than a physical cardboard kit, I decided that I wanted the proportions of everything in game to be consistent with that of a real pool table as well. Therefore, I drew a sketch that based the size and shape of all of the game elements off of the size of the player’s ball. This also enabled me to plan on incorporating all 15 numbered balls as bumpers in the game due to their decreased size in proportion to the playfield.
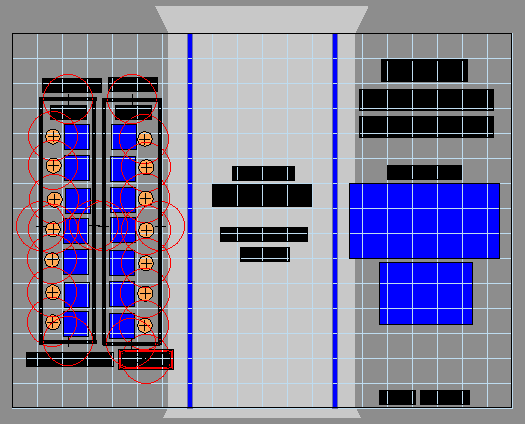
Additionally, Visual Pinball X offers the capability of pairing your game with a backglass, which I planned to do as well. I wanted my backglass to display all of the information required to keep track of the game in a convenient, easy to understand manner. As a result, I drew up a sketch of a backglass concept as well.
Finally, I also decided to add a new mechanic to the rules that involved tracking which individual billiards had been pocketed. If a player were to pocket all of the billiards of their own type, then they would receive double the score for the rest of that game. In turn, if the player were to pocket all of the billiards that weren’t their type, then the game would instantly end and their score was negatively impacted depending on one of two circumstances. If the player’s score was positive when this happened, then it was divided by 2, and if it was negative, then it was multiplied by 2.
Initial design sketch for Pin-8-Ball – Visual Pinball X Edition‘s playfieldInitial design sketch for Pin-8-Ball – Visual Pinball X Edition‘s backglass
Initial Design
Unfortunately, I learned pretty quickly that although there were far more capabilities to create the virtual version of Pin-8-Ball with using Visual Pinball X, its editor still had lots of limitations.
First and foremost was its lack of documentation and explanation. As a result of this, my use of the editor was significantly hindered as I had to learn how to use it through practice and research of great lengths. Additionally, due to the nature of Pin-8-Ball‘s gameplay flow, it was crucial that I ensured that the playfield was adjusted perfectly to maintain it a balanced experience. Because Visual Pinball X lacks a grid-snapping feature, I had to spend a lot of time manually typing in and lining up the coordinates of each element of my playfield. This ultimately led me to have to temporarily scrap the idea of including a backglass to go along with my initial design because I did not have enough time to learn about how to set it up. Instead, I opted to use the backglass editor to create a user interface for the table that displayed the crucial information, because by default, elements on the backglass editor would appear over the playfield in gameplay.
As a result of another limitation, I also had to designate which bumper corresponded to which billiard using decals, because the bumpers themselves could not be properly configured to display my custom-made billiard graphics.
Aside from these limitations, however, I was able to encapsulate my original vision for the game very well in its initial prototype.
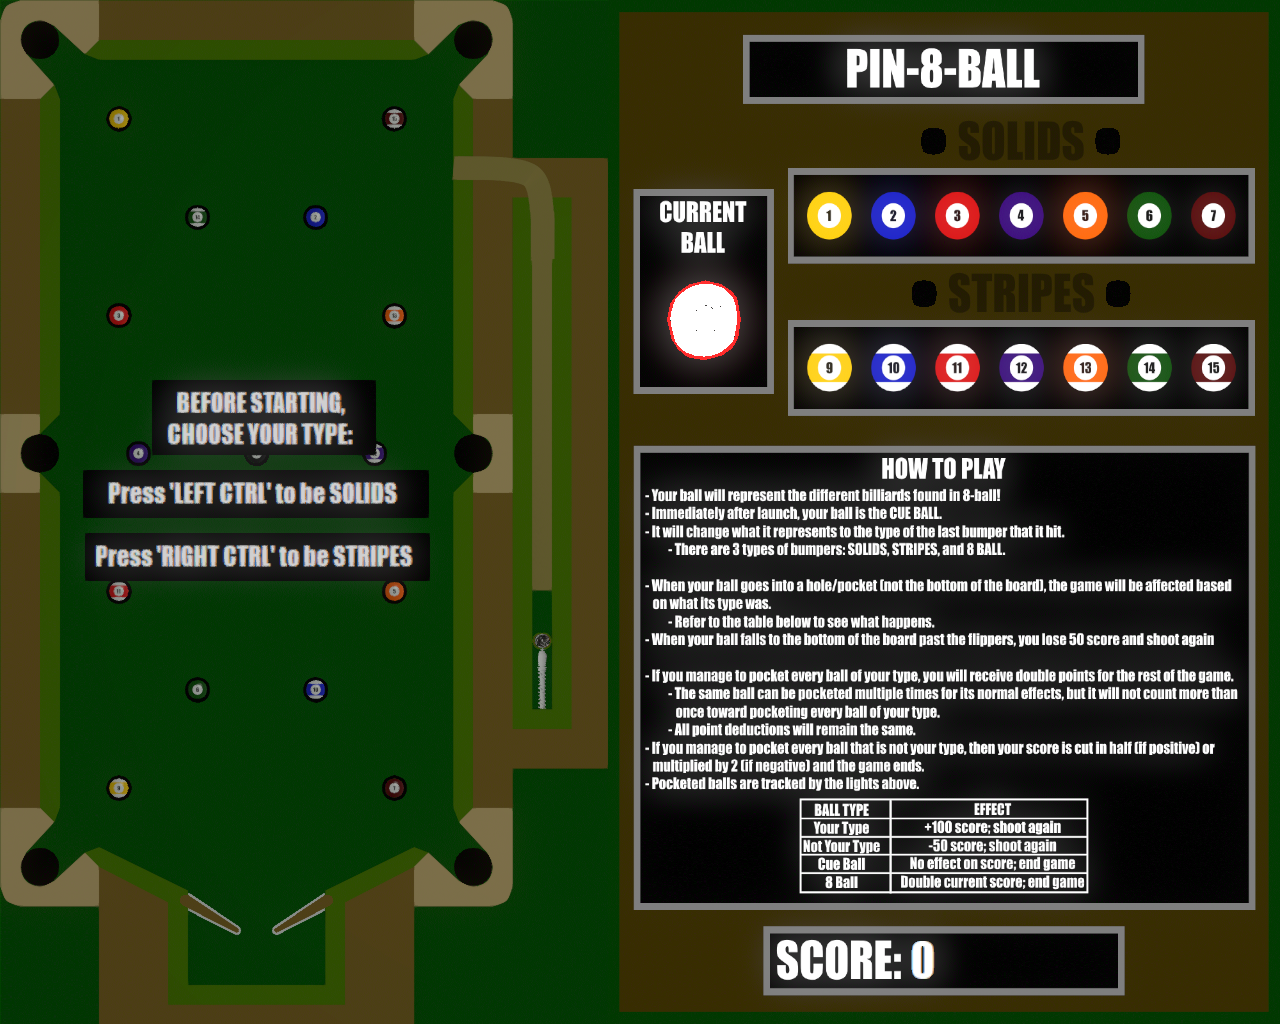
Initial design of Pin-8-Ball – Visual Pinball X Edition‘s start screenInitial design of Pin-8-Ball – Visual Pinball X Edition in play after choosing solidsInitial design of Pin-8-Ball – Visual Pinball X Edition in play after choosing stripesInitial design of Pin-8-Ball – Visual Pinball X Edition‘s game over screen
Initial design of Pin-8-Ball – Visual Pinball X Edition‘s playfield in the editorInitial design of Pin-8-Ball – Visual Pinball X Edition‘s user interface in the editor
Playtest Results
Due to a misconception regarding our class schedule, there was not much of an opportunity for Pin-8-Ball – Visual Pinball X Edition to receive playtesting. I did gain some valuable feedback from what little amount of playtesting there was, however.
Overall, playertesters had fun with the game and enjoyed it, but universally agreed on 1 thing: that I should increase the size of the pockets. By pure coincidence, I had just previously realized that I measured the proportions of these holes in accordance with the ball incorrectly, so I already planned to increase the size of the them. The playtesters also supported another idea that I had which involved adding more flippers to the playfield in order to produce more engagement because they’d sometimes have to wait a long time for the ball to reach the flippers again.
Final Design
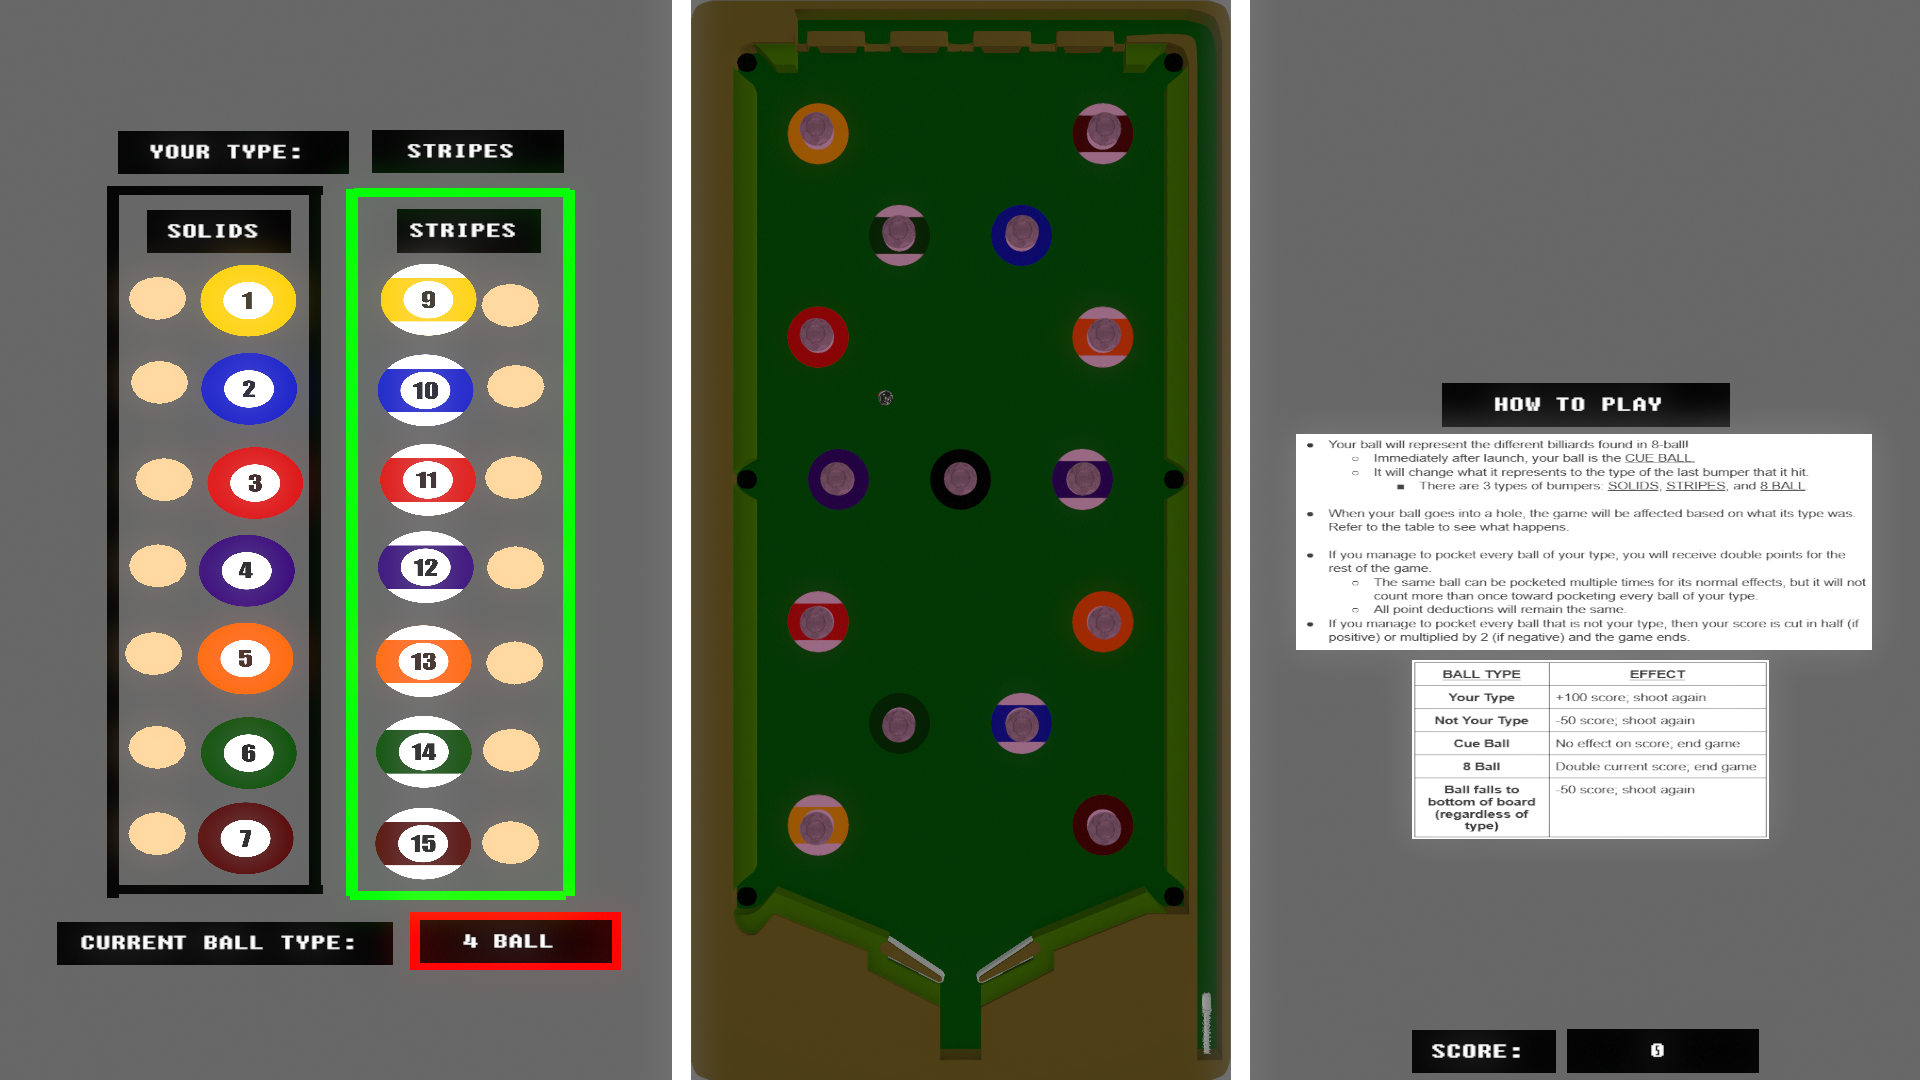
As a result of the playtesting and my own realization, I began work on resizing the pockets for the final version of Pin-8-Ball – Visual Pinball X Edition.
In order to increase the size of the pockets, I had to reshape the walls of the table and reconfigure how launching the ball worked. There was no longer any space for the ball to travel from the plunger, through the wall, and out the top of the table to enter play, so I added a ramp to it to travel over the wall with instead. I also added more decorative elements to the outer edges of the table to make it resemble a real pool table more closely.
In order to address the issue of waiting for the ball to reach the flippers, I decided against adding more of them to the playfield. I could devise a way to implement them in which it wouldn’t look or feel awkward, so I approached this problem another way instead. Rather than adding more flippers, I made the playfield more open by repositioning some of the bumpers and decreasing their radius to actually match that of the ball.
Thanks to the help of a fellow peer, I also discovered the existence of bumper caps, only accessible through copy and pasting from a separate template table. These bumper caps were capable of supporting my billiard graphics, so I replaced the decals on the playfield with them to give the bumpers a much more polished appearance.
After struggling to get the backglass feature to work properly for an excessive amount of time, I made the unfortunate decision to scrap the idea altogether in favor of a refined user interface. I bundled relevant information together, established a consistent theme throughout it, and programmed it to supply information to the player in the most feasible way possible. Instead of the playfield being in the middle of the screen, I shifted it all the way to the left side, and dedicated the right side to the user interface. I also changed the aspect ratio of the table during gameplay so that it’d display my graphics correctly.
Finally, I changed the point of view of Pin-8-Ball – Visual Pinball X Edition to be top-down and orthographic. I made this choice for two reasons. Firstly, it made it easier to see where the ball was on the playfield because of its large size. Secondly, Visual Pinball X has a rendering error that causes the kickers that I use as the pockets to render on top of walls. By making the camera view top-down and orthographic, I was able to work around both of these issues.
Final design of Pin-8-Ball – Visual Pinball X Edition‘s start screenFinal design of Pin-8-Ball – Visual Pinball X Edition in play after choosing solidsFinal design of Pin-8-Ball – Visual Pinball X Edition in play after choosing stripesFinal design of Pin-8-Ball – Visual Pinball X Edition‘s game over screenFinal design of Pin-8-Ball – Visual Pinball X Edition‘s playfield in the editorFinal design of Pin-8-Ball – Visual Pinball X Edition‘s user interface in the editor
Final Thoughts
Overall, translating Pin-8-Ball from the real world into a computer was certainly an interesting experience. I’m happy with how it turned out, though, and I like the changes that I made along the path of its development. With the likes of Skitelle and Pin-8-Ball – PinBox 3000 Edition, I am very proud of this project!
Here’s a picture of my finished physical design, complete with two bumpers, two rubber band bouncers, the curved music staff ramp, and the blue meanie ears elements.
From Physical to Digital – Changes
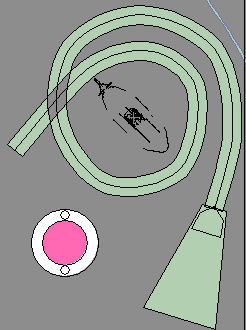
Something that I struggled with while working on the physical version of the machine was the spiral ramp. From the very beginning, I wanted to have a ramp that led into a spiral-shaped rail encircling the titular yellow submarine. However, due to physical limitations, I couldn’t get the ramp to work properly without either the marble getting stuck on the spiral or the marble not being able to make it up the ramp.
However, in the Visual Pinball version, this is no longer the case!
Something else that I wanted to include from the beginning but due to the physical limitations of the coardboard I couldn’t make properly were the Blue Meanie “pop-up” targets. These targets drop down once they’re hit, so through the power of your pinball you can defeat them and help save Pepperland.
Initial Digital Design
Playtesting Reactions
People enjoyed the theme and were excited that I got the spiral ramp properly implemented into this version of the game! I also recieved some great feedback to help improve my final design:
The back bumper should be changed to either be closer to the middle of the back wall or further to the left, since it dumps the ball in a strange spot.
The ramp is very difficult, and even more so to get enough power in order for the ball to make it around.
If the ball went down the right side of the ramp, it would always go into the gutter. (People liked the rubber triangle near the bottom left of my design, and wished it was on both sides)
When the meanies are finished being knocked down, there doesn’t feel like there’s much else to do.
These comments helped inform the version of my final design.
Final Digital Design
For my final design, I made some changes in conjunction with the comments from the playtest feedback.
The spiral ramp (and the submarine) were moved forward.
I added the triangular shape to the right side of the playfield as well to help prevent too many gutterballs.
I replaced the two larger bumpers with three smaller black bumpers to represent more of the Sea of Holes. If I were to continue working on this project, I would instead make these kickers.
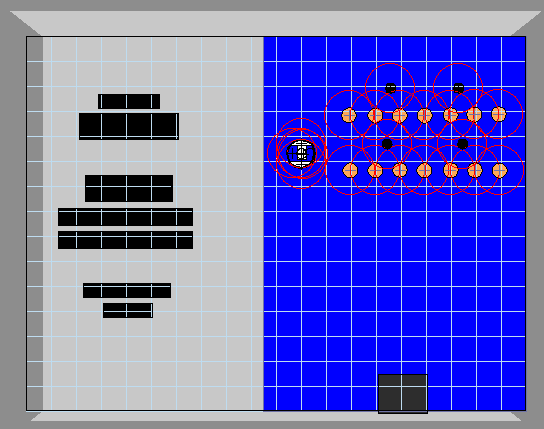
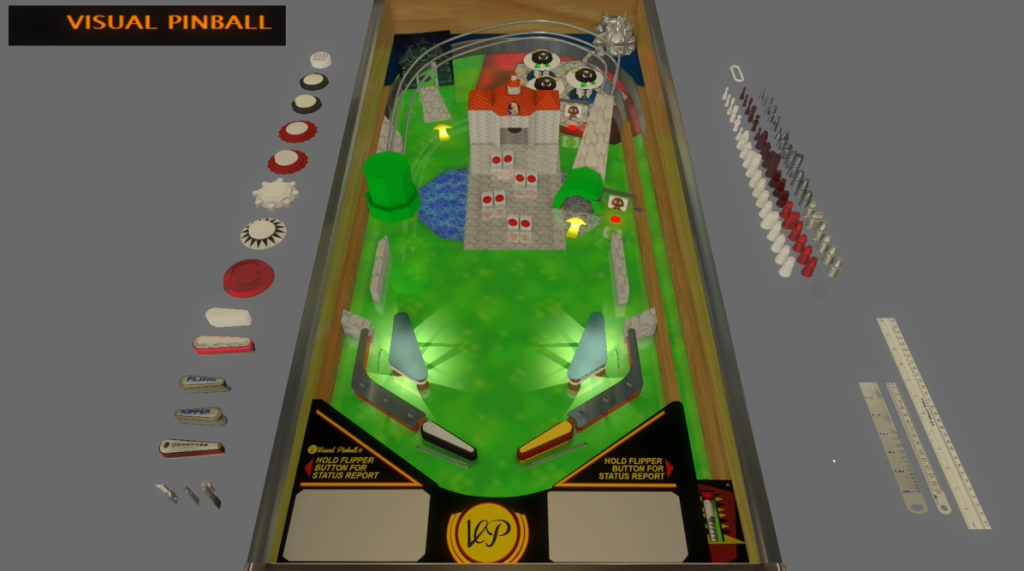
My cardboard Pinball machine was Disc Golf Themed. Unlike most people, I didn’t bring my cardboard box to digital. This was mainly because I felt like there weren’t enough features for a more advanced machine, and I also wanted a machine that was more recognizable to the average person. For these reasons, I decided to pivot and make a Mario-themed Pinball machine. Right off the back, I was happy with how many different features I could easily include using things from the Mario universe. Let me explain the making process.
Initial Sketch
Original Pinball Design
The idea sketch idea had these main features: Peach’s Castle in the center, mushroom bumpers, a warp pipe that brought the ball around the course, goomba spinners, a Luigi ball unlock, and a Bowser figure that would fall in lava after you hit every other feature. While presenting this in class, Professor Jacobs had the brilliant idea of using lights instead of actually animating the figure. I ended up taking his advice.
Block out
The initial block out yielded 2 main changes from the sketch. The first change was that I moved the bumpers to behind the castle. This was because it made it possible for the ball to go into the bumpers right after launching it, and it also meant the castle would be less covered and more of a centerpiece of the machine. The second main change came from feedback from Kai while I was working on it. He said that the middle of the board felt very empty. I realized that he was right, so I added targets down the middle that you could shoot, and they would fall. At this point, I didn’t know what I would make the targets, but I wasn’t worried as there were lots of enemies in the Mario Universe from which I could choose.
Polishing
The polishing phase of this machine took the longest by far. The first thing I worried about was textures. I was inspired by Mario 64, so I used my inspiration to steal those textures. Then I Modeled a version of Peaches Castle in Blender and added it to the machine. I thought the playfield would look boring being all grass, so I added a lava section at the back. When it came to texturing the bumpers, I realized that mushrooms would no longer make sense, but Mario 64 has bully enemies that try to knock you into lava, so it seemed like a fitting reskin for the bumpers. I decided to make the targets in the middle red coins. After adding the bridge texture to the playfield below the castle to look more like the starting area from Mario 64, I had to move the targets a little to be on the bridge. The game also revolved around collecting 8 red coins, so I had to bump the number of targets from 6 to 8. I also added a little Bowser statue to the top right corner of the box using the model from Mario 64. Another change from the sketch was that the top left corner had a Luigi section which would give you a Luigi ball, but I changed it to Luigis Mansion because I thought it would look cooler. This would end up having negative consequences later (Foreshadowing!!). A small detail I added was that the first ball you have is red, like Mario, but if you get the Luigi ball, it’s green to show a visual difference. The last visual thing I added was lights, so the features had visual feedback for the players. And then with a little bit of scripting magic, the box was complete. It works almost exactly as I planned. If you shoot the ball into the castle, it will just spit it out, but if you shoot it into the castle after hitting every spot, indicated by their lights turning off, the bowser statue will light up showing that you won!
Feedback
I got some good feedback at Imagine. The main thing I took away was that it was fun and addicting (Yay!) Multiple children were playing it and had to be begrudgingly taken away by their parents. The only bit of negative feedback that I got was that when players hit Luigi’s mansion and it kept their ball and put a green ball into the launcher, players did not realize they got an extra ball, and they thought their first was just stuck. This is because I had no signifiers of what would happen when you hit that. Maybe if I just kept it as the Luigi symbol it would have been clearer, or I could have just had the words unlock Luigi ball on the mansion to show it. Those were the main points of feedback I had gotten.
Conclusion
I am very happy with how the box turned out. I think the features work well, some of the shots are challenging, but I don’t think they’re too hard. What I’m most proud of is that it plays and feels like a pinball machine, which was my main goal from the start. To that end, I think I succeeded wonderfully and I’m very proud of the work I did for this class!
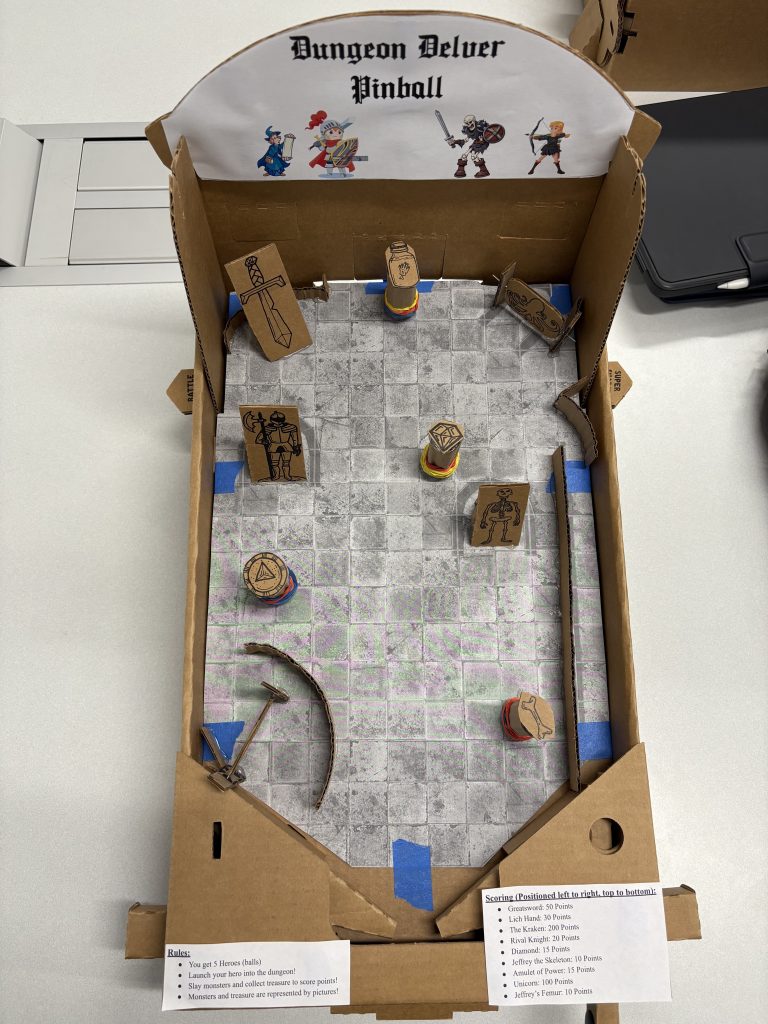
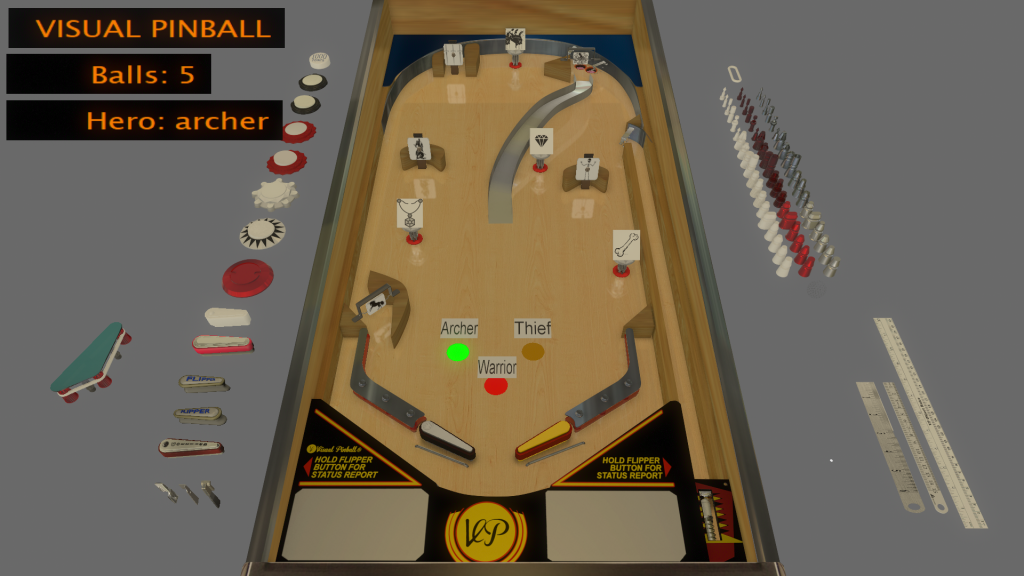
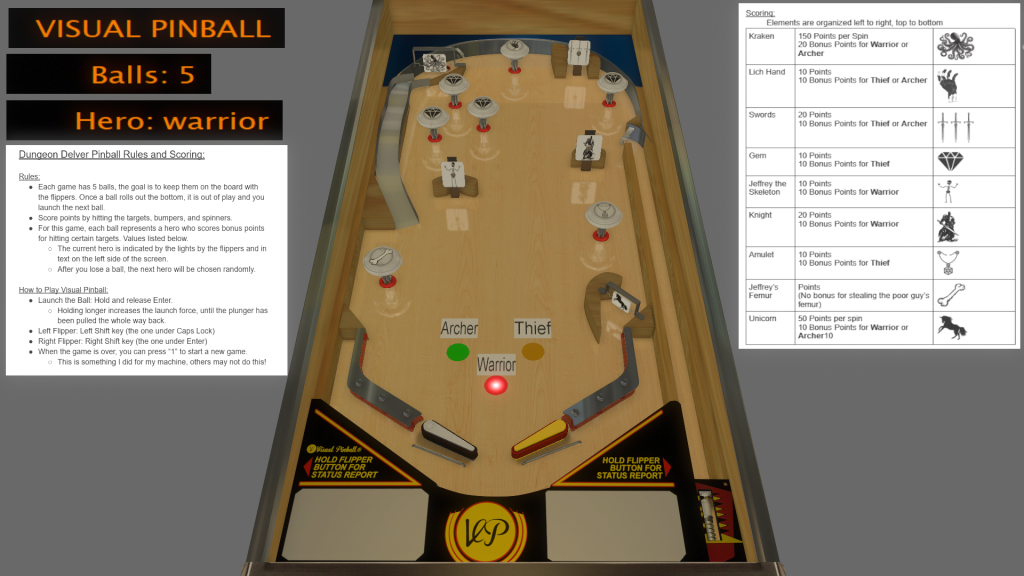
The Cardboard Prototype of Dungeon Delver Pinball.The Initial Virtual Build of Dungeon Delver PinballThe Final Virtual Build of Dungeon Delver Pinball
Cardboard to Digital:
My original plan was to keep the Visual Pinball machine as close as possible to the cardboard Pinbox 3000 version, with some improvements that can be made in the digital version. However, the Visual Pinball template has a much larger playfield than the Pinbox, the flipper can output much more force, and the ball seems to have less friction than the marble on cardboard. In short, there is a lot more space in Visual Pinball, and the ball can easily get there.
Perhaps the most frustrating challenge of Visual Pinball was the scripting. I know a few programming languages fairly well, but Visual Basic was not one of them before starting this project. I knew logically how all of the code should work, but I did not know how Visual Basic handled things like random number generation, resulting in quite a bit of time spent in documentation learning the syntax.
Dungeon Delver Pinball Initial Build in Visual Pinball
Initial Build:
The initial Visual Pinball build is almost identical to the cardboard version, but with functional targets and bumpers, as well as a gate to keep the ball from falling back into the plunger lane. However, this approach did not provide much of a challenge, given the increased playfield size and flipper strength, the Kraken spinner was no longer challenging to hit. To help correct this problem, I added a ramp in the center as the only path to the spinner, and added some kickers and gates to send the ball back into the rest of the playfield. Unfortunately, the centralized ramp did not give the ball enough space to move between elements, creating a boring game. Playtesters also reported a fair amount of deadspace in the upper portions of the playfield. They also noted that it was hard to see the images on the playboard elements to aim appropriately and maximize their points.
I did succeed in scripting the game. There is a hero system where each ball is randomly assigned to be a Warrior, Thief or Archer, and scores more points for hitting certain targets. The selected hero is indicated by text on the backglass and by lights just above the flippers. There is also score tracking on the backglass. The game is coded to give players five balls, and once the game ends, pressing the “1” key resets the game.
Dungeon Delver Pinball Final Build in Visual Pinball
Final Build:
For the final build, the first thing to fix was the board spacing. My first attempt was to move the ramp over to the right wall, but that caused problems with the launch gate. I decided to move it against the left wall, and flipped where all of the elements were. I had to put a short wall under the ramp to prevent the ball from getting stuck. Flipping the board seemed to help a little, but the unicorn spinner ended up being too difficult to hit. I had to shift the nearest bumper and target a little to the left and widened the gap leading to the spinner. Unfortunately, this version did not get much playtesting, so I am unsure if it needs further adjustment. I also made most of the playboard elements larger to make the graphics on them easier to see, but they can only get so big before the game becomes too easy. I also added more bumpers to fill the remaining dead space I noticed. In terms of scripting, I added a seed for the random number that determines what hero the ball represents to avoid the same patterns from repeating. I also added the rules to the backglass for ease of access.
Overall, my Visual Pinball machine is still fairly simple, but I am proud of how it turned out. I managed to add a fairly unique mechanic with the hero system that should help spice up the game. I also managed to make a playfield where every element is worth engaging with, if only just a little. My only issue is that I didn’t have time to add more complex heroes.
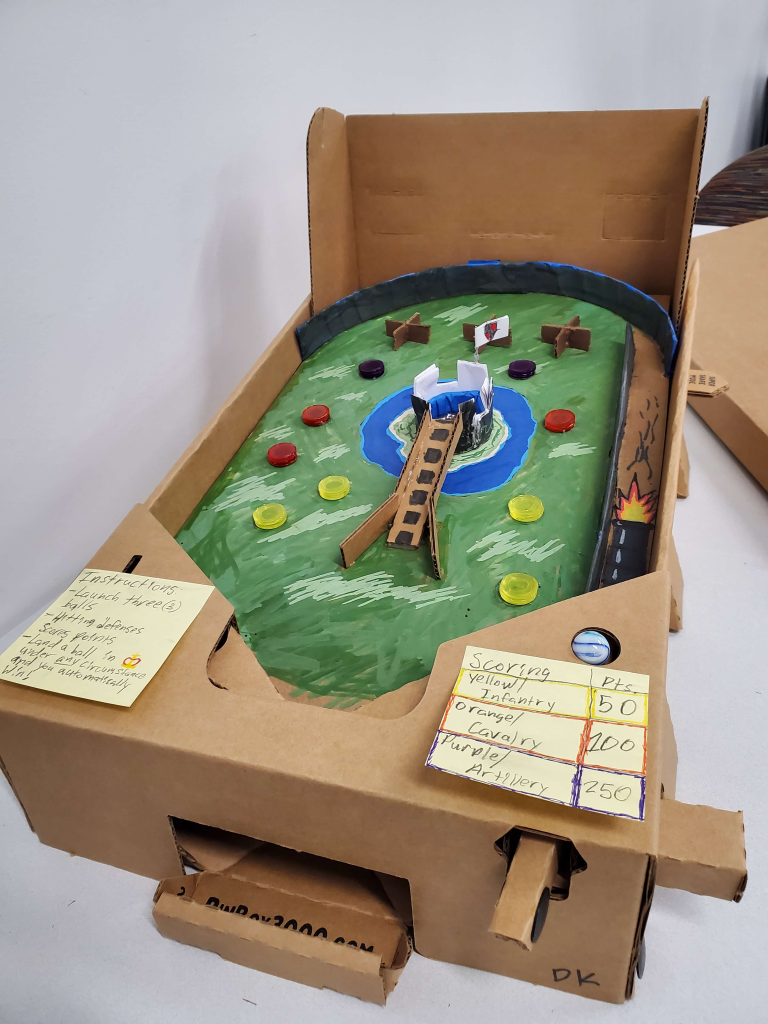
The original iteration of Storm the Castle!, in Pinbox 3000 form.
As mentioned in my previous post about Storm the Castle!, I said that I would be revising the layout I made in my Pinbox Pinball project in Visual Pinball, an open-source pinball engine, with a list of definite fixes for the virtual layout. Just so you don’t have to go back through the other post, what I said I’d be doing is the following:
Move the castle a bit back and have all the bumpers forward, that way it seems more akin to attacking an opposing force.
Add some sort of visual representation for each of the troop types (infantry, cavalry, artillery), perhaps with a little cutout drawing on top/in front of each bumper.
Change how the castle works. I can’t exactly keep the balls stuck in a hole in Visual Pinball, since that’ll result in a softlock. I’ll most likely make the castle a walled-off kicker with a rail being the only way to get into it, but we’ll see once I get started on getting this together.
Changes
I not only incorporated the changes listed above, but I also did the following:
Change the enemy troops from being bumpers to drop targets. This would make the concept of taking out the enemy forces much, much more tangible, since hitting the target would remove them from the board.
This posed a separate problem of not having much to do once targets were eliminated, so I decided to incorporate another mechanic: Waves. Once you knock out a group of targets (Infantry, Cavalry, Artillery), you would get a point bonus for routing (taking out) that respective group, and they would all pop back up.
I also decided to have all troops pop back up once your ball was out of play. That way you wouldn’t have to launch a ball into an essentially empty board.
Add a spinner to the castle ramp. That way you still get some credit for hitting the ball up the ramp, even if you don’t actually breach the castle.
At first it doesn’t give that big of a bonus, but if you can manage to successfully breach the castle, it’ll give you more points. The more you breach the castle, the more points you’ll get.
Design
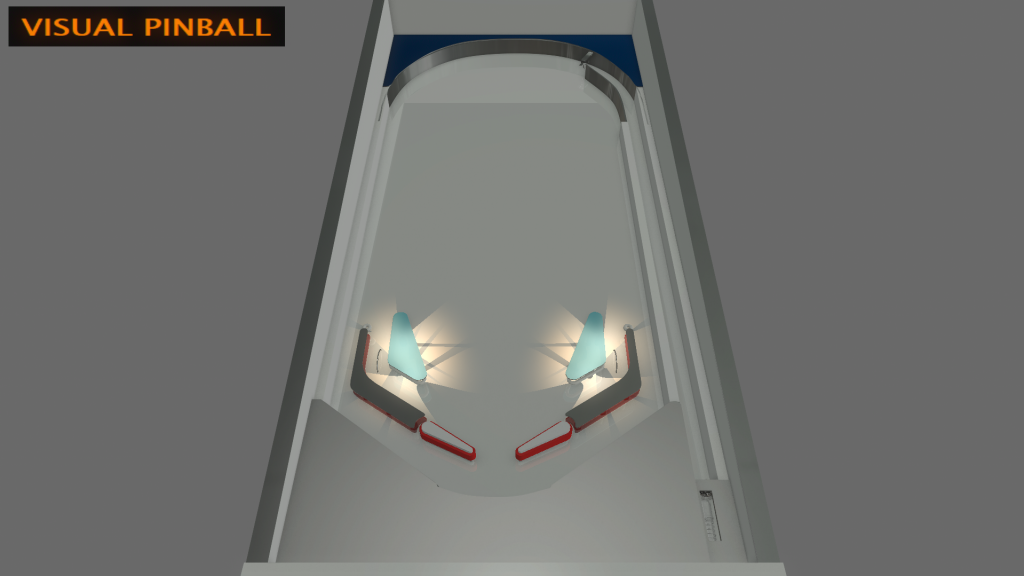
Thanks to Visual Pinball being a virtual pinball editor, I didn’t have to worry about making the table itself; the engine has a preset for a completely blank pinball table.
The default blank table Visual Pinball provides.
The trickiest part of getting the table working was the scripting. While including simple things, like a bumper, drop target, trigger, etc. is as easy as dragging and dropping, Visual Pinball is kinda archaic; if you want to do fancier things, like group targets together or have a kicker hold a ball for a certain amount of time, you’ll need to use Visual Basic scripts to make things work; however, because Visual Pinball has been around for so long, forum posts and really old websites provide a lot of the exact code you’re looking for.
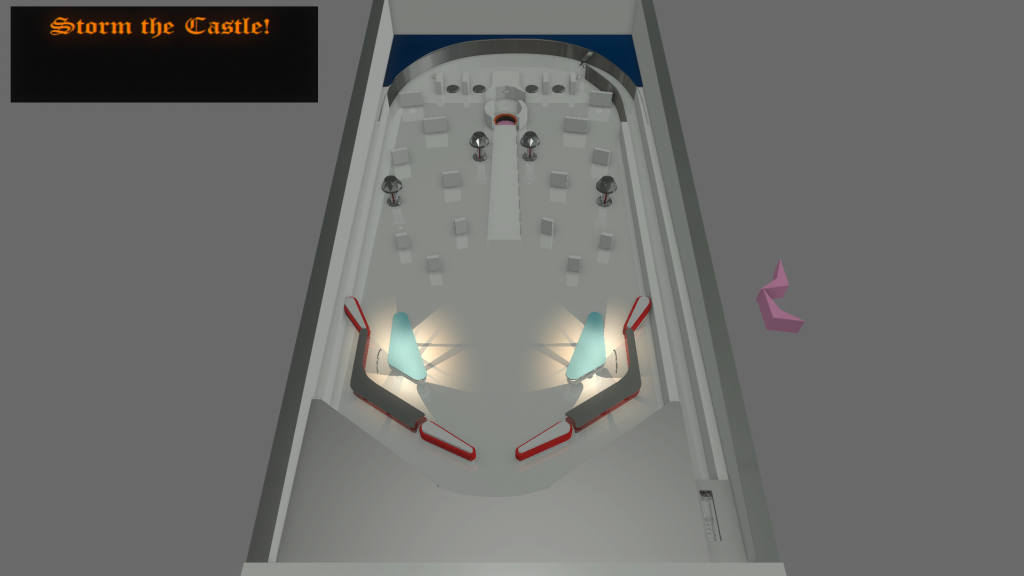
The pinball table in one of its earlier stages.
Thanks to those online sources for making the scripting process easier, I was able to add a lot more functionality than I’d hoped for, including the following:
Incorporating a light that will go out if you hit its respective target.
Including a multiball mechanic every 5 times you breach the castle.
Increasing the amount of points you get every time you knock down a set of targets or breach the castle.
Having an end of ball (Assault) bonus, which would be dependent on how many times you breached the castle or knocked down sets of targets.
I would’ve loved to have the Assault Bonus show each part one at a time, similar to your typical pinball table after you lose a ball; however, timers were hard to manage and I ultimately couldn’t get it done in time.
Pressing F5 to reset when the game is over.
However, there were still some issues that popped up that were a bit out of my control. These included:
The pinball itself could completely miss the kicker in the castle, which meant that you’d be shafted out of points if this happened.
I decided to justify this one by saying that cannons won’t always hit their mark; just refine your aim and try again.
Score updating and displaying text representing bonuses (i.e. defeating a troop type or breaching the castle) was wonky.
This is why there are two separate displays for the score and flavor text; that way, score can be displayed while bonuses are clearly described.
There’s an issue of how consistently the text updates when you get a bonus, and while that could be rectified with Timers in Visual Pinball, it ended up just not working when I tried to program it.
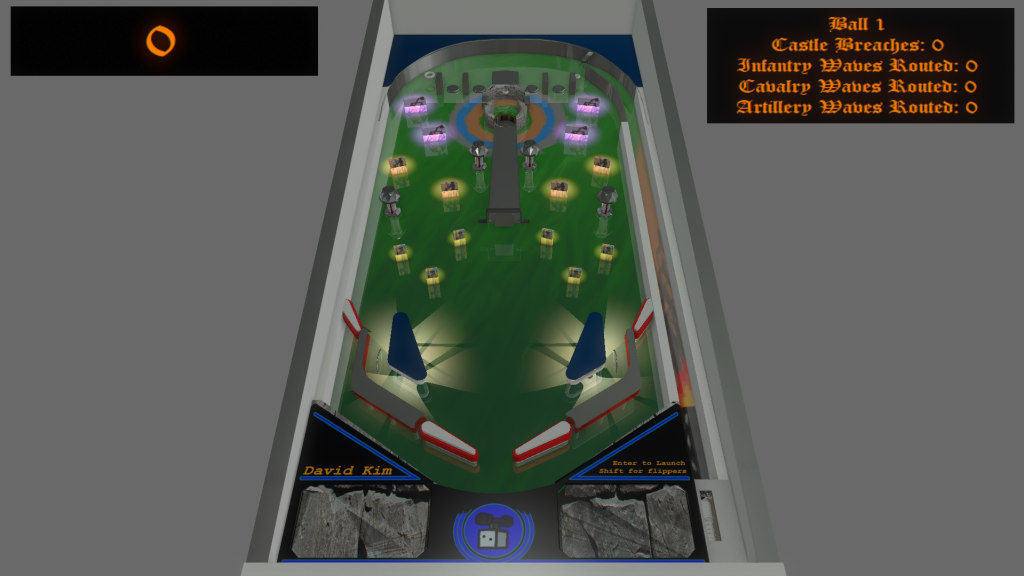
The first final (oxymoron?) iteration of Storm the Castle!, complete with art pass and display text.
Playtesting and Feedback
Unfortunately, I couldn’t get much peer feedback because my table wasn’t in a playable state when we needed to playtest the tables in-class, so I had to improvise with feedback from friends and from Imagine RIT, which is RIT’s signature event for makers.
I’ll talk more about how the Imagine RIT experience went when I talk about the Demo Days, but in short, feedback at the event was overall positive. The biggest critiques were in regards to the lights; the orange and yellow lights had minor issues with contrast when under certain viewing angles. It also seems to be a game in which players are either capable of extremely high scores or super punishing, and there’s not much in-between there.
I’m overall very proud of how things turned out with the Visual Pinball iteration of Storm the Castle!. I’m glad I was able to put in most of the functionality I wanted into the table, and it’s super satisfying to play now.