The Experience 1.0 Post Mortem

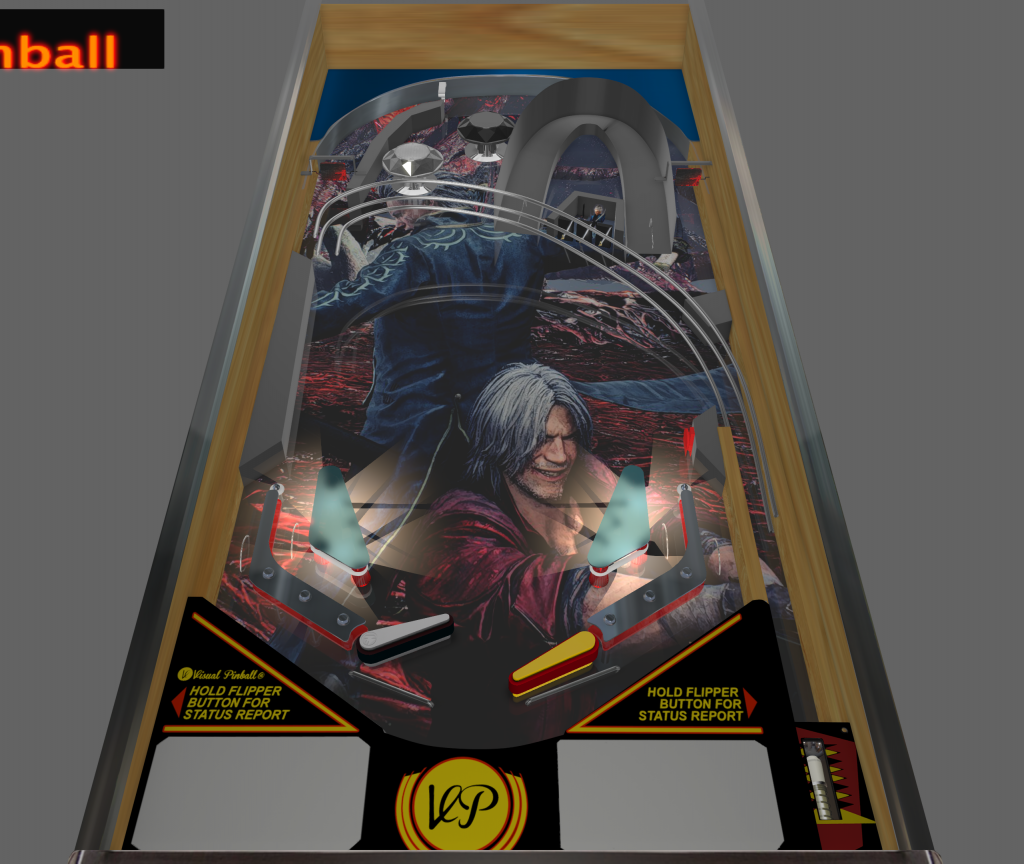
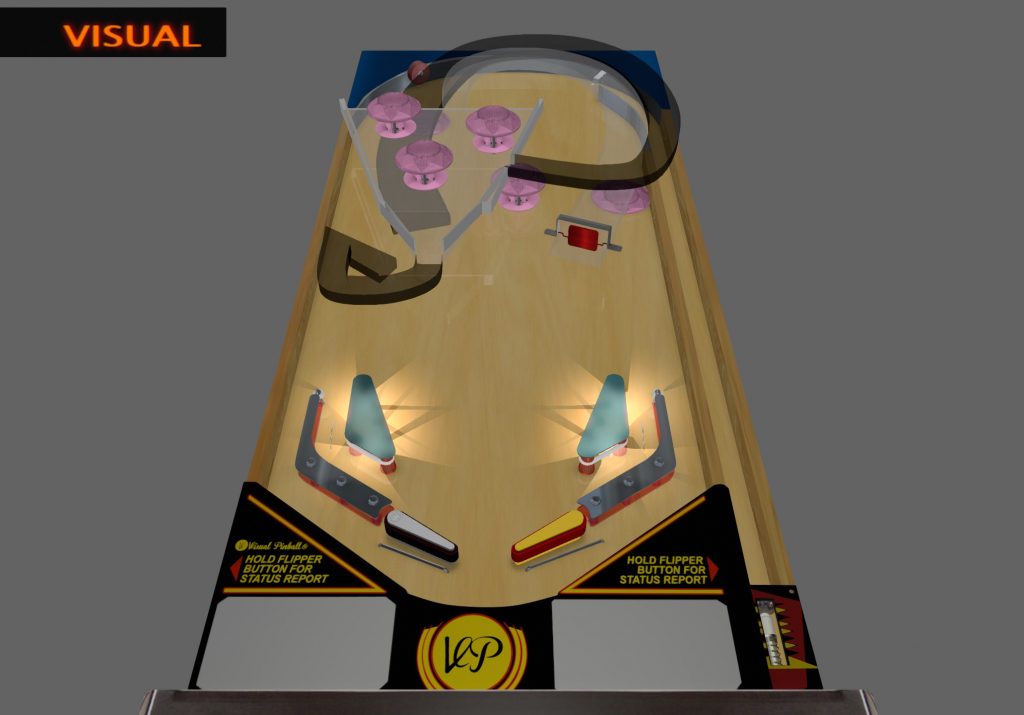
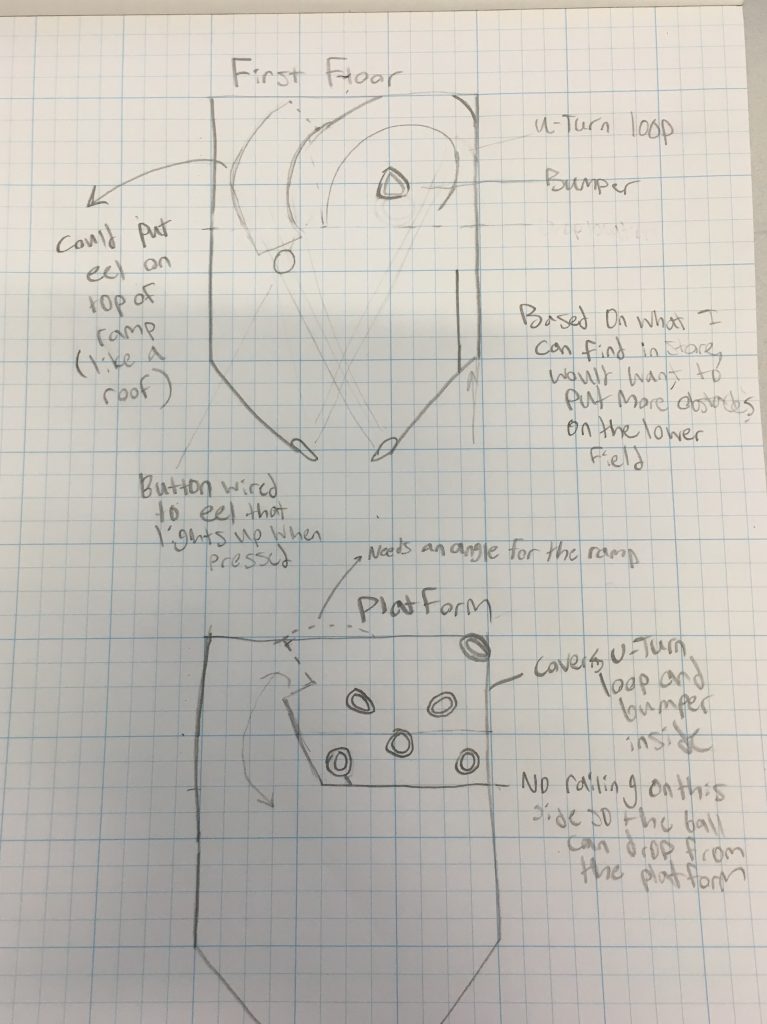
So, now I have just come back from playtesting the first iteration of my Hendrix pinball machine. It had three ramps, 2 being somewhat identical with a few differences just to be able to fit on the machine, and one ramp that swooped from one side to the other, along the back of the board. It also had a few different bumpers splattered around the board.

Overall, I don’t this machine captured what I was looking for. It had music, and the visual design people seemed to enjoy, and even the ramps people said felt okay. However, I don’t think it was really as successful as the original physical machine. I attribute this to poor mechanical design on my part, there were a few flaws on the board. The first being the bumpers that I had placed, they felt random and were simply not enjoyable. Moving forward for the second iteration of the machine, I will try to be more purposeful with my placements.

The part that was relatively successful was the swooping ramps that the machine contained. The feedback for them was that the amount of points given to them seemed fair, and that they felt relatively fun to use. The only issue was some clipping that the back ramp had, which I didn’t realize until people began playtesting, as it felt normal to me, and I didn’t give it the attention it needed.

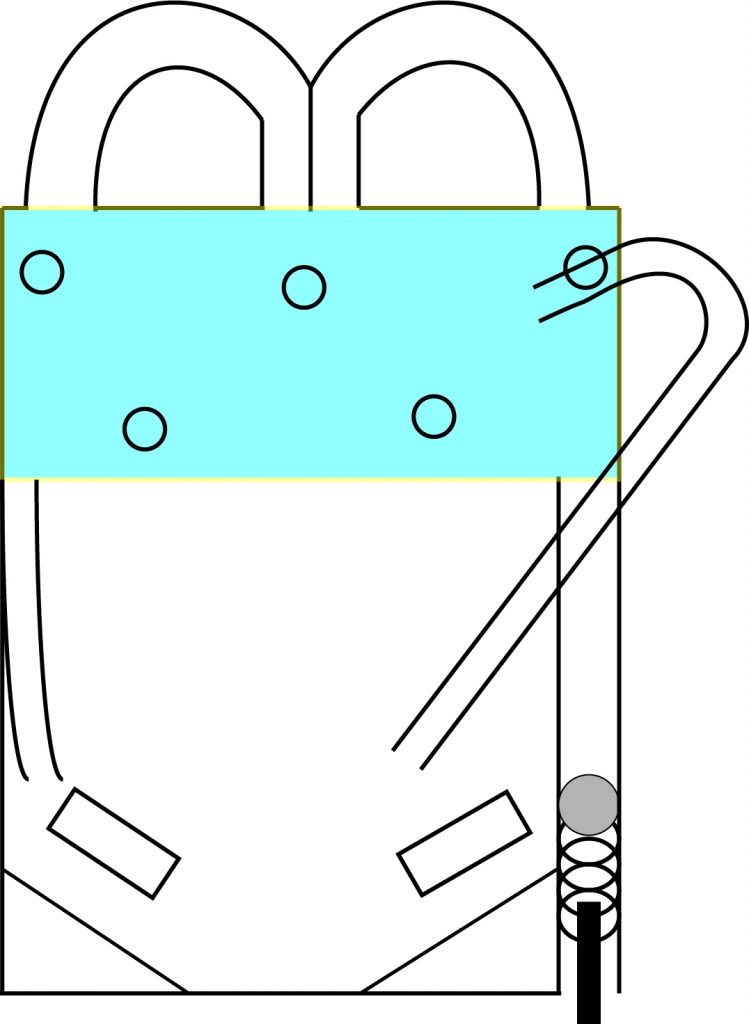
Moving forward, I know that while three ramps was cool, I need to use less ramps, and add more variety to the field. I plan on doing this through adding more than just bumpers, as well as, like I said, having more thought put into where I place the bumpers rather than the random placement that I had used previously.

I think with more work, this machine can be quite fun, but I need to really hone in on the feeling of crazy guitar solos, by using parts of his solos within the machine as part of sound effects.

The Experience 1.0 Design

For my first iteration, I had few goals further than the previous Jimi Hendrix design. I was mostly, like most of us, looking to get a feel for using Visual Pinball. I had to figure out how to fit what I previously had in the Pinbox 3000, into a digital field, and keeping it withing the bounds of the pinball machine.

I knew I wanted similar mechanics to the physical machine, because people enjoyed the swooping ramps. It made the game have a feel more akin to Jimi Hendrix’s long solos. This was a bit difficult, as I couldn’t use the outside of the field to make the ramps feel wider and longer. What also constraint me was the fact that I wasn’t aware of how to make the field larger, since I thought all machines had a standard size, I didn’t think this would have been feature. (I was wrong)

Lastly, there was no type of fidget spinner kind of object in visual pinball so I had to change that mechanic. I ended up changing it for a few bumpers splattered around the board. I wasn’t sure how well they’d work and feel, but there’s only one way to figure that out.

Devil May Cry Pinball Postmortem

I was very happy with how this iteration came out. I felt very comfortable navigating the Visual Pinball program and was able to complete everything I set out to do which is very reassuring for the future. The goal of my game was simple at this point: knock down the three drop targets in front of Vergil and then hit him 5 times before they raised back up.

The feedback I received was also very positive. People really liked the concept of the theme, and especially the implementation of sound effects and music from the games in order to really sell the theme. They found the concept very fun, though a bit simple. They wanted some more goals and targets to hit, which is fortunate because that’s exactly what I intend to do in the next iteration.

Moving forward, I’m excited to take this concept to the next level and make a complete and robust scoring system that includes multipliers and even a Style Ranking system similar to the games.

Citations:

https://www.uhdpaper.com/2019/04/devil-may-cry-5-dante-and-vergil-4k-194.html

https://devilmaycry.fandom.com/wiki/Yamato

http://www.gamethemesongs.com/Devil_May_Cry_3_-_Vergil_Battle_2.html

https://www.sounds-resource.com/playstation_2/dmc3/

https://www.sounds-resource.com/pc_computer/devilmaycry4specialedition/

https://www.sounds-resource.com/pc_computer/ultimatemarvelvscapcom3/sound/10021/

Devil May Cry Pinball

For my advanced Pinball I decided to do a complete overhaul of my original idea. Originally I planned on just recreating the basic functions of my Castlevania pinbox, however I decided to scrap that in favor of a theme that I felt would fit pinball better.

Devil May Cry is a fast-paced character action series with a strong focus on style, and I felt that would be the perfect fit. For this iteration, I only plan on making the basic playfield and having a simple objective. I’m unsure if I’m going to add numerical scoring just yet.

A big focus this time around will be nailing the theme, so that means a lot of art assets from the game and especially sound effects. For my next iteration, I plan to expand this concept immensely.

Burnout – Basic VP Postmortem

Summary

Wow how about that, I was able to get my table together and y’all played it. I’m very happy with how the machine turned out.

The board in all its glory, ready to be played

The Good

I got the mission working! Though there was some difficulty getting the flags to work properly, I eventually got it all working (thanks Chris). I’m happy with getting the second level and ramps working, all the messages work as intended. I think my vision for the board really came through

The Bad and The Ugly

Some of the visual elements, such as the rival car decal above the R A C E drop targets, don’t work as well as I’d want. It’s also a little unclear that the second level of the board is a second level. It can be a bit jarring for players as the second level isn’t transparent so it’s unclear where the ball is. Finally, the ball could sometimes spend a lot of time on that second level of the board, which was boring and not conducive to play. I plan on using this as my base for my advance machine, so I hope to remedy these issues in the next iteration.

What I’d Change

I didn’t add vaporwave or outrun music to my outrun themed board, that would be change number one. Then I would make the second level transparent and reimport the rival graphic / place emphasis on it in the board to go on the theme a bit more.

Basic Visual Pinball Postmortem

Due to my lack of familiarity with Visual Pinball, I knew my build would have a lot of chinks that I never ironed out, but for most parts, I think it turned out all right.

The Good

The best thing I think was how well the ramps worked and how the ball interaction with the bumpers on the top of the second level handled itself.

The ramps had curves to them so it was fun to watch them roll along the curves onto the second level and it was even cooler if the rare occurrence of when the ball got off of one ramp, bounced off of a bumper and went on the other ramped and came down.

The Bad

This is something I didn’t consider till I was already out of time but the timing to hit the ramps was too strict and getting the balls up the ramp was too hard at times.

Alongside that issue, the way I had decided to handle preventing balls from getting stuck anywhere by sticking bumpers under the ramps, it just created more issues and it didn’t really create a smooth game flow that I had wanted.

In the end, it felt like people weren’t actually getting to play my build the way I had intended it.

What I’d Change

The biggest thing I’d change is to make the skill shots to hit the ramps much easier. That allows for more opportunities to get up on the second level and more fun.

After that, I’d rework how I would prevent balls from getting stuck under ramps. I would probably do something alongside of completely blocking it off with a block or the likes.

Basic Visual Pinball Design

Initial Thoughts

Going into designing with Visual Pinball, I wanted to keep it simple and take ideas from previous designs, but primarily from my advanced design.

I wanted to make something with ramps and a second level again as I wasn’t too happy with how my advanced design turned out. As I wouldn’t have to worry too much about having well-built ramps where balls don’t get stuck, I was looking forward to it.

Designing it

The initial design I came up with wasn’t too different from my advanced design; there is an external ramp that was added in and instead of spinners to interact with on the second level, I planned on using bumpers.

I wanted to create a smooth flow of the ball going around the ramps and easy skill shots so getting up the ramps happen a lot more often.

Making it

As I moved on to actually start building my design, some things had changed:

  • The second level didn’t cover up the entire width of the machine
  • There are only two ramps that led up to the upper level
  • Removal of the external ramp
Rendered Machine

I had made the second level much narrow due to not being able to get external ramps to work. I haven’t been able to figure it out but for some reason, the ball would get stuck halfway through the loop and would not budge. Thus I had to give up on the external ramp and settle for simple internal ramps.

Alongside the compromises I made for the external ramps and upper level, I had created fewer ramps than I had initially thought to due to space limitations.

The ramps I was creating were taking up a lot more space than I initially thought it would and only was able to fit two in.

In the end

I think I had built something that I was thinking of from the beginning. It’s definitely rough around the edges but those are things I can learn from and take with me.

Strong Choice – Pinball Alley

My choice for the Strong Museum was to bring my advanced pinbox as well as my improvement of it, which was my advanced virtual machine. I chose to bring these two because I feel that they show all that I’ve learned while attending the class. I used my skills developed over repeatedly making pinboxes to lead up to this advanced design. I also really love my idea for the bowling game and how it shows the diversity of pinball itself.

Each machine plays off the other main idea. I wanted a machine that resembled something I was truly passionate about, which ended up being bowling. The physical machine uses a similar design layout, however, it works a lot less than my virtual machine. Therefore, I want to show each of them at the Strong so people who play them can get an idea of my thought process. They will also be able to see the improvement of the idea as I moved from physical to virtual.

Electric Eel Abyss – Simple Visual Pinball Playtest

I received good feedback for my machine for the in-class playtest.

A screenshot of my visual pinball machine
Machine during playtesting

People liked the theme of the machine and thought it was cool, but most said it was too dark and this made the features hard to see. I will definitely address this in my advanced design and make the whole thing brighter. I also had one comment mentioning that the ball can get stuck in the pin between the flippers, so I may decide to remove this entirely from my machine and block the gutters along the side so the ball doesn’t drain quite so easily.

I also got advice on adding a kicker for the multiball feature (from hitting the button on the top floor) instead of spawning it at the plunger so that the ball can be automatically in play and the player doesn’t have to pull the plunger. On a similar note, people didn’t like the ball falling back into the plunger on occasion, so I’ll take a closer look into how I can reduce that occurrence and make for a more interesting lower playfield. Overall, I got a lot of helpful feedback for this design that I can use to make my machine better in the advanced iteration.

Electric Eel Abyss – Visual Pinball Pitch

My layout drawing that I’m continuing to build upon for my visual pinball machine.

For my simple visual pinball design, I decided to continue with my physical advanced machine concept of the electric eel and neon lights. I think this machine lends itself well to the digital realm and opens more doors for what I can do and add, since I was a bit limited in my advanced design in terms of features and interactivity.

Although I am mostly using this opportunity to learn Visual Pinball and experiment with different things, most of the machine (save for the eel) will be replicated and iterated on depending on the feedback I received for my advanced design. For my advanced machine, I plan on modeling a very simple eel and putting it on the field like I have with my physical machine.